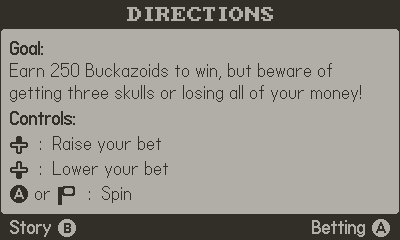
In the early days of the Web and the iPhone, there was a vibrancy in the air from working with new and emerging platforms. I feel much of that same excitement when working on the Playdate alongside an eager, vibrant, and positive community. However, the early days come with the challenges of working on a new platform, where the SDKs, code examples, and third-party libraries are not nearly as developed as with more mature environments.
Panic provides two important documents for developing for the Playdate (Inside Playdate and Designing for Playdate), but that is only the start of our journey. This post will cover a number of topics and initial questions I had when developing my first Playdate game, One-Armed Space Bandit.
Topics:
Scene Managers
Due to the young age of the Playdate SDK, it is not as fully fleshed out as more mature environments, which means that developers need to create a lot of the base level tools. When I started my game, one of the first things I started to look into was how to create separate "screens" or "rooms". The term for this is a scene manager.
Wrap Your Own Solution
I came across several options from writing your own scene manager to using third party tools. The first option is to do it yourself, but that might only be the best route if you want to keep things as simple as possible or if you want to have complete control over the process. Refer to SquidGod's YouTube video Creating a Scene Manager for the Playdate for additional details on this approach. I wanted something which would help me get going quickly, not having to spend time creating a framework, especially if something else might already exist.
Roomy
The first Playdate-based scene manager I tried out was Roomy, which was based off of the library originally written for LÖVE, another game engine with Lua scripting support.
To install Roomy, I first needed to install the dependency management system toybox. Down the dependency rabbit hole we go!
On my initial attempt, I tried to install toybox with the command:
pip install toyboxpy
I then got this error on my Mac: zsh: /usr/local/bin/pip: bad interpreter: /System/Library/Frameworks/Python.framework/Versions/2.7/Resources/Python.app/Contents/MacOS/Python: no such file or directory.
Oh joy, are we having fun, yet? I then checked which versions of pip (a Python package manager) I had installed on my computer (a MacBookPro M1 running macOS Ventura).
% which pip
/usr/local/bin/pip

% which pip3
/opt/homebrew/bin/pip3

% pip3 --version
pip 23.0.1 from /opt/homebrew/lib/python3.11/site-packages/pip (python 3.11)

% which python3
/opt/homebrew/bin/python3

% python3 --version
Python 3.11.3
After brushing off the cobwebs, I remembered that Python 3 tools have their own executables, so I tried the version 3 tools, instead of the deprecated version 2 utilities. I had likely installed Python 3 on my Mac at some previous time. This is what worked for me:
% pip3 install toyboxpy
Collecting toyboxpy
  Downloading toyboxpy-1.2.3-py3-none-any.whl (33 kB)
Collecting semver
  Downloading semver-3.0.1-py3-none-any.whl (17 kB)
Installing collected packages: semver, toyboxpy
Successfully installed semver-3.0.1 toyboxpy-1.2.3

[notice] A new release of pip is available: 23.0.1 -> 23.1.2
[notice] To update, run: python3.11 -m pip install --upgrade pip
To verify that toybox installed successfully, I checked:
% which toybox
/opt/homebrew/bin/toybox
Note: If you are using an Intel-based Mac, the location Homebrew locations will likely be in a different location than /opt/homebrew.
To integrate Roomy into a project, go to the project folder from the command line and type:
toybox add roomy
toybox update

% toybox add roomy
Updating the toystore...
Added a dependency for 'roomy@1'.

% toybox update
Resolving dependencies...
Installed 'github.com/RobertCurry0216/roomy-playdate@(>=1.0.0 <2.0.0)' -> 1.0.0.
Finished.
For my initial experiments with Roomy in my project, it seemed to fit the bill. I was able to create a couple of example rooms and move between them.
For some unknown reason several months later when I returned to the project, the toyboxes.lua file could not find the import file 'github-dot-com/RobertCurry0216/roomy-playdate/roomy-playdate.lua'. Potentially an issue after updating the Playdate SDK from 2.0.0 to 2.0.1? Some other cached issue? I resolved this by just manually copying the roomy-playdate.lua file into the project.
The roomy-playdate project hasn't been updated in several years, and if it is still dependent upon toybox....meh. Fortunately the Roomy GitHub repo is still around, so it is possible to manually install the library, which is the approach I'd recommend for integrating Roomy into your project.
Upon this writing in February 2025, it appears that a number of the Toybox references have gone 404. The dead links:
- https://toyboxpy.io/
- https://github.com/DidierMalenfant/toybox.py
Noble Engine
In October 2023, I switched over from using the Roomy library to the Noble Engine (which contains the NobleScene component) for the scene manager. NobleScene had more functionality, such as a menu system, plus I was occasionally getting weird issues like Roomy would suddenly fail.
Noble Engine links:
When pulling the Noble Engine template via git, recurse the submodules so it also pulls down the engine.
git clone https://github.com/NobleRobot/NobleEngine-ProjectTemplate.git
cd [project directory]
git submodule update --init --recursive
I ended up using Tower to pull down the submodules. This reference shows how to then update the submodules.
git 1.9 can do this in one step:
git clone --recurse-submodules [repository-url]
Fortunately, the built-in version of git on modern Macs is more modern. For reference:
- macOS 13.6.2: git version 2.37.1 (Apple Git-137.1)
- macOS 14.7.2: git version 2.39.3 (Apple Git-146)
- macOS 15.3.1: git version 2.39.3 (Apple Git-145)
The NobleEngine proved to be very useful, not only to serve as a scene manager with transitions, but it also has a menu system (used on the main screen of One-Armed Space Bandit) and includes other utilities such as laying out and formatting text.
Sound + Audio
The Playdate offers multiple options for playing audio files, such as WAV, MP3, and MIDI. Each of these formats have their advantages and uses. In my efforts to keep the game size relatively small, I tried to work with MIDI files as much as possible, although I encountered a number of odd issues where certain MIDI files would not play correctly so I reverted to using WAV or MP3.
One-Armed Space Bandit is an obvious homage to the Slots-o-Death machine from Space Quest 1, and to keep true to the spirit of the 80s Sierra games, I made use of variants of the audio tracks from several games.
I exported four sound files from Space Quest 1 and two others from Leisure Suit Larry 1 as MIDI files by using AGI Studio. I also imported some Sierra games into WinAGI, then exported the audio files as MIDI to hear the difference in sound quality. One of the audio tracks from LSL1 came out sounding very odd, so I experimented with exporting the song from AGI Studio for Mac with different instruments. I ended up exporting some songs and set the three voices to Square or Sawtooth waves (instruments around #81 and #82) to keep that classic 3-voice Tandy sound.
The audio format Sierra developed for their AGI-era games was very compact, and the MIDI exports tend to sound fairly close with the proper voices. One of the great advantages to MIDI is the tiny size of the files versus comparable WAV or MP3 files. Perhaps due to the legacy of the file type, or the files themselves may have not been properly exported, macOS had difficulty in playing the MIDI files.
The macOS Finder didn't recognize how to play the MIDI files, and neither did the built-in command line utility afplay (audio file play).
% afplay Sound25.mid
Error: AudioFileOpen failed ('typ?')
Even if I tried to play the MIDI files in other programs, there were errors or refused to play them. I tried to using Audacity, but no luck hearing anything. Quicktime Player wouldn't play anything. VLC Player was able to play the MIDI files. Both Logic Pro and its little sibling GarageBand can also open these troublesome MIDI files. They have a piano roll to customize the notes. Also useful to see how many tracks there are.
I was finally able to export the files as MP3 files. I was even able to export one file as an uncompressed WAV file, which blew up a 1KB MIDI file to 741KB. Yikes. I exported the file as an MP3, which resulted in a 68KB file.
I had also updated ffmpeg in Homebrew (brew install ffmpeg), which took a fair amount of time and plenty of other libraries to install. I then ran the command:
ffmpeg -i Sound28.mp3 -acodec adpcm_ima_wav Sound28.wav
The resulting WAV file was 189KB, still somewhat larger, but not nearly as bad as the other WAV file.
Playdate's documentation recommends when using Audacity:
To encode into ADPCM with Audacity:
File > Export Audio… > File type: WAV (Microsoft), Encoding: IMA ADPCM.
For more details on working with audio on the Playdate, there's a great little GitHub project and YouTube video available.
Working with the Hardware
Running your game on Playdate hardware:
- Attach your Playdate to your computer via a USB cable.
- Turn on your Playdate by pushing the Unlock button on top.
- Run your game in the Playdate Simulator.
- Choose Upload Game to Device from the Simulator’s Device menu. After the game is uploaded to your Playdate, it will start running automatically. (Keyboard shortcut: Command/Control+U)
Note: On the Mac, might need to accept several permissions to connect to the Playdate and allow the Playdate Simulator to upload to it.
When the software is uploading, the Playdate will mount itself and go into a DATA mode. As the software loads, the Playdate will show a logo and the text:
Sharing DATA segment as USB drive
Eject disk to reboot
Plugging in the Playdate shows in the console:
echo off
target=dvt1
build=5cf1e016-2.3.1-release.165008-buildbot-240207
boot_build=5cf1e016-2.3.1-release.165008-buildbot
SDK=2.3.1
pdxversion=20300
serial#=PDU1-Y001234
cc=9.2.1 20191025 (release) [ARM/arm-9-branch revision 277599]
pcbver=0x01
time and date set
How to boot the Playdate into disk mode:
If you want to see the file system of the Playdate, especially to get to the screenshots, you can boot the device into Disk Mode. This is a method to be able to retrieve screenshots taken on the device.- Home Button > Settings
- Go to System
- Scroll down and select Reboot to Data Disk
To reboot, eject the Playdate from your connected computer, or press the A button.
Hard Reset
At one time, my Playdate got into a really weird state where it was unresponsive to any of the buttons. To perform a hard reset, I had to undock the crank, then take a paperclip and insert it into the tiny hole inside where the crank is normally docked to reboot the system.
Fonts
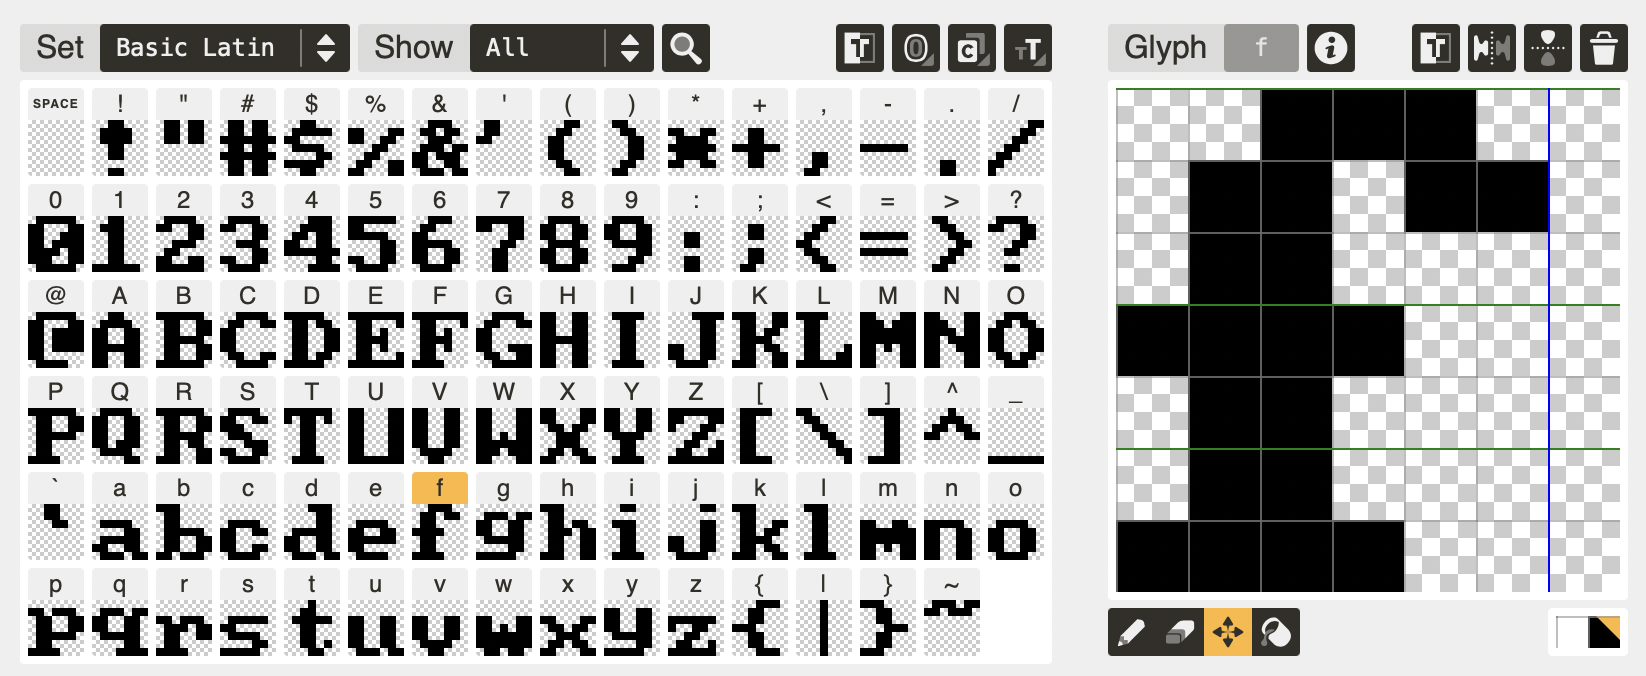
One of the first projects I started in preparation for my Playdate game was to create a font based off of the font used in Sierra's AGI games (such as Space Quest 1, which was the prime influence of One-Armed Space Bandit). I ended up using this chunky, pixelated font in the title bars in One-Armed Space Bandit.
I started out by using the Sierra AGI Font by Goatmeal at Fontstruct. I used this as a good starting point for the font and then built upon it with extended Latin characters. Fortunately, this is a nice, pixelated font and is easy to design using tools like FontStruct and CAPS.
Other resources I've used for font design are the Macintosh app Glyphs Mini and the book Designing Fonts by Ulrike Rausch and Chris Campe.

To make use of this Sierra AGI font for the Playdate, download the zip file, uncompress it, and move Sierra-AGI-Basic-Latin-and-Supplement.fnt into your project. I created a folder named fonts inside the Source folder of my project.
To create the titles with this custom font, I load the font into a variable and then pass it into the custom drawTextScaled method.
local sierraFont <const> = playdate.graphics.font.new('fonts/Sierra-AGI-Basic-Latin-and-Supplement')

playdate.graphics.setImageDrawMode(gfx.kDrawModeFillWhite)
Utilities.drawTextScaled("CREDITS", 200, 14, 2, sierraFont)
One issue I encountered was my custom font was not very large for my needs, so I looked around for a method to increase the size. Fortunately, fonts are treated like sprites, so their size can be modified. I found one method to change a font's size, and I used that code example as the basis for what worked for my font:
This is my modified version (which I put in the Utilities.lua file) since the original code didn't work properly with my Sierra-type font:
function Utilities.drawTextScaled(text, x, y, scale, font)
	local padding = 0
	local w <const> = font:getTextWidth(text)
	local h <const> = font:getHeight() - padding
	local img <const> = gfx.image.new(w, h, gfx.kColorClear)

	-- Note: gfx is a const of playdate.graphics
	gfx.lockFocus(img)
	gfx.setFont(font)
	gfx.drawTextAligned(text, w / 2, 0, kTextAlignment.center)
	gfx.unlockFocus()
	img:drawScaled(x - (scale * w) / 2, y - (scale * h) / 2, scale)
end
If you want to use a TrueType or OpenType version of the Sierra AGI Enhanced font for desktop computer usage, download it from the FontStruct page.
Wrapping Paper
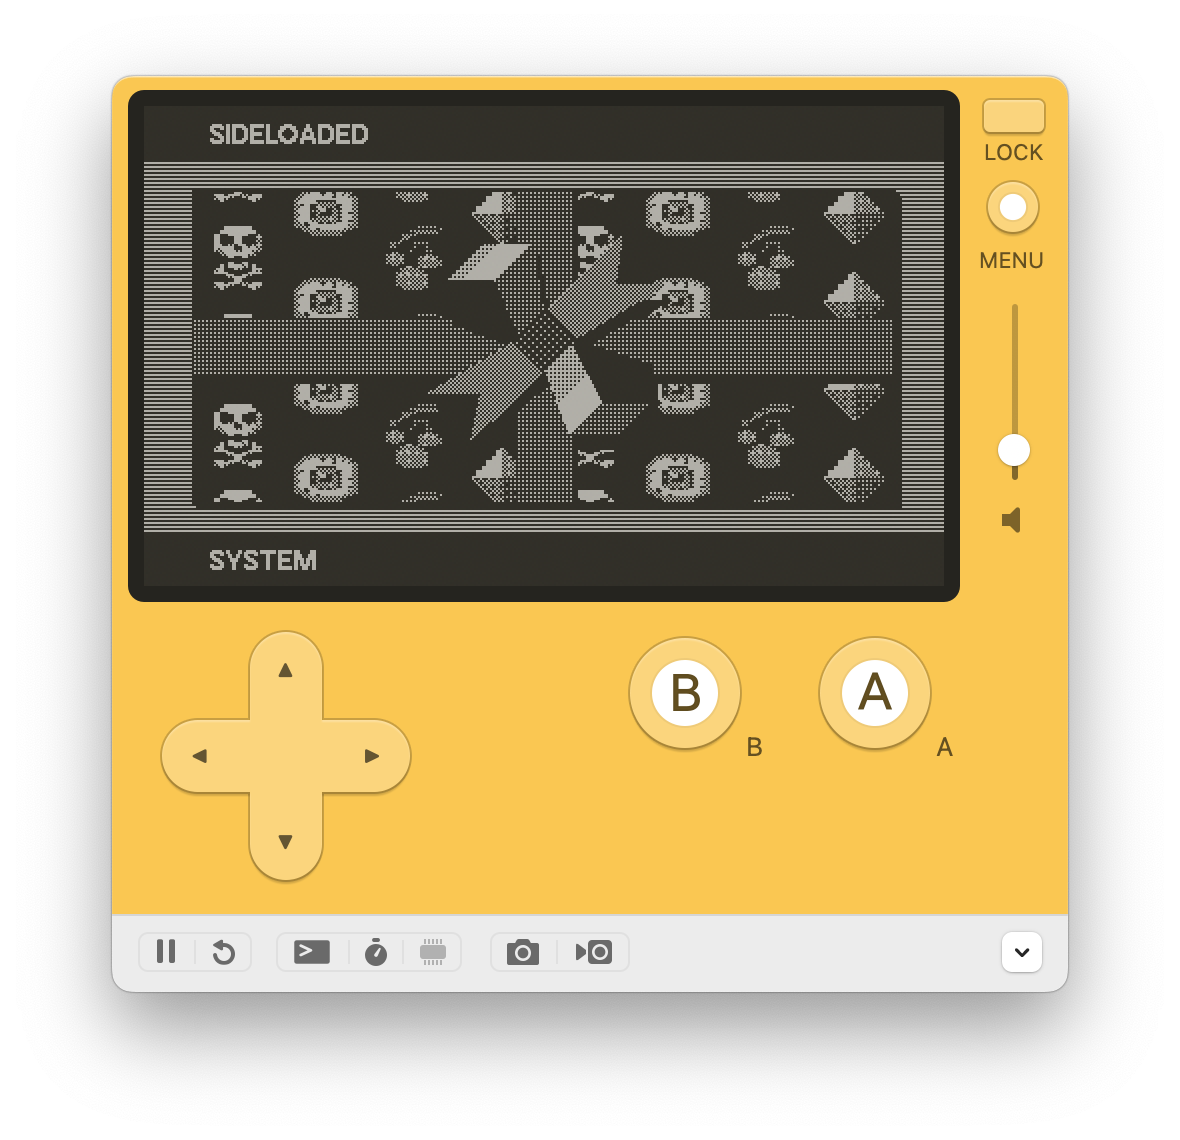
Panic as a company just exudes fun, which has been present in their products for decades. One of these lovely touches of joy is the process of "unwrapping" a new game on the Playdate. If you include the (optional) file wrapping-pattern.png into your project, it will create a distinctive wrapping paper design around your app on the Playdate.
From the Inside Playdate documentation:
Optional, but if present, will be used as the pattern for the wrapping paper on newly-downloaded games that have yet to be unwrapped. The image dimensions should be 400 x 240 pixels. (Template files are available to help you design the wrapping-paper art for your game. This functionality can be tested in the simulator by selecting "Wrap Current Game" from the Playdate menu.)
The wrapping-pattern-templates.zip file contains multiple template files for Aseprite, Photoshop, and a standard PNG. When designing your pattern, you'll likely want to create a repeating pattern as seen on traditional wrapping paper. Even though the image is 400x240 pixels in size, some of it will be clipped or be hidden behind the ribbon.
How to test the wrapping paper in the Simulator:
- Create a wrapping-pattern.png image (400x240) and put into the
Source/SystemAssetsfolder of your project. - Build the project and then copy the pdx file (should be in the root of your project folder) into the
~/Developer/PlaydateSDK/Disk/Gamesfolder on the Mac. Location will be something different for Windows and Linux. - Start the Simulator, go Home, and then select the menu
Playdate > Wrap Current Game
Side note: There used to be a way to "rewrapp" apps back up via an app called Giftwrap from Gatesphere. It is mentioned in a Reddit thread that Giftwrap exploited a bug in the Playdate software, but it was patched in version 2.6.0 of the system software, so sadly Giftwrap is no longer available.
Accessibility
I've worked with accessibility in the mobile space, and fortunately the Playdate also has some accessibility settings, as well.
How to enable the accessibility feature on Playdate:
Home > Settings > Accessibility
As of early 2025 (System version 2.6.2), there are two accessibility options: Reduce Flashing and Upside Down.
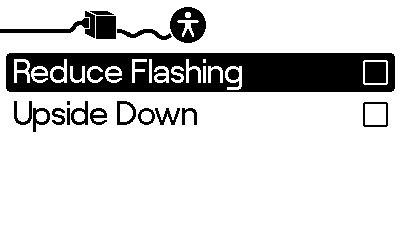
In version 1.0.1 of One-Armed Space Bandit, I added a screen shake feature. But to avoid effects like the shaking, I perform a check via playdate.getReduceFlashing() to check if I should skip that effect or proceed.
-- This function relies on the use of timers, so the timer core library
-- must be imported, and updateTimers() must be called in the update loop
-- References:
--   Playdate: https://sdk.play.date/2.6.2/Inside%20Playdate.html#f-display.setOffset
--   Lone Fury: https://github.com/stuartbnicholson/lonefury/blob/master/source/main.lua
--   Hexa: https://github.com/stuffbyrae/hexa/blob/master/source/main.lua
function ScreenShake(shakeTime, shakeMagnitude)

    -- If reduce flashing is enabled, then don't shake.
    if playdate.getReduceFlashing() then
        return
    end

    -- Creating a value timer that goes from shakeMagnitude to 0, over
    -- the course of 'shakeTime' milliseconds
    local shakeTimer = playdate.timer.new(shakeTime, shakeMagnitude, 0)

    -- Every frame when the timer is active, we shake the screen
    shakeTimer.updateCallback = function(timer)
        -- Using the timer value, so the shaking magnitude
        -- gradually decreases over time
        local magnitude = math.floor(timer.value)
        local shakeX = math.random(-magnitude, magnitude)
        local shakeY = math.random(-magnitude, magnitude)
        playdate.display.setOffset(shakeX, shakeY)
    end

    -- Resetting the display offset at the end of the screen shake
    shakeTimer.timerEndedCallback = function()
        playdate.display.setOffset(0, 0)
    end
end
Resources
- Inside Playdate
- Designing for Playdate
- Inspecting a basic game for Playdate
- How to Build a Game for the Playdate Console Using the Playdate SDK and Lua
- Approach to create a menu system for the title screen
- Playout- a lua UI layout library
- Playout - GitHub
- Playout - Itch
- gfxp-viewer
- gfxp
- Windows Playdate simulator menu item “Wrap Current Game” was disabled
- Playdate-Audio-Tutorial---Basics