Edenwaith Blog
25th February 2020 | Programming
As I've admitted in the past, I have a bad habit of having a large number of tabs open in my web browser. Bad enough that I've written scripts to count how many tabs are open in either Safari or Chrome.
While these scripts are useful to let me know how egregious my tab opening habits have been recently, they do not help in curating the massive number of tabs to a more manageable amount. So I wrote another script to help keep the tab population under control.
At my job at Acme Co. (the fine purveyor of generic products used everywhere and by everyone, including wily coyotes), we make use of Atlassian products such as JIRA and Confluence for tracking tickets and documentation. I often find that I have far too many tabs open, and after my session has expired, I am forced to relogin to access these pages anyway, so I might as well close them. The following script CloseAcmeTabs.scpt is the example I use to iterate through all of Chrome's open tabs, find any open JIRA or Confluence tabs, and then close these tabs. To make use of this script for your own uses, change acme.com to the appropriate domain name.
To simplify running this script, I added an alias into my .bash_profile file:
alias closetabs='osascript ~/Projects/Scripts/CloseAcmeTabs.scpt'
Once the file has been updated, refresh the bash shell environment: source ~/.bash_profile
Now to run the script, type closetabs in the Terminal, and the AppleScript will start, close any JIRA and Confluence web pages, and then print out the total of tabs which were closed.
While this does not entirely curtail my habit of opening hundreds of tabs, it does help automate at least one process by removing the tabs I know will have expired by the next day, so this script does help by doing some regular browser maintenance when I call for it.
30th December 2019 | Edenwaith
This past year proved to be a shift away from the standard set of Mac and iOS projects, but a return to what started my path to programming: games. I began my exploratory research into reverse engineering Sierra On-Line's AGI game engine last year, which led to me porting Qt AGI Studio to the Mac, which was then used to create King's Quest 1 - Redux. Working on these projects has rekindled my love of not only playing classic adventure games, but having a chance to work on them. This is something I plan on continuing in some form or another over the next year.
On the more traditional front, two versions of EdenList for iOS were released this year. With the advent of Catalyst, I might even develop a new version of the Mac version of EdenList — an app which hasn't been updated since the iOS version was first released in 2010. Or, then again, maybe I won't. These are merely ideas at this time which I'm contemplating.
2019 was a rare year in which Permanent Eraser did not see an update, since I had originally planned on rebuilding the app from the ground up for the next major version. Unfortunately, the app is having issues with macOS Catalina, so I am in the process of working on Permanent Eraser 2.9 to fix these issues with the latest version of macOS.
macOS Catalina rang the death knell for older 32-bit apps and frameworks, which means 33 RPM will no longer work on the latest version of macOS. I am still contemplating on whether or not to rewrite 33 RPM to be able to work on Catalina, and perhaps even iOS, but there are other projects which are taking precedence at this point.
One of these other projects includes something I've been working on for over 23 years — a novel. Before I got into computer programming, I was into creative writing. I wrote short stories, poems, and even completed a full length novel. The work I am currently working on is finally nearing the completion of its first draft. I have surpassed 100,000 words, which is an average length of a novel, and now I am in the process of finishing off putting the final bits and pieces to form the initial draft. If this was software, I would consider it the alpha build. The basic form is there, but it still requires the extra polish and fixes before it is ready.
Looking to 2020, I plan on completing the first draft of my novel, Permanent Eraser 2.9, and several game-related projects. Aside from those, time will always tell.
29th November 2019 | Programming
Inbox zero. A lofty goal, but often difficult to regularly obtain, especially when new e-mail is continually rolling in.
I've had some jobs where the e-mail was minimal, and most of the day-to-day communication was reserved for daily stand ups and over instant messenger. In such cases, e-mail is not an issue when the signal-to-noise ratio is high since nearly all of the e-mail that was delivered was actually applicable to me.
But then there are jobs where one is deluged under a mountain of electronic messages covering notifications and alerts, on top of regular correspondence. Setting up rules in your e-mail client can help direct the flow, but it still doesn't cut down on the amount of messages, plus there is the daunting task of actually reviewing the messages.
Let's be honest — we aren't always going to read every single e-mail, especially if a majority of them do not require a response or are not directly applicable. To help mitigate the unnecessary amount of message I need to review, I have written an AppleScript which periodically scans through Microsoft Outlook and marks any old messages as read.
Setup
Script Editor (/Applications/Utilities/Script Editor.app) is the primary tool for writing, compiling, and running AppleScripts. However, it can also be useful to read and edit scripts from another text editor, such as the venerable BBEdit. I was surprised to see that BBEdit, a longtime Mac application, did not natively support AppleScript syntax highlighting. Fortunately, BBEdit (and its now-retired sister app TextWrangler) supports Codeless Language Modules to be able to provide syntax highlighting for additional languages. I went out and found an applicable AppleScript language module and installed the AppleScript.plist file in ~/Library/Application Support/BBEdit/Language Modules/. This was more for the purpose of reviewing and formatting code in BBEdit, but the brunt of the work to compile and test the script was done in Script Editor.
The AppleScript
The following script iterates through several Outlook subfolders and marks any old unread messages as read. The cutoff argument in the markUnreadMessages method is used as a threshold to determine how far back to mark old messages as read. This will keep more recent messages in an unread state to give more time to review the messages. For messages which do not pertain to me, I have those e-mails sent to the Other folder, and all of those messages are immediately marked as read when the script is run. Any e-mails which go directly to my primary Inbox are not touched by this script since I want to personally check such e-mails. For your own variant of this script, add the necessary mailbox folders and decide how much of a time threshold you need.
Launchd
Since e-mail needs continual maintenance, a good approach to ensure that this script is called at regular intervals is to use launchd on the Mac. To set up a launchd job, we create a property list file for the launch agent.
Writing: To set up a launch agent, a property list is created and then placed within the ~/Library/LaunchAgents/ directory. The following launch agent is fairly small and straightforward which calls the Mark Unread Emails AppleScript everyday at 9:00 a.m. Refer to the launchd website for further details on how to configure a launch agent for launchd. For this example, the property list is named local.markunreademails.plist.
Copying: Once the property list has been written, copy the file to ~/Library/LaunchAgents/local.markunreademails.plist.
Relaunching: Next relaunch launchd from the Terminal:
launchctl load -w ~/Library/LaunchAgents/local.markunreademails.plist
Starting: To start and/or test the launch agent, run: launchctl start ~/Library/LaunchAgents/local.markunreademails
References
8th October 2019 | EdenList
Last month, EdenList 2.1.0 for iOS was released, featuring new printing capabilities, Dark Mode for iOS 13, and improved accessibility with Dynamic Type support.
Printing
After nearly a decade, I finally purchased a new printer, which has some nice features such as AirPrint and a duplexer. AirPrint in particular is a very welcome addition, especially with the proliferation of mobile devices over the past dozen years. This was key for me to finally take a look at adding printing support to the iOS version of EdenList.
I was initially surprised that printing wasn't already a feature supported by default on iOS, even if in some rudimentary form. It seemed like it should have been a relatively simple concept, but ended up being far more complicated than I had originally assumed. It seems like printing something as commonplace as a list would be a simple matter, but it is not. The frameworks make it relatively simple to print things like images, text, HTML, or a PDF, but if you want more customized printing, then you will have to handle it yourself.
After considering several options on how to best print a standard table view of data, I decided to go with constructing an HTML page from the data and printing the generated web page. The standard UITableView only displays a subset of the total data, so one cannot just take the visible portion of the screen and print it, since there might be a lot of unseen information. That is why I went the route of using an HTML template and used that to display what to print.
The following is a code snippet from EdenList which shows taking an HTML template and forming a web page with the list's data. In this example, the print functionality is part of the Share sheet, instead of an isolated function.
let fileTitle = self.title ?? ""
let fileURL = NSURL(fileURLWithPath: self.filePath)

var htmlContent = ""

// Retrieve the print_template.html file and put into a string
let templatePath = Bundle.main.path(forResource: "print_template", ofType: "html")

do {
	htmlContent = try String(contentsOfFile:templatePath!, encoding: String.Encoding.utf8)
	// Swap out the title with the name of the file to print
	htmlContent = htmlContent.replacingOccurrences(of: "__LIST_TITLE__", with: fileTitle)

	var itemsHTML = ""

	// Loop through the records and construct an HTML table for printing
	for item in self.records {
		let checkedOption: String = item.itemChecked ? "checked " : ""
		let itemTemplate = """
			<tr>
				<td><input type="checkbox" \(checkedOption)/></td>
				<td>
					<h4>\(item.itemTitle)</h4>
					<h5>\(item.itemNotes)</h4>
				</td>
			</tr>
		"""

		itemsHTML += itemTemplate
	}

	htmlContent = htmlContent.replacingOccurrences(of: "__LIST_ITEMS__", with: itemsHTML)

} catch _ as NSError {

}

let printInfo = UIPrintInfo(dictionary:nil)
printInfo.outputType = UIPrintInfo.OutputType.general
printInfo.jobName = fileTitle
printInfo.orientation = .portrait
printInfo.duplex = .longEdge

let formatter = UIMarkupTextPrintFormatter(markupText: htmlContent)
formatter.perPageContentInsets = UIEdgeInsets(top: 36, left: 36, bottom: 36, right: 36)

let excludedTypes:[UIActivity.ActivityType] = [.postToFacebook, .postToTwitter, .postToVimeo, .postToWeibo, .postToFlickr, .addToReadingList, .assignToContact, .saveToCameraRoll]
let shareVC = UIActivityViewController(activityItems: [fileTitle, fileURL, printInfo, formatter], applicationActivities: nil)

shareVC.excludedActivityTypes = excludedTypes
Dark Mode
One of the landmark features in iOS 13 is the new Dark Mode appearance. For apps which stick with the stock UI components, adopting Dark Mode is fairly straightforward. There were a couple of places where I needed to check for iOS 13, but I did not need to add too many specific changes to get EdenList to look presentable in iOS 13. I could have also set up Dark Mode-specific icons, but felt that the current images work pretty well with both light and dark appearances.
if #available(iOS 13.0, *) {
	messageLabel.textColor = UIColor.systemGray
} else {
	// Fallback on earlier versions
	messageLabel.textColor = UIColor.darkGray
}
However, if your app isn't set up to support Dark Mode at this time, especially if you have a more distinct or customized design, then you will want to ensure that you are using specified colors for your various elements, and not using Default colors.
Dynamic Type
I have been learning a lot about WCAG and accessibility standards lately, which led me to properly implement Dynamic Type throughout the app. To better support a range of text sizes, EdenList now better supports Dynamic Type. This is reminiscent of the various styles (paragraph, header, caption, etc.) that a word processor uses, so it uses predefined terms instead of explicit font sizes. By avoiding explicit font sizes, it allows iOS to resize the text dependent upon the user's settings.
To alter the size of text in iOS, go to Settings > Display & Brightness > Text Size and adjust the slider.
25th September 2019 | Programming
Each year, Apple releases updates to its software platforms and development tools, which always comes with a bevy of changes. Xcode 11 came with an extra surprise by removing the long standing developer tool Application Loader, which was an alternative method to upload apps to Apple's Mac and iOS App Stores.
Per the Xcode 11 release notes:
Xcode supports uploading apps from the Organizer window or from the command line with xcodebuild or xcrun altool. Application Loader is no longer included with Xcode. (29008875)
Historical Background of Application Launcher and altool
If you write traditional Mac or iOS software in Xcode, you normally submit your apps to the App Store via the Organizer window in Xcode. However, if you build or distribute your software via other methods, then the Xcode Organizer may not be the way you generally upload the software. This is where Application Loader was useful by being able to take an existing app and upload the software to Apple. With that route now absent in the latest release of Xcode, alternative methods are necessary.
Application Loader was a companion developer tool that, according to its copyright date, goes as far back as 2002, but the oldest version of Application Loader I could find came with Xcode 3.2, putting it around the same time period that the iOS and Mac App Stores starting up. This app came bundled with Xcode and could be accessed via the following menu in Xcode:
Xcode > Open Developer Tool > Application Loader
Even though Application Loader has been inexplicably retired, there is an alternative solution, the command line tool altool, which has been available since at least Xcode 6. altool is a versatile utility which can notarize, verify, or upload an app. Considering that altool was part of Application Loader before being moved over to the ContentDeliveryServices framework, it can perform the same duties that Application Loader handled. This post will focus on validating and uploading an app. Notarization, a relatively new security measure, will be addressed in a future post.
Validate app
xcrun altool --validate-app -f path/to/application.ipa -t ios -u <appstore_username@example.com> -p <appstore_password>
This is the same process as what Xcode uses to validate an app, and it will also return any success or error messages from the validation.
Upload App
xcrun altool --upload-app -f path/to/application.ipa -t ios -u <appstore_username@example.com> -p <appstore_password>
In these examples, appstore_password is a per-application password you need to create at Apple's website. If you have multiple products, you will need to create a separate password for each app.
xcrun is used to locate and run development tools on the system, which is a useful utility to have, especially in the case of using altool, since its location has changed between Xcode 10 and Xcode 11. In Xcode 10, altool was part of the Application Loader app (/Applications/Xcode.app/Contents/Applications/Application Loader.app/Contents/Frameworks/ITunesSoftwareService.framework/Versions/A/Support/altool), but with Xcode 11, it has been moved to be part of the ContentDeliveryServices.framework (/Applications/Xcode.app/Contents/SharedFrameworks/ContentDeliveryServices.framework/Versions/A/Frameworks/AppStoreService.framework/Versions/A/Support/altool).
Since altool is a command line utility, it can be easily utilized in an automated system, such as with a continuous integration and deployment build process. If you prefer to use Application Loader, make sure to keep a copy of Xcode 10 around, but it is unknown how long that will continue to work, so it is a good idea to eventually migrate your process to using altool, instead.
Using altool with the Keychain
If you are adding altool to a CI/CD automation flow, it is best to store the application-specific password in either an environmental variable or the macOS Keychain, instead of displaying the password in a plain text script.
To add the password to the Keychain, run the following command from the macOS Terminal:
xcrun altool --store-password-in-keychain-item <MY_SECRET> -u <appstore_username@example.com> -p <appstore_password>
MY_SECRET is whatever value you wish to set for the name to store in the Keychain. Verify that the password was successfully saved in the Keychain (/Applications/Utilities/Keychain.app).
To make use of the password stored in the Keychain:
xcrun altool --validate-app -f /path/to/application.ipa -t ios -u <appstore_username@example.com> -p @keychain:MY_SECRET
Transporter
About a month after Xcode 11.0 was officially released, Apple replaced the abandoned Application Loader with another app: Transporter. Transporter originated as a Java-based command-line tool for Windows, Linux, and Mac to submit content to the iTunes Store, App Store, and iBooks Store. Transporter 1.1 is now a Mac app which can also upload app binaries to App Store Connect, effectively supplanting Application Loader.
Transporter is not bundled with Xcode, but it can be downloaded from the Mac App Store and used in a similar manner to the retired Application Loader to upload .ipa or .pkg files to App Store Connect. Log in with either a App Store Connect, iTunes Connect, or encoding house account to upload your content to the appropriate portal.
Resources
15th August 2019 | Games
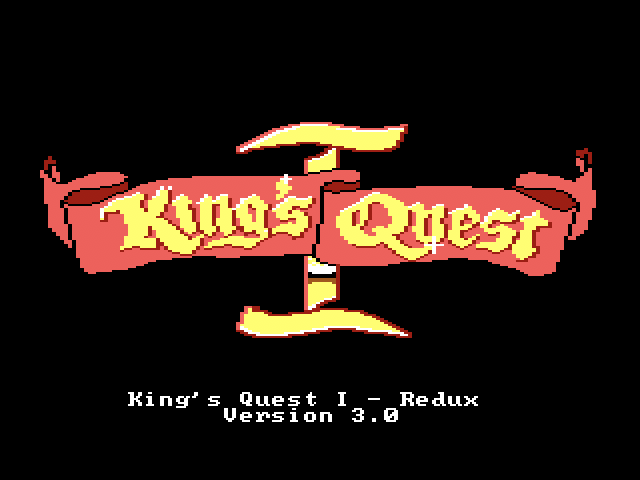
This is a day I've been looking forward to for a long time...
When I was seventeen years old, I finally decided on a major to study Computer Science, so once I graduated I could go work for Sierra On-Line and make awesome games. Sadly, the Sierra of my youth would shutter a couple years later, taking my dreams along with it. Until today.
My friend Dan introduced me to the world of Sierra adventure games where we searched for the lost treasures of Daventry, saved the universe from the dreaded Sariens, and repeatedly crashed the patrol car on the streets of Lytton.
Heartened by our digital adventures, we would try to make up our own "games" by sketching out screens on paper for our own imagined magnum opera. That dream never fully died and today I am resurrecting it in the form of King's Quest 1 - Redux.
Barring the use of a time machine so I can go back to 1985 to work for Sierra, this is as close as I will come to achieving that original goal. This is my love letter to all of those great Sierra games I grew up with in the 1980s.
A year ago I began investigating the inner workings of the Adventure Game Interpreter (AGI), the game engine which powered the early Sierra adventure games (King's Quest 1 - 4, Space Quest 1 and 2, Police Quest 1, Leisure Suit Larry 1, and more). Early in the year I ported QT AGI Studio from Linux to the Mac, which provided the necessary tools to modify the original King's Quest game.
So why King's Quest 1? Why not, I suppose. But if I was going to hack on an AGI game, it might as well be the game that started it all and helped kick off a set of franchise series that Sierra would become famous for. Even with the EGA enhanced version of the game which came with the improved AGI engine, the game still has its flaws and shortcomings.
In the later AGI-era games, one could go into a screen and simply type "look" to get a general description of the area. However, games like King's Quest 1 and Space Quest 1 did not have this option and required the player to be more specific when inspecting their surroundings. I went through all 83 screens of the game and added the option to be able to just type "look" to get a general description. Upon doing this, I discovered that some of the screens did not even have a description (such as some of the screens with the troll bridges), so I borrowed the room descriptions from the SCI remake of King's Quest 1 to fill in the blanks.
Another shortcoming was that KQ1 had only three speeds: Slow, Normal, and Fast. Slow and Normal were standard, but Fast was dependent upon the speed of your computer, comparative to what the Fastest speed would be in other games. I tweaked the game so the Fast setting was equivalent to the Fast speed in other AGI games, and Fastest is now what the Fast speed used to be. Pressing F10 will also toggle through the four different speeds.
King's Quest 1 provides for a number of solutions to the variety of puzzles throughout the game, but it also came with quite a few dead ends. I went about fixing a couple of these dead end scenarios:
- You can no longer plant the beans on the same screen as the condor if you have not already been to the Kingdom of the Leprechauns. Doing so would have prevented the condor from appearing.
- If you fall into the hole leading to the Kingdom of the Leprechauns, but did not pick the mushroom first, another mushroom will be available by the large rock.
- The biggest change to this game is the addition of a couple of new screens which allows Graham to find the thieving Dwarf's hideout and retrieve any major stolen treasures, similar to what can be done in King's Quest 2. So if the Dwarf does catch Graham unawares and steals one of the three lost treasures of Daventry, Graham still has a chance to get it back.
In the original 1984 version of King's Quest, there were no close up images of the inventory items. It wasn't until the later EGA enhanced version that this feature was added. However, how the item appeared in the game versus how it was displayed as an inventory item did not always pair up correctly. I updated a couple of items so they would better match in appearance and their description. Several examples include the Magic Mirror, the Sceptre, the Shield, and the Mushroom.
KQ1 has gone through several iterations, and it appears that even how certain tasks were scored has changed over time, which resulted in a couple of bugs I discovered, where it is possible to get a maximum score of 159 out of 158, or even achieve "negative" points, which will eventually roll over and become 255 points.
The first, and one of the most noticeable changes in the game is the revamping of the title and credits screens. I played around with a number of ideas, but settled on fitting in with tradition by using the title screen that was used for King's Quest 3 and 4, including using the same starting music from the title sequence of KQ3 before switching to a credits screen which was styled after the credits used in The Black Cauldron or KQ3.
So what's next? This past year has been an extremely fun and educational experience in learning how the AGI engine worked and then testing my new skills by updating King's Quest 1. I still have a couple of smaller ideas that didn't make it into the initial 3.0 release, so perhaps there might be some minor or patch versions at some time in the future. However, the big ideas I have in store would be for version 4.0, which would involve massive changes to the land of Daventry, new art work, and additional puzzles — practically a new game. This may never come to pass, but it is this same fun of imagining how King's Quest could be improved which lead to the creation of King's Quest 1 - Redux by taking an existing game and imagining how it could become even better.
It's been an amazing journey, folks. Welcome back to Daventry.
14th July 2019 | 33 RPM
As it has been expected for the past several years, Apple will be officially dropping support for all 32-bit Mac apps and related technology in the next version of their desktop operating system: macOS Catalina.
Because Apple has deprecated their own QuickTime framework, which 33 RPM is heavily reliant upon, 33 RPM will not work on macOS Catalina. I have tested and confirmed this on a beta version of macOS Catalina, and 33 RPM will not even launch.
As I have detailed in previous blog posts, there are a couple of options I can take: I can either rewrite the entire app, or I can retire it.
App Rewrite
Now that Project Catalyst has been officially announced, it gives me a better idea about the feasibility of writing a new version of 33 RPM which will run not just on the Mac, but on iPhones and iPads, as well. I am still not pleased with the design of the native Music player on iOS devices, so if I do port 33 RPM over, it will be designed as a more straightforward music player, in addition to providing music transcription tools to alter the speed and pitch of songs. However, rewriting the entire app will not be a trivial task since it will involve using a new framework, a different programming language, and supporting new operating system platform(s), in addition to the standard time necessary to rework everything. Work on 33 RPM was initially started in 2005 using the QuickTime framework and Objective-C, so I imagine that very little of the original code can be salvaged for the necessary rewrite. If 33 RPM sees a rebirth, it will not be a quick one.
Retirement
The other (but sadder) alternative is to finally sunset this app after eleven years. I have already retired a number of my early Mac apps, so this would hardly be a first, but it is still a time for lament when the end of an era has come.
I am not officially pronouncing 33 RPM's fate just yet — that will ultimately depend on how much interest, time, and energy there is to bring 33 RPM into a new era. I am always working on a number of projects, including a rewrite of Permanent Eraser, so I would not expect a potential new version to happen for easily a couple of years at this point. I hope to have come to a more concrete decision within the next year if I wish to continue developing this app.
Regardless of 33 RPM's ultimate future, it has been a good run, especially for an app that has already been in semi-retirement for several years, so it is impressive that for an app that hasn't been updated since late 2012, it still runs fine on macOS Mojave.
33 RPM is the type of app I personally wanted for many years and designed it because I was not happy with the existing software solutions at the time. Once again and always, thank you to everyone who has ever downloaded and used 33 RPM. I hope you have enjoyed it as much as I've enjoyed creating this app.
References
22nd June 2019 | Tutorial
DOSBox has been a godsend in being able to play older DOS games on modern systems, but its interface and user-friendliness leave much to be desired. DOSBox contains a number of options, but it requires the necessary know-how to properly configure these settings to get the best use out of this utility. This blog post will outline a number of tricks I've used to get the most out of DOSBox.
Keyboard Shortcuts
Since DOSBox does not display a standard menu bar, there are a number of hidden, but useful, keyboard shortcuts available.
Toggle full screen: ALT/Option + Enter
Increase CPU speed: CTRL + F12
Decrease CPU speed: CTRL + F11
Mounting and Unmounting Drives
On initial launch, DOSBox doesn't seem very useful, and the user is being stared at by a non-helpful Z: prompt. The first step is to tell DOSBox where you have stored your DOS programs. On my Mac, I have a folder where I keep all of my DOS games.
Mac: mount c /Applications/Games
Windows: mount c D:\Games\
Mounting a CD is a little more involved, and the interface between Windows and Mac is also a little different to indicate the source path of the CD.
Mac: mount d /Volumes/Name_of_CD -t cdrom -usecd 0
Windows: mount d d: -t cdrom -usecd 0
DOSBox will allow you to associate a mount point to whichever drive letter you choose. Even if your CD drive is actually the E: drive on your Windows computer, you can specify it to be drive D: under DOSBox.
If you need to unmount a drive (such as the CD drive), add the -u switch and the letter of the drive:
mount -u d
Automounting a Drive
The next several tips involve editing the configuration file. The configuration file is just a plain text file, so you can use any text editor to open up and modify the file. The file can be found in the following locations, depending upon which operating system you are using:
Windows XP:
%USERPROFILE%\Local Settings\Application Data\DOSBox\dosbox-{version}.conf
Windows Vista and later:
{system drive}:\Users\{username}\AppData\Local\DOSBox\dosbox-{version}.conf
Mac: ~/Library/Preferences/DOSBox {version} Preferences
Note: The version number will correspond to the version number of DOSBox.
Each time that DOSBox is restarted, it forgets the previously set mount points, so it defaults to the unhelpful Z: prompt. To set up DOSBox so it will automatically mount a particular "drive" each time it launches, go to the autoexec section in the configuration file, and add a couple of lines to mount a given drive. Once this is saved, DOSBox will run these commands on start up so the drive will be automatically mounted, reducing the amount of steps you'll need to make each time you use DOSBox.
[autoexec]
# Lines in this section will be run at startup.
# You can put your MOUNT lines here.
mount c /Applications/Games
c:
Changing to Tandy Mode
One of the advantages of having a Tandy computer in the 1980s was its 3-voice sound system, which produced far superior audio to that of the standard PC which had a simplistic speaker that could only create single voice beeps. By default, DOSBox does not have the Tandy mode enabled, but it can be set to produce Tandy-style audio and visual effects.
To enable the Tandy mode, change the machine to type tandy under the [dosbox] section:
[dosbox]
language=
machine=tandy
captures=capture
memsize=16
This works out well to enable the 3-voice sound for early Sierra games such as King's Quest 3, but I have noticed that some early SCI games (e.g. Space Quest 3, Colonel's Bequest) do not load so I had to set the machine type back to svga_s3.
References
21st May 2019 | Programming
I've spent a good portion of the past year learning how to deconstruct, modify, and then reconstruct Sierra On-Line's AGI adventure games. With the right tools, it is not too difficult to change the appearance of a background picture or an inventory object's image. Tweaking the occasional image makes for a fun experiment, but the true magic comes from altering the underlying logic of the game to provide additional functionality.
The AGI games were developed using a custom scripting language called LOGIC. One of the interesting side effects of modifying a LOGIC source file in AGI Studio for Mac is that it saves out a copy of the file (e.g. logic.045) into the project's src directory. Unfortunately, the text editor in AGI Studio is quite simplistic and doesn't work too well. Fortunately, one can directly edit the LOGIC files stored in the src directory using their preferred text editor, instead of editing the source file directly inside AGI Studio. Once I discovered I could use an external text editor to modify the LOGIC files, that became my standard workflow. (Note: the code still needs to compiled within AGI Studio, but it will read in any changes to the saved files in the src directory.)
One downside to working with an old, obscure, and proprietary language such as LOGIC is that modern day text editors will likely not know how to properly provide syntax coloring. Fortunately, there is a way to work around this issue in BBEdit by creating a Codeless Language Module. I had recently encountered a similar issue when reading a C# file on a Mac, which prompted me to learn about the Codeless Language Modules in BBEdit. After doing some research, I learned that it was very feasible to design my own module for AGI LOGIC. Below is the current version of the AGI LOGIC Codeless Language Module for BBEdit.
To install, download and unzip the agi-logic.plist file and copy it into the ~/Library/Application Support/BBEdit/Language Modules/ directory on your Mac.
When editing a LOGIC source file in BBEdit, select AGI LOGIC as the Document Language setting from the bottom of the window, which will enable syntax coloring and the ability to quickly (un)comment lines and blocks of code.
References
21st April 2019 | Programming
Easter eggs have been part of a long standing tradition of hidden secrets and quirks buried in software, particularly video games. On this day of Easter, let's do a little Easter Egg hunting in the original King's Quest. The items shown in this article are mostly about quirks, glitches, and errors that have been discovered which result in some amusing and/or interesting results.
Zombie Goat
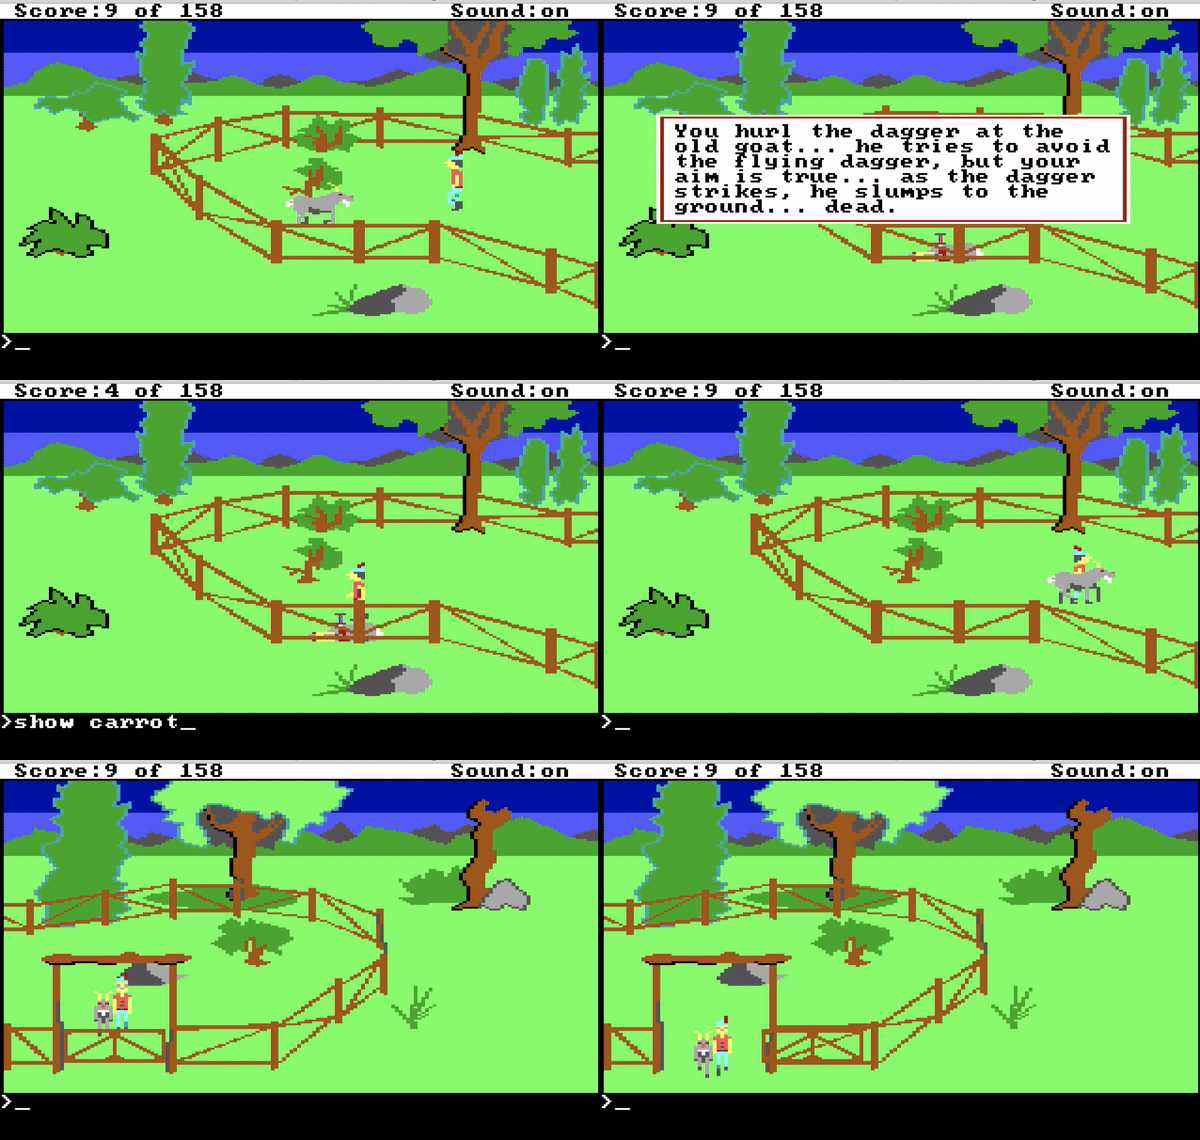
One of the things which provides replayability in King's Quest 1 are the multiple options to solve problems. There is often an ideal (generally a more pacifist route) way to conquer certain challenges, but there are also more violent methods, as well. The dagger is intended to cut the well's rope so Graham can obtain the bucket. However, it is possible to kill either the dragon or the goat with the dagger, as well.
If you lack a conscience and are willing to incur the wrath of the ASPCA by killing the goat, you can earn back a few karma points by showing the carrot to the dead goat, who will miraculously resurrect (just like Jesus did on the third day).
Walk On Water
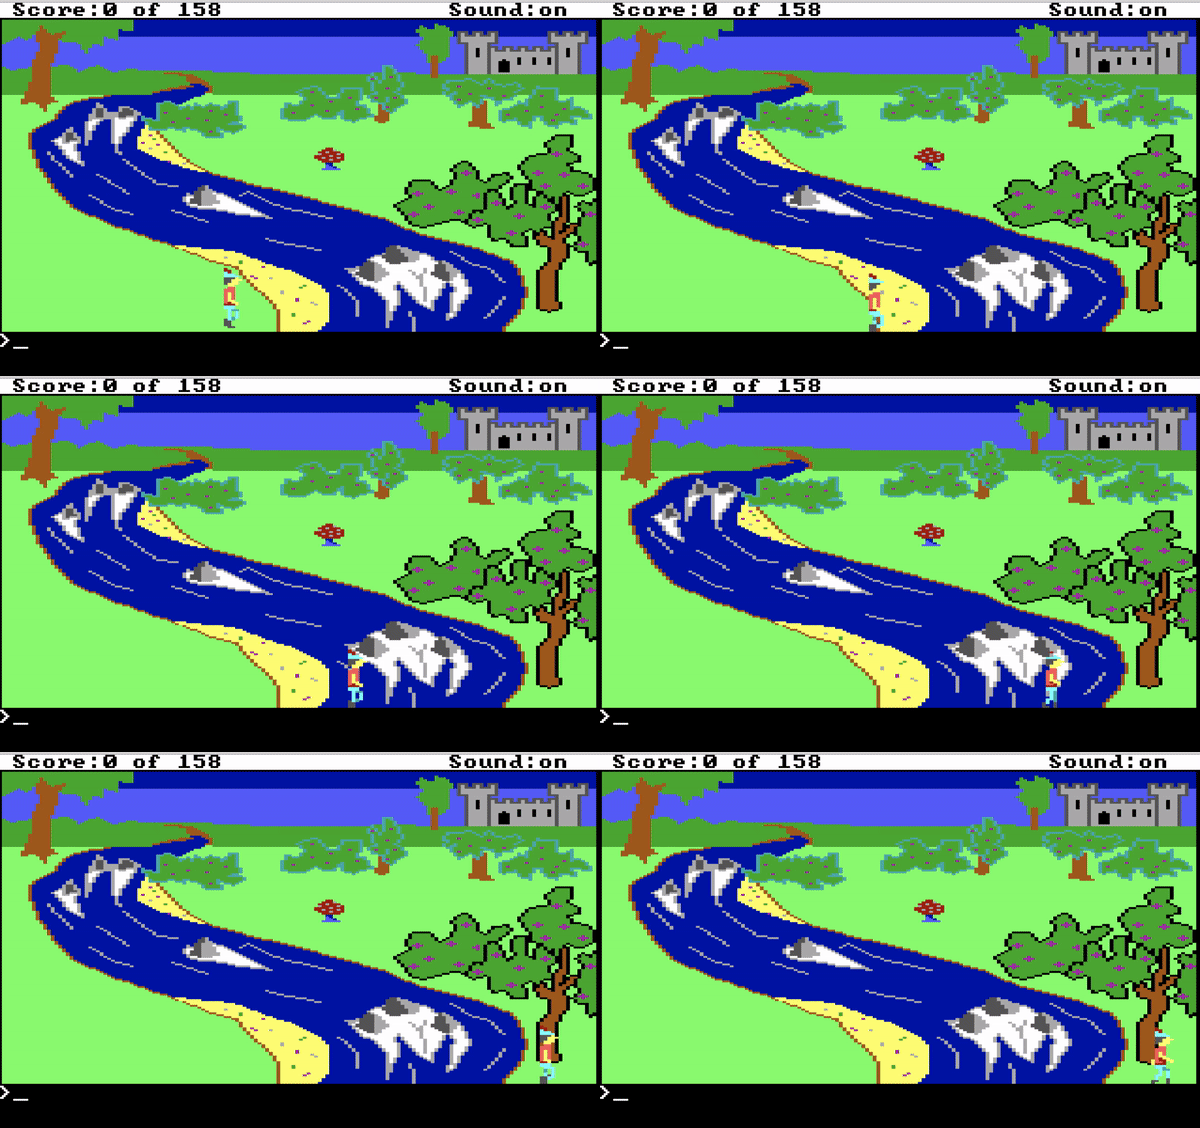
Speaking of Jesus, Sir Graham is not the messiah (especially if he goes about killing defenseless goats), but they both can walk on water. If you go to the screen with the mushroom, move Graham so his feet are about one pixel below the bottom of the screen and then walk to the east. If you line Graham up just right, he can "walk" across the river without drowning.
Walk Through Walls
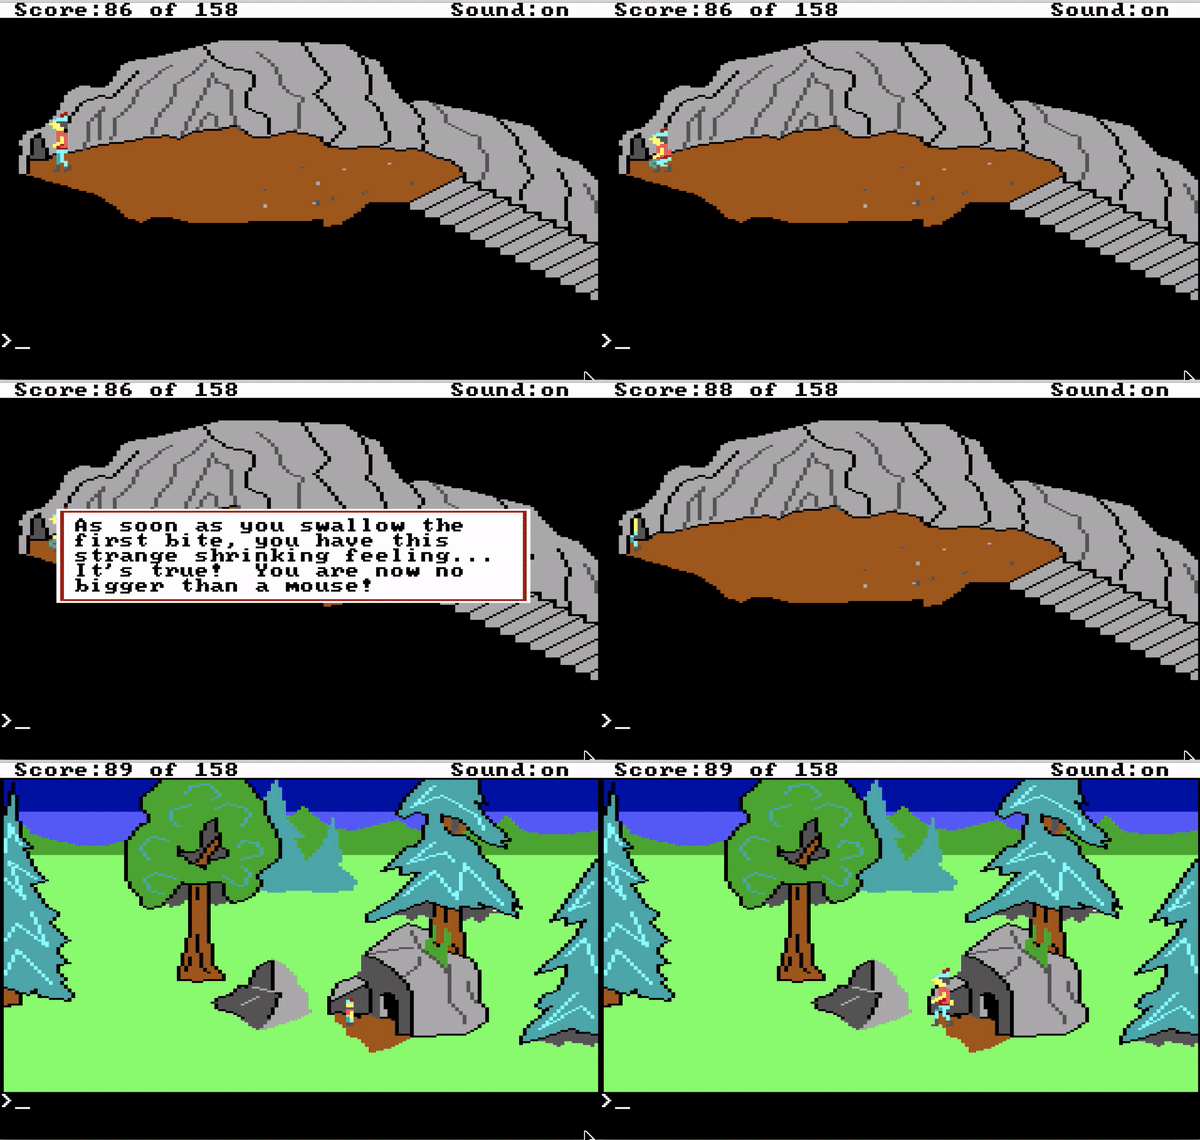
Walking across water is just one of Sir Graham's many talents. He can also walk through stone walls! This is a bizarre bug I found many years ago. Just before leaving the Leprechauns' kingdom, have Graham duck, eat the magic mushroom, and then finally stand, which will revert Graham's sprite back to the normal view instead of mini-Graham. With the game thinking that you are still mini-Graham, you can walk through the wall to the west.
Medieval Flamethrower
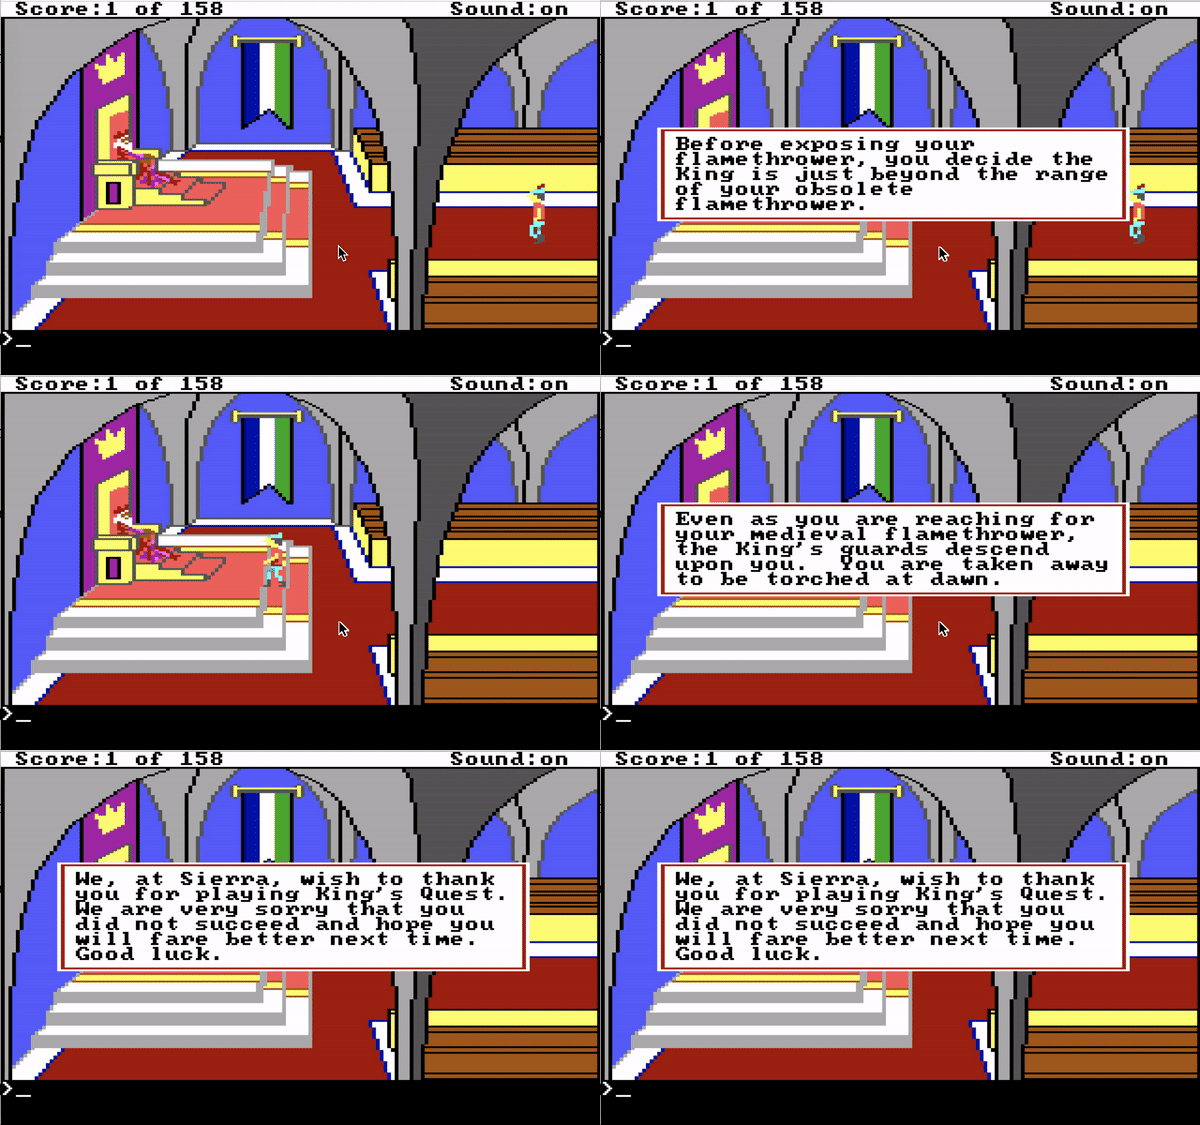
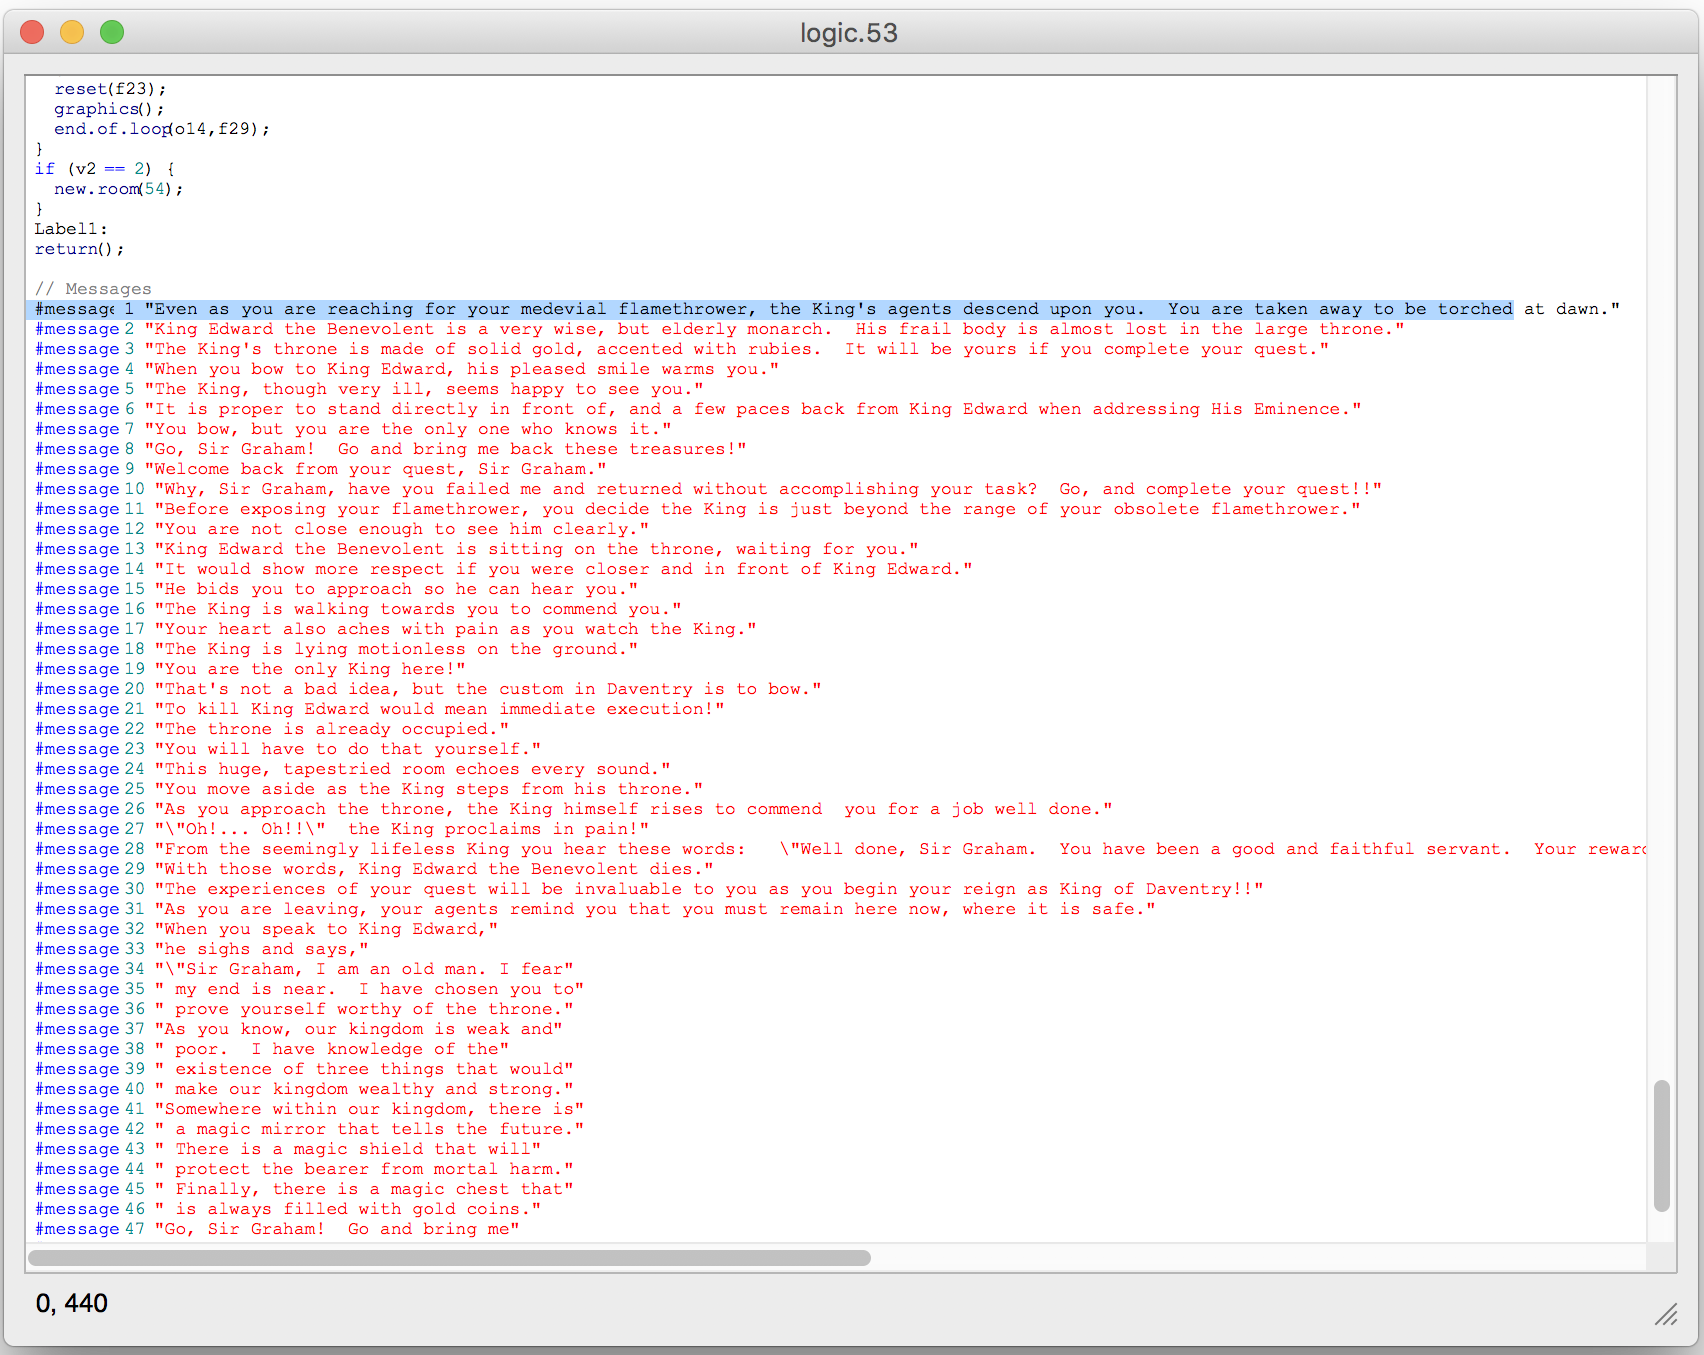
The above demonstration is not actually in the original King's Quest per se, but the lines about the medieval flamethrower were left over lines still left in the source code, as pointed out by The Cutting Room Floor. The screenshot below shows the messages for Room 53, the king's throne room, which includes a couple of unused messages.
Knight Rider Fan
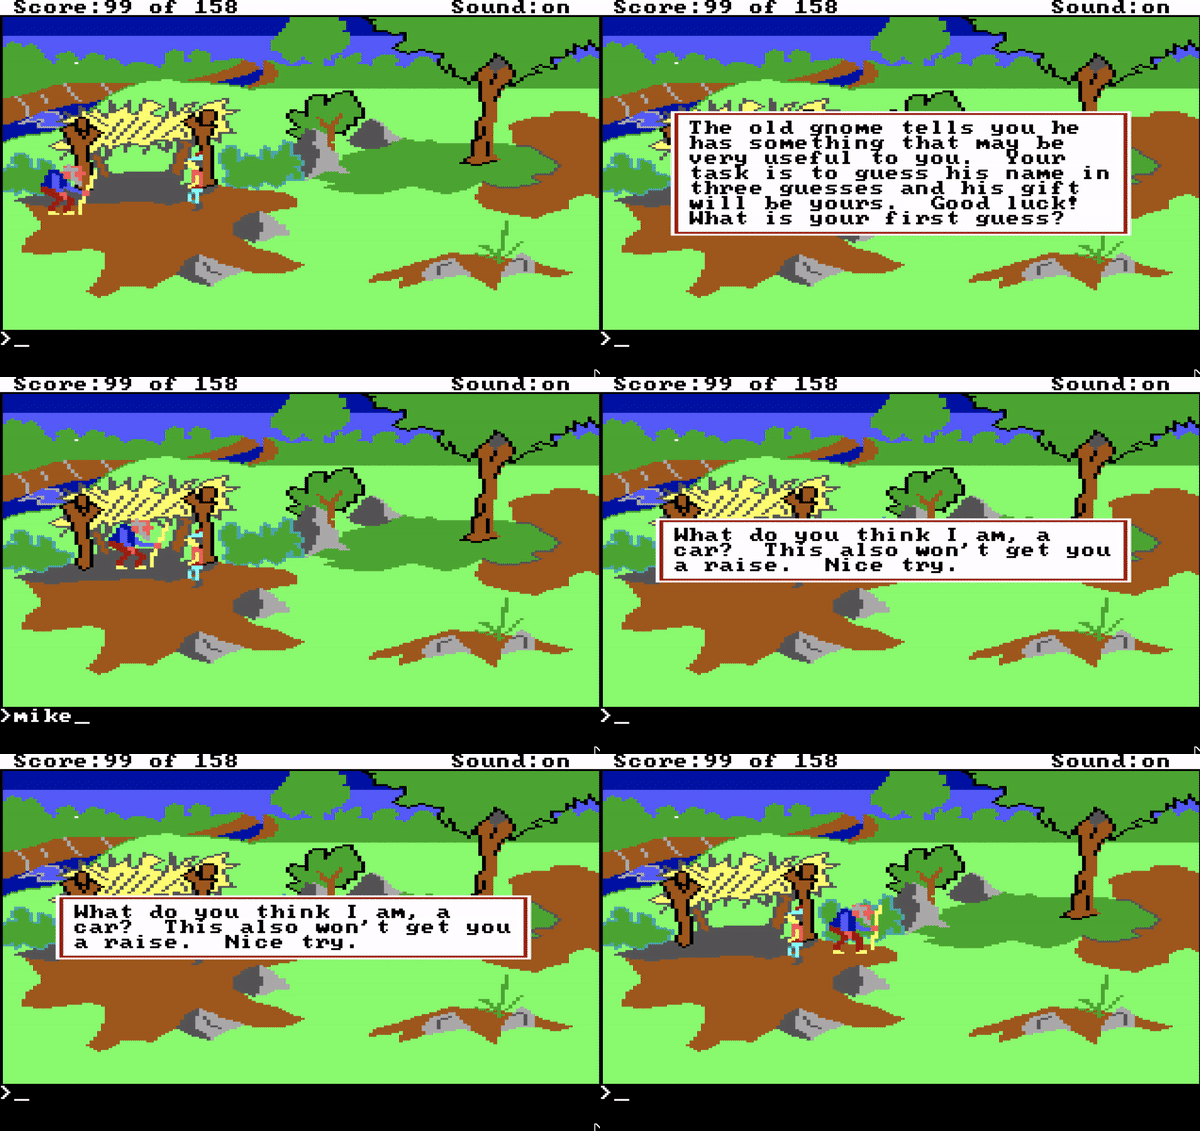
Figuring out the name of the gnome (ifnkovhgroghprm) in this game, was probably the most notorious of all of the puzzles (which was even poked at in the 2015 King's Quest game), but there was one other name which was added as a joke, a reference to the era in which this game was made. If you guess the name Mikel Knight, the gnome will respond, asking if you think he is a car. This is a not-so-subtle reference to Michael Knight, the main character of the TV show Knight Rider which aired from 1982-1986.
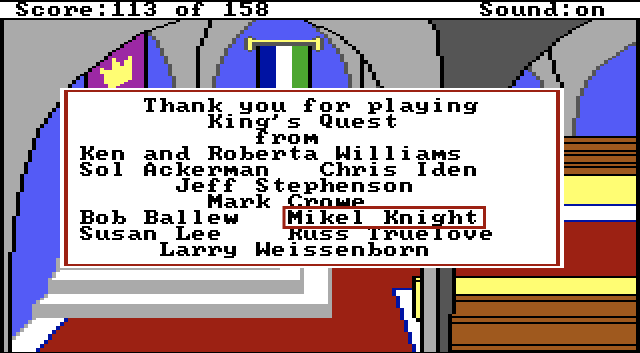
The name Mikel Knight makes one additional appearance in the end credits of the game, which initially made it appear that one of the developers was named Mikel Knight, but according to The Sierra Chest there was never a Sierra employee by that name.
Unsympathetic Troll
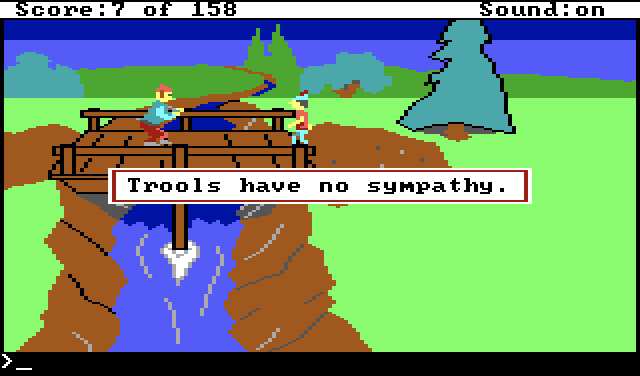
Sierra generally did an excellent job with proofreading 99.9999% of the time, but every once in a great while, a spelling error did manage to slip by. If you type beg troll at the east bridge leading to the gnome's island, the returned message says Trools have no sympathy.
Water For Alligators
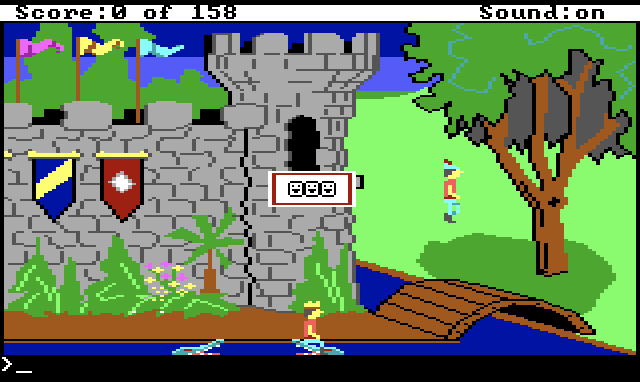
In this screenshot, Sir Graham watches as his doppelgänger King Graham rides an alligator. To reproduce this glitch, you will need to go into debug mode in the game, add the 26th object, which is water, but that object only appears in the game when you fill the water bucket, so when you try and "look" at the water without having the bucket, it creates this glitch.
- Type:
ALT + D to turn on debug mode
- Press
ENTER twice to dismiss the two messages
- Type:
GET OBJECT
- Type:
26
- Press
F4 and look at the WATER
Maximum Points
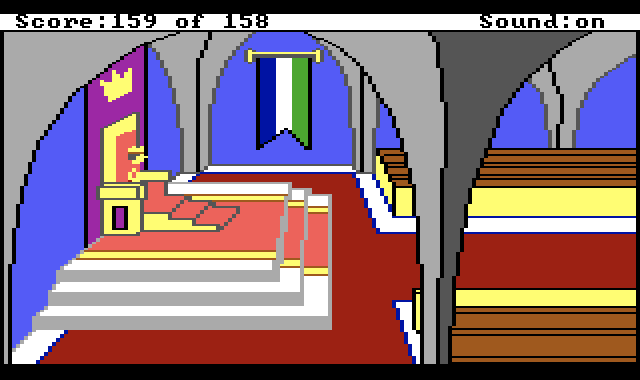
13 July 2019 Update: The maximum score in King's Quest 1 is 158 points, but there are two methods to be able to exceed this score. I reviewed a list of all of the possible points in KQ1 and if you do everything properly, you can get a score of 159 points. From a points list I found in an earlier edition of the King's Quest Companion, it appears that some points regarding the magic bowl had been changed over time, which results in a couple scoring oddities. If you want to get all of the possible points, here are a couple of easy to miss points:
- Make sure to bow to King Edward at both the beginning and end of the game.
- Look inside the stump which contains the pouch.
- Give the empty bowl to the woodcutter, then say the word
fill.
- Do not give away any of the treasure (e.g. gold egg, gold walnut, diamonds, sceptre, etc.) you find. That will result in losing points, whereas the "most correct" solution will gain points.
- After throwing the water at the dragon, go back up the well (which will refill the water in the bucket) and gain more points.
- Eat the witch's gingerbread house.
- This game generally favors non-violent actions, but pushing the witch into her oven will give you an extra 7 points.
- Guess the gnome's name (ifnkovhgroghprm) on the first try. Subsequent attempts will earn less points.
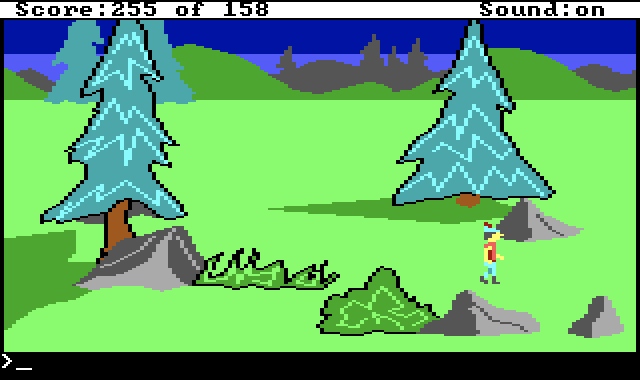
While inspecting the source code of King's Quest 1, I came across something I had never seen before. If you read the word on the bottom of the bowl, it will give you a single point, but if you then try and fill the bowl with stew, it doesn't give any additional points. Filling the bowl normally gives you two points. But if you eat the stew, it takes away two points, so if you perform the following steps properly, this will result in a net of -1 points.
- Get the bowl (3 points)
- Read the bowl (1 point)
- Fill the bowl (0 points)
- Eat the stew (-2 points)
- Keep repeating steps 2 - 4 until you have 255 points
If you repeat this enough times, the score will not become -1, but it will instead roll over to 255. The score is stored as an unsigned 8-bit integer, so none of the AGI games has a maximum score of more than 255. Instead of the score becoming a negative number, it will roll over to its maximum value (similar idea if an odometer could turn backwards).
Happy hunting!


