Edenwaith Blog
4th July 2020 | Permanent Eraser
Just three weeks since the last release, Permanent Eraser 2.9.0 has been released which focuses on several refinements and improvements for the app on macOS Mojave and Catalina. These resolved issues were discovered during the initial development of 2.9.0 (and subsequent development of 2.8.1). However, several of these issues (such as properly refreshing the progress indicator and preventing the "cannot check for malicious software" Gatekeeper warning on Catalina) required bumping up the minimum system requirements of the app which resulted in Permanent Eraser finally dropping support for PowerPC-based Macs.
For many years, I held off from dropping support for older computers and operating systems, especially since the primary function of Permanent Eraser is to securely erase files on mechanical hard drives, which are not so common these days. That was the primary reason that Apple removed Permanent Eraser from the Mac App Store, because this "could" cause harm to a person's computer, even though Permanent Eraser checks if a file is on an SSD, and if so, only erases the file once. However, changes in macOS Mojave and Catalina finally forced Permanent Eraser to upgrade a bit and drop support for PowerPC, 32-bit Intel (the earliest line of Intel-based Macs), and Mac OS X 10.5 Leopard.
What's new and improved in Permanent Eraser 2.9.0:
- Fixed progress indicator refreshing issue on macOS Mojave and Catalina.
- Fully Intel 64-bit, no longer runs on PowerPC or 32-bit systems.
- Adheres to Gatekeeper requirements on macOS Catalina.
- Tested on macOS Big Sur Beta 1 for potential issues.
- Note: Now requires Mac OS X 10.6 Snow Leopard or later.
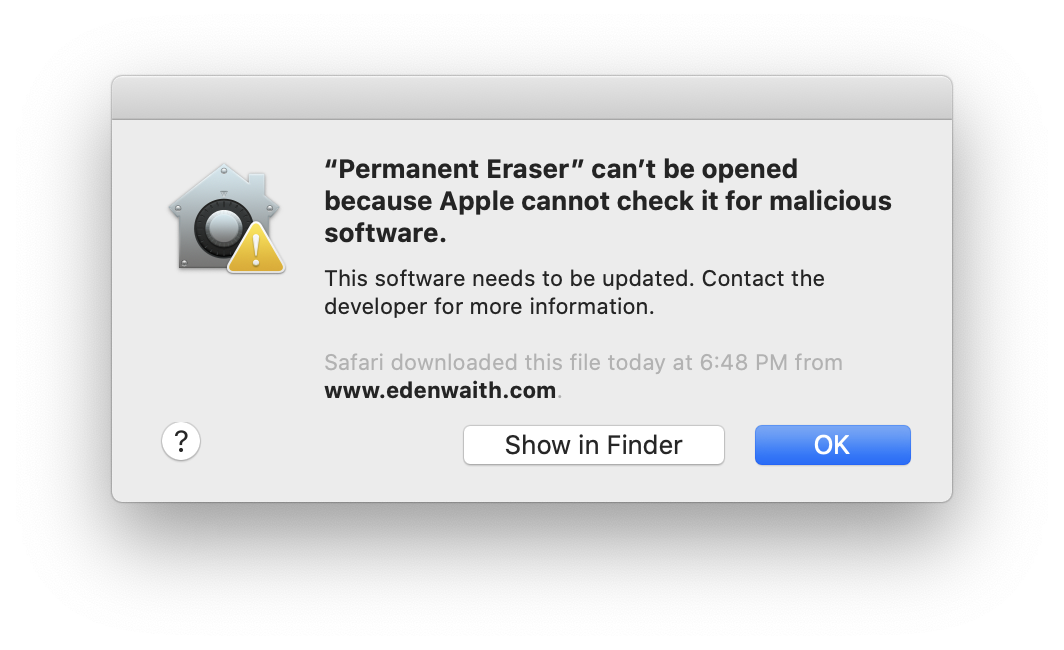
As mentioned in the release for Permanent Eraser 2.8.1, Gatekeeper on macOS Catalina was throwing an invalid warning error that said that Apple could not check Permanent Eraser for malicious software. This is the type of message I'd expect if Permanent Eraser had not been properly code signed and notarized, but Permanent Eraser 2.8.1 had both of those in place. Fortunately, with Permanent Eraser 2.9.0, this error went away. My assumption is that dropping support for PowerPC and 32-bit Intel corrected this particular problem. Despite Permanent Eraser being removed from the Mac App Store (MAS), the previous attempt to submit Permanent Eraser 2.8.1 to MAS did clue me in that Apple only wants 64-bit software now, no legacy software. This might be due to Intel will soon be the new legacy as Apple announced at WWDC 2020 that it will be switching Macs over to their own custom Arm-based processors, currently dubbed Apple Silicon.
Fifteen years ago we saw Apple begin the process to migrate from PowerPC processors to Intel. We are seeing the same song and dance, and even a lot of the same actors, such as Rosetta, coming back onto the scene. Will Permanent Eraser run natively on Apple Silicon? For the current iteration of Permanent Eraser, the answer is likely 'no'. I would not be surprised if all Arm-based Macs going forward will only be equipped with SSDs, and if this does occur, then there is little reason for Permanent Eraser 2 to support these particular Macs. However, Permanent Eraser 3 will likely support Intel and Arm-based Macs.
I did a little preliminary testing of Permanent Eraser 2.9.0 on the first beta of the next version of macOS: Big Sur. As should be expected with any beta, it has its rough edges, and I encountered a couple of areas which did not look correct.
- The icons in the Preferences toolbar did not display: I'm not certain if this is a change in using glyphs for the OS iconography, or an issue with the app that will need to be updated to adhere to the new style.
- The plug-in does not work and claims there is an issue with one of the Automator actions: Once again, this might be an issue with Big Sur being in beta. I will need to check with a later version of Big Sur to determine if Permanent Eraser will need to be updated or if this is a beta issue.
Considering there could be some potential issues with Permanent Eraser and macOS Big Sur, a patch release could still be in the future before Permanent Eraser 3 is released. But for now, Permanent Eraser 2.9.0 address the most egregious of issues encountered with macOS Mojave and Catalina.
Update - 18 July 2020
Permanent Eraser 2.9.1 has been released to address an occasional crash which could occur when erasing the Trash on macOS Mojave.
References
24th June 2020 | Apple

Another year, another update to the plethora of Apple's operating systems. This year's macOS release — Big Sur — certainly has some big changes, most notably the first version that will run on Apple's upcoming Apple Silicon processors. There was also a visual refresh, more akin to the jump from Mavericks to Yosemite than moving from Mac OS 9 to X.
Installing beta software is always risky, and already I've read of a couple accounts where people have tried to install Big Sur on either an external disk or on another partition and encountered some nasty surprises (including bricking the computer). For now, installing Big Sur under a virtual machine (VM) might be the safer way to go until the software hardens up. In this post, I'll go over the steps and issues I encountered with installing the first beta version of macOS Big Sur under VMWare Fusion 11.5.5.
Download macOS Big Sur
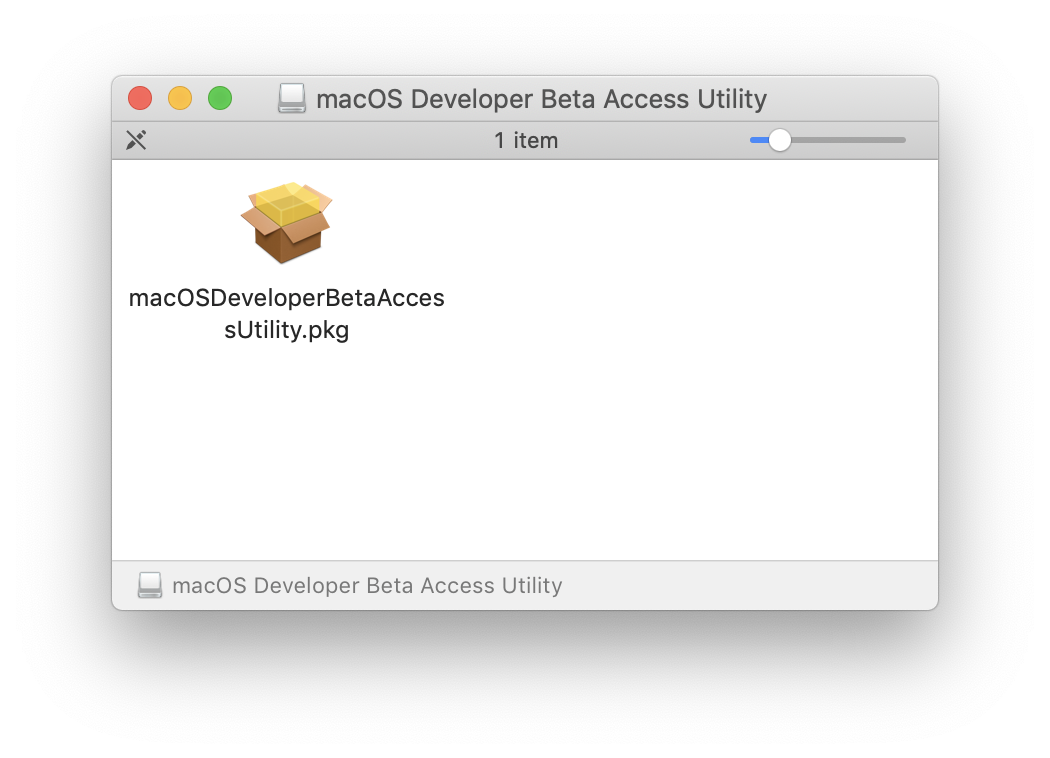
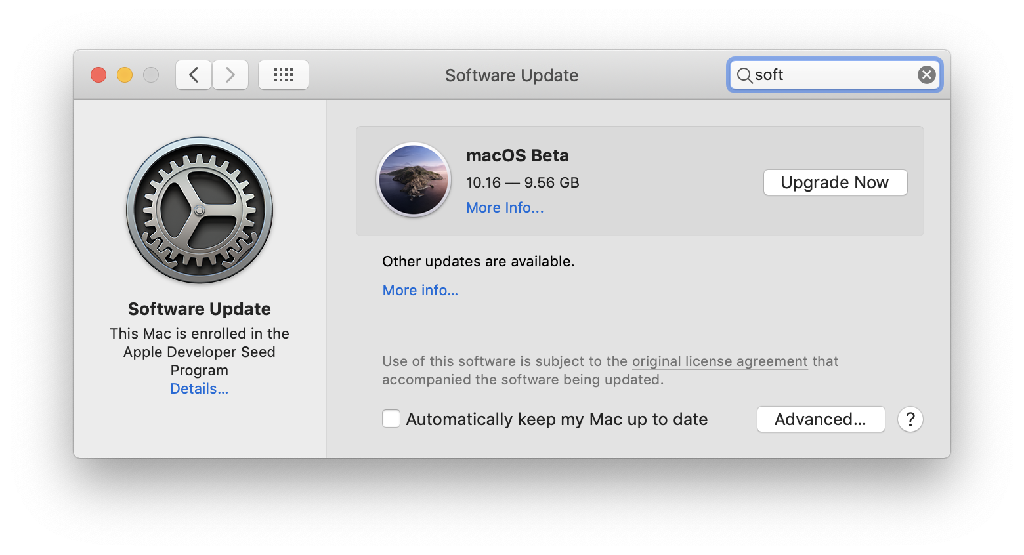
The first step is to get a copy of the software. Unfortunately, Apple doesn't make this as straightforward as just downloading a single file. Log in to Apple's developer portal and go to the beta applications downloads page. Click on the Install Profile button to download the macOSDeveloperBetaAccessUtility.dmg file. Open up the disk image and install the software. This will then allow you to download the beta version of Big Sur through the Software Update pane in System Preferences. Note how the window says macOS 10.16, yet Big Sur is actually version 11.0.
Creating a Big Sur ISO
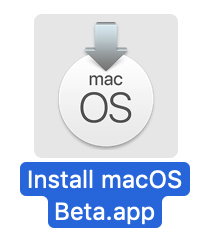
To install macOS in VMWare Fusion, we need to generate an ISO from the downloaded Install macOS Beta.app installer. The installer comes in at 9.57GB and another 22GB will be needed on top of another 60GB reserved for the VM.
// Create a DMG Disk Image
hdiutil create -o /tmp/BigSur -size 12000m -volname BigSur -layout SPUD -fs HFS+J

// Mount it to your macOS
hdiutil attach /tmp/BigSur.dmg -noverify -mountpoint /Volumes/BigSur

// Create macOS Big Sur Installer
sudo /Applications/Install\ macOS\ Beta.app/Contents/Resources/createinstallmedia --volume /Volumes/BigSur --nointeraction
On my first attempt, I initially reserved 10GB, expecting that would be large enough. Nope. That resulted in a "prelinkedkernel" error. Bumping things up to 11GB fixed the issue, though. I've seen some feedback mentioning that 11GB is not even enough, and it should now be 12GB.
// First attempt tried to make the volume sized at 10GB
% sudo /Applications/Install\ macOS\ Beta.app/Contents/Resources/createinstallmedia --volume /Volumes/BigSur --nointeraction
Password:
Erasing disk: 0%... 10%... 20%... 30%... 100%
Copying to disk: 0%... 10%... 20%... 30%... 40%... 50%... 60%... 70%... 80%... 90%... 100%
Making disk bootable...
Copying boot files...
Failed to copy boot file: “prelinkedkernel” couldn’t be copied to “PrelinkedKernels”.
The bless of the installer disk failed.

// Second attempt, successful at 11GB
% sudo /Applications/Install\ macOS\ Beta.app/Contents/Resources/createinstallmedia --volume /Volumes/BigSur --nointeraction
Password:
Erasing disk: 0%... 10%... 20%... 30%... 100%
Copying to disk: 0%... 10%... 20%... 30%... 40%... 50%... 60%... 70%... 80%... 90%... 100%
Making disk bootable...
Copying boot files...
Install media now available at "/Volumes/Install macOS Beta"
Next, I tried to unmount the Installl macOS Beta disk, but encountered some errors. I ended up having to force eject the volume from the Finder.
// Unmount Big Sur Disk
hdiutil detach /Volumes/Install\ macOS\ Beta
hdiutil: couldn't unmount "disk4" - Resource busy
The final step is to convert the disk image and rename it to an ISO file.
// Convert the DMG file to an ISO file
hdiutil convert /tmp/BigSur.dmg -format UDTO -o ~/Desktop/BigSur.cdr

Reading Driver Descriptor Map (DDM : 0)…
Reading Apple (Apple_partition_map : 1)…
Reading  (Apple_Free : 2)…
Reading disk image (Apple_HFS : 3)…
.....................................................................................................................
Elapsed Time:  1m 46.417s
Speed: 103.4Mbytes/sec
Savings: 0.0%
created: /Users/[username]/Desktop/BigSur.cdr

// Rename and Move to Desktop
mv ~/Desktop/BigSur.cdr ~/Desktop/BigSur.iso
Another Example
A helpful reader submitted this tip on what worked for them:
hdiutil create -o InstallMedia -size 20G -layout SPUD -fs HFS+J -type SPARSE

hdiutil attach InstallMedia.sparseimage -noverify -mountpoint /Volumes/install_build

sudo /Applications/Install\ macOS\ Big\ Sur\ Beta.app/Contents/Resources/createinstallmedia --volume /Volumes/install_build --nointeraction

hdiutil convert InstallMedia.sparseimage -format UDZO -o InstallMedia.dmg
Installing onto VMWare Fusion
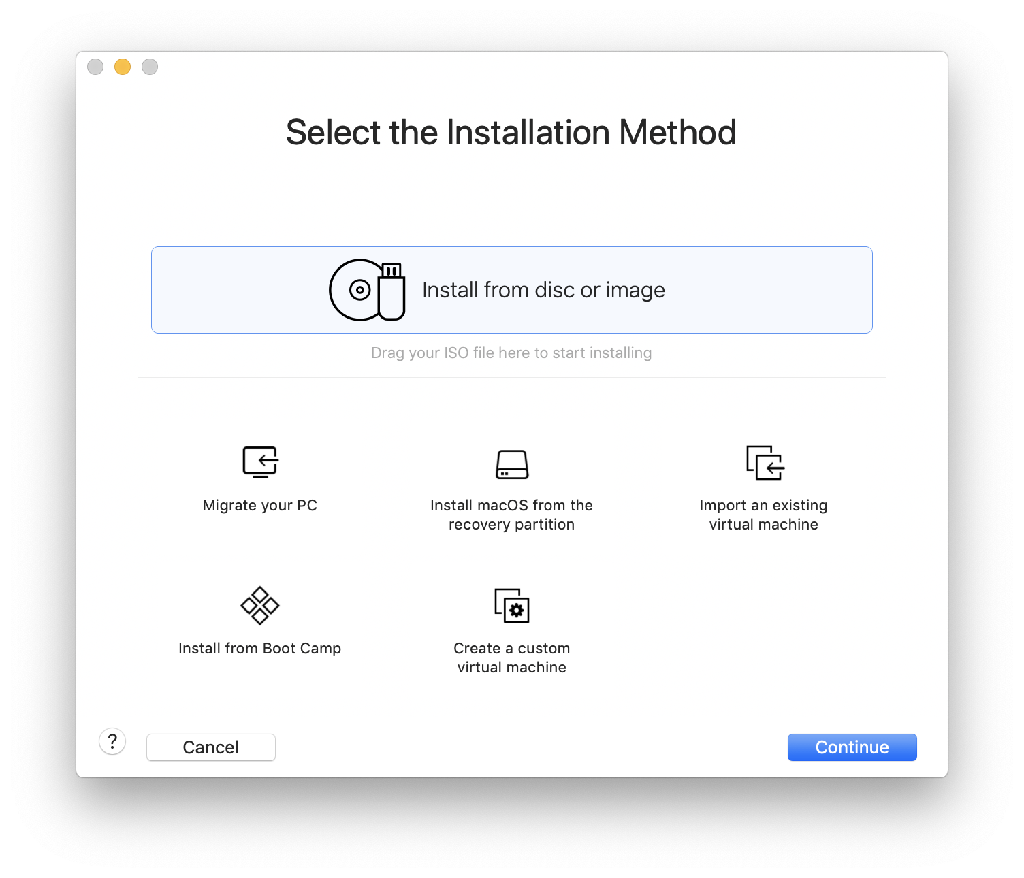
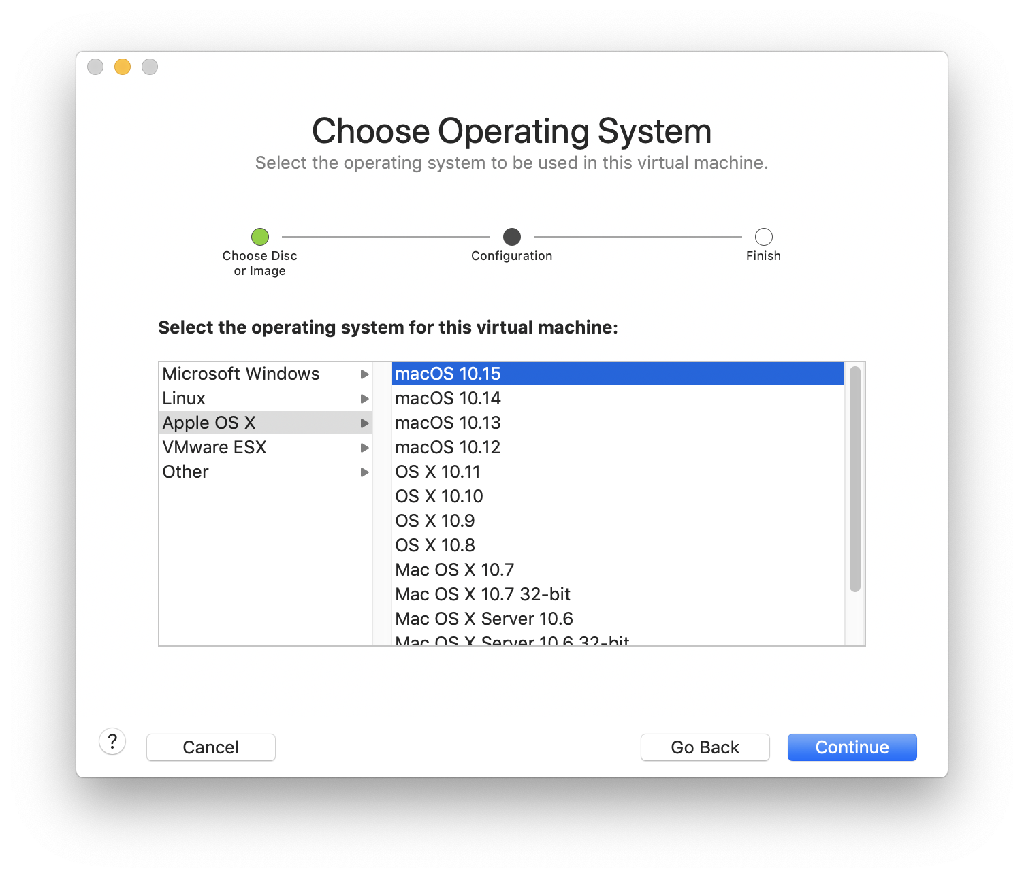
Now that we have an ISO of Big Sur, we can install it on VMWare Fusion. Start up VMWare Fusion, create a new VM (File > New...) then drag the ISO file onto the main window. Highlight BigSur.iso and click the Continue button. Since Big Sur is not recognized, just select macOS 10.15 for now.
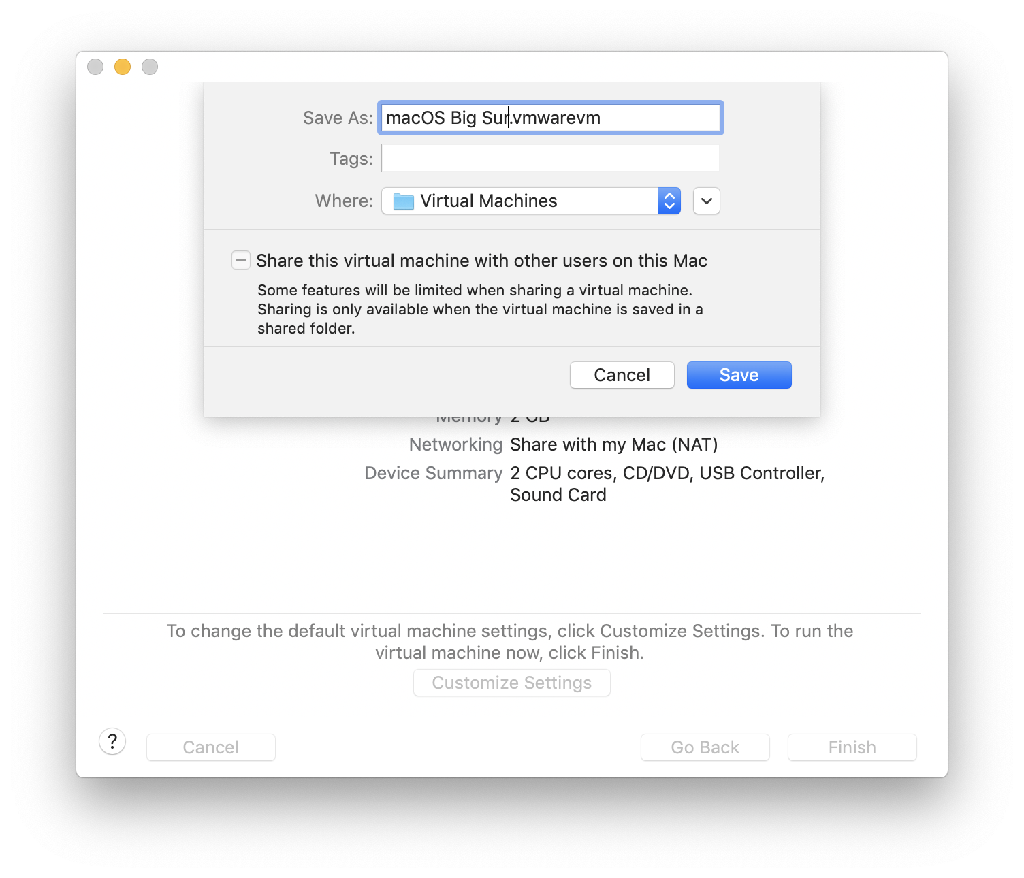
On the Finish screen, you can customize the settings, which only allows the rename of the VM file. We'll need to modify some other settings later in the process.
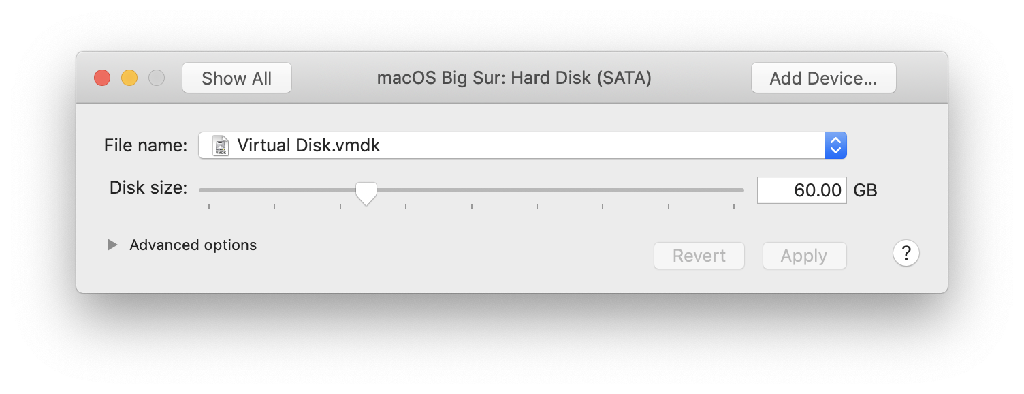
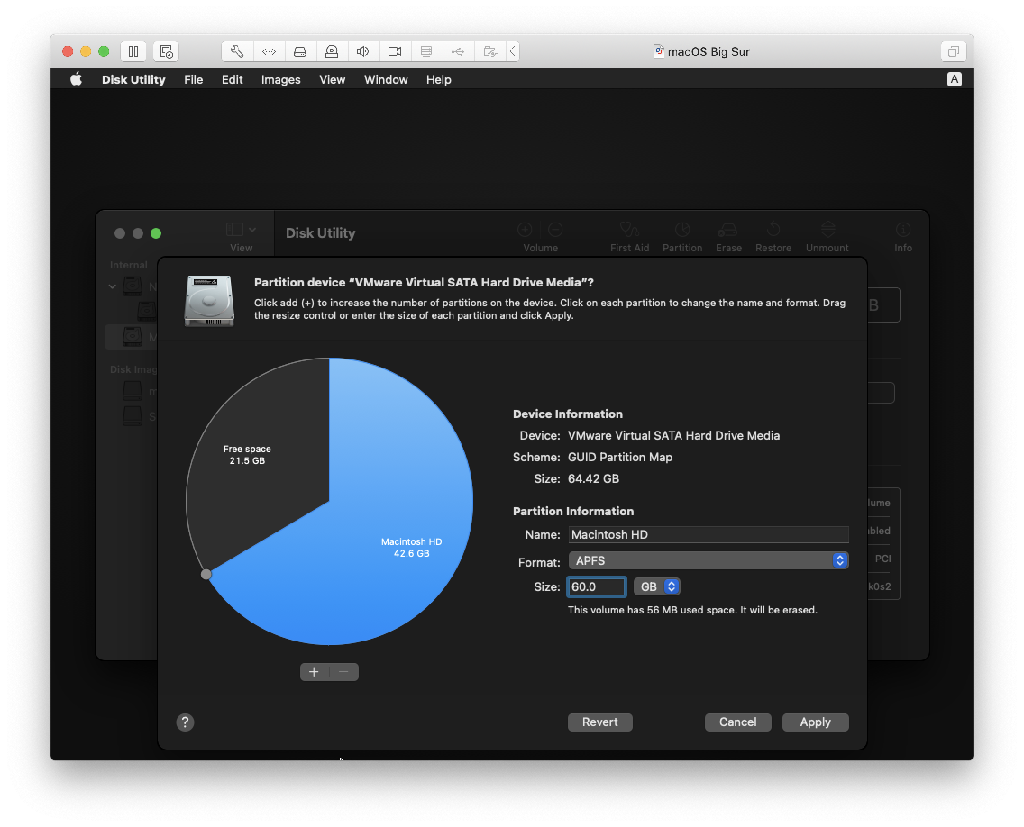
The first problem I encountered was that the default 40GB for the VM was not going to be large enough for macOS Big Sur. As the installation began, I went into the VM settings and changed the hard drive size up to 60GB. However, this isn't as easy or as straightforward as it should be. Another step will be needed to ensure that the VM is the proper size.
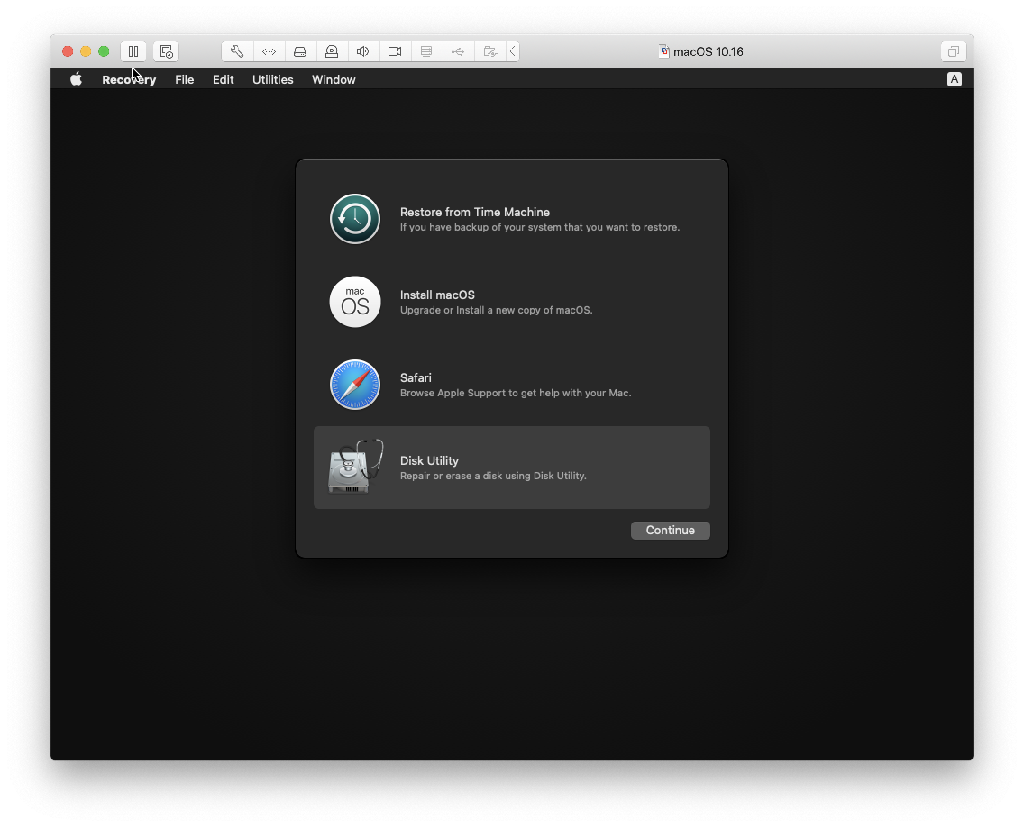
At the Recovery screen of the installation process, select Disk Utility before continuing the installation of Big Sur.
If Disk Utility still only shows ~40GB, shut down the installation process, make sure that the VM HD settings show at least 60GB, and restart the process. I also recommend bumping up the VM's RAM from the default 2GB.
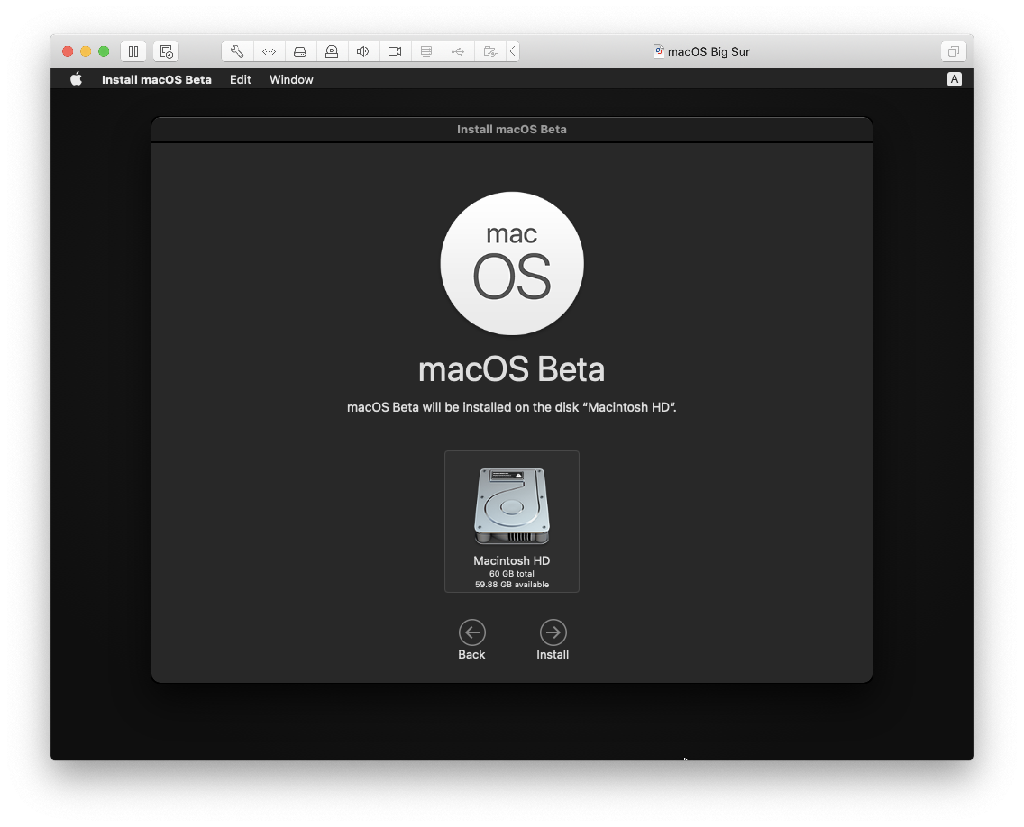
Now that the virtual drive's size has been increased, there should be enough space to install Big Sur. Quit out of Disk Utility and then click on Install macOS from the menu to continue the process to install the new operating system. I ran this on an iMac with a 2TB Fusion drive, so the install took awhile at times (and ran slower than a Mac SE), but it does give an early taste of the next version of macOS.
References
17th June 2020 | Permanent Eraser
I've had a tenuous relationship with the Mac App Store (MAS). The first version of Permanent Eraser to be released on MAS was 2.5.3 over eight years ago. When I tried to release version 2.6.0, it was rejected due to the optional plug-in (which was also present in the previous version). Since this was an important component to Permanent Eraser, I did not bother trying to release 2.6.0 on MAS. Years later I started getting reports from people that Permanent Eraser was not working for them, and I determined the issue was they were running the older MAS version of Permanent Eraser which encountered an issue on macOS Sierra due to that the srm utility had been removed from the operating system. Permanent Eraser 2.6.0 added a custom build of srm which allowed for alternate erasing patterns, but Permanent Eraser 2.5.3 still relied on the version of srm which had previously been supplied by the operating system. I ended up releasing Permanent Eraser 2.7.2 and 2.7.3 onto the Mac App Store without any memorable issues or complications. I did not bother releasing Permanent Eraser 2.8.0 on MAS since the new feature to be able erase protected files required authorization rights, which would not have been permitted in a MAS version of the app. This brings us up to the current version of Permanent Eraser.
Due to the issue where Permanent Eraser 2.8.1 was getting a Gatekeeper warning (Apple cannot check for malicious software) when launching in macOS Catalina, I decided that perhaps submitting the latest version of the app to the Mac App Store would be a workaround for this particular issue until I can resolve it.
It's been several years since the last Mac App Store version of Permanent Eraser and things have certainly changed in that time. Application Loader has been retired and has been replaced by altool and Transporter. The latter tool can upload ipa and pkg files, so I needed to bundle up the Mac app into a package. To do so, I packaged Permanent Eraser using the following (not entirely correct) command:
productbuild --component ./Permanent\ Eraser.app/ /Applications/ PermanentEraser.pkg
I then submitted the app via Transporter, and after a couple minutes of validation, it returned six errors.
ERROR ITMS-90237: "The product archive package's signature is invalid. Ensure that it is signed with your "3rd Party Mac Developer Installer" certificate."

ERROR ITMS-90240: "Unsupported Architectures. Your executable contained the following disallowed architectures: '[i386 (in com.edenwaith.mac.permanenteraser.pkg/Payload/Permanent Eraser.app/Contents/Library/Automator/Erase.action/Contents/MacOS/Erase), none (in com.edenwaith.mac.permanenteraser.pkg/Payload/Permanent Eraser.app/Contents/Library/Automator/Erase.action/Contents/MacOS/Erase)]'. New apps submitted to the Mac App Store must support 64-bit starting January 2018, and Mac app updates and existing apps must support 64-bit starting June 2018."

ERROR ITMS-90240: "Unsupported Architectures. Your executable contained the following disallowed architectures: '[i386 (in com.edenwaith.mac.permanenteraser.pkg/Payload/Permanent Eraser.app/Contents/Library/Automator/EraseFreespace.action/Contents/MacOS/EraseFreespace), none (in com.edenwaith.mac.permanenteraser.pkg/Payload/Permanent Eraser.app/Contents/Library/Automator/EraseFreespace.action/Contents/MacOS/EraseFreespace)]'. New apps submitted to the Mac App Store must support 64-bit starting January 2018, and Mac app updates and existing apps must support 64-bit starting June 2018."

ERROR ITMS-90240: "Unsupported Architectures. Your executable contained the following disallowed architectures: '[i386 (in com.edenwaith.mac.permanenteraser.pkg/Payload/Permanent Eraser.app/Contents/Library/Automator/EraseTrash.action/Contents/MacOS/EraseTrash), none (in com.edenwaith.mac.permanenteraser.pkg/Payload/Permanent Eraser.app/Contents/Library/Automator/EraseTrash.action/Contents/MacOS/EraseTrash)]'. New apps submitted to the Mac App Store must support 64-bit starting January 2018, and Mac app updates and existing apps must support 64-bit starting June 2018."

ERROR ITMS-90240: "Unsupported Architectures. Your executable contained the following disallowed architectures: '[i386 (in com.edenwaith.mac.permanenteraser.pkg/Payload/Permanent Eraser.app/Contents/MacOS/Permanent Eraser, com.edenwaith.mac.permanenteraser.pkg/Payload/Permanent Eraser.app/Contents/Resources/srm), none (in com.edenwaith.mac.permanenteraser.pkg/Payload/Permanent Eraser.app/Contents/Resources/srm)]'. New apps submitted to the Mac App Store must support 64-bit starting January 2018, and Mac app updates and existing apps must support 64-bit starting June 2018."

WARNING ITMS-90788: "Incomplete Document Type Configuration. The CFBundleDocumentTypes dictionary array in the 'com.edenwaith.mac.permanenteraser' Info.plist should contain an LSHandlerRank value for the CFBundleTypeName 'All' entry. Refer to https://developer.apple.com/library/archive/documentation/General/Reference/ InfoPlistKeyReference/Articles/CoreFoundationKeys.html#//apple_ref/doc/uid/TP40009249-SW1 for more information on the LSHandlerRank key."
Lovely. Fortunately, most of these issues were relatively easy to fix.
Code Signing a Package
For the first issue, I originally thought it was questioning which certificate I used to sign the app. My code signing of the app was correct, it was code signing the package file which I forgot to do. I logged into the Apple Developer portal and created a new Mac Installer Distribution certificate which I could use to properly sign the pkg file. Once I had the new certificate, I then built and signed the package:
productbuild --component ./Permanent\ Eraser.app/ /Applications/ PermanentEraser.pkg --sign "3rd Party Mac Developer Installer: John Doe (12AB34567C)"
Removing the Fat
For years, Apple has been heavily "encouraging" developers to ensure that their software is entirely 64-bit compliant. Things ultimately came to a head with the release of macOS Catalina which disallowed any 32-bit software and brought about the end to older applications and frameworks. Current trending predictions are that Apple will soon announce that they will be transitioning their Macs over to ARM processors, and if so, the movement towards 64-bit software might have been part of a multi-year plan.
Four of the warnings complain about the presence of any non-64 Intel architectures. There are two different command line tools which can be used to see what architectures are present in a binary: file and lipo. The following displays what architectures were present in the secure removal utility srm:
% file srm
srm: Mach-O universal binary with 4 architectures: [ppc_7400:Mach-O executable ppc_7400] [x86_64:Mach-O 64-bit executable x86_64]
srm (for architecture ppc7400):	Mach-O executable ppc_7400
srm (for architecture ppc64):	Mach-O executable ppc64
srm (for architecture i386):	Mach-O executable i386
srm (for architecture x86_64):	Mach-O 64-bit executable x86_64

% lipo -info srm
Architectures in the fat file: srm are: ppc7400 ppc64 i386 x86_64
The results show that srm contained four architectures, two for PowerPC (ppc7400 and ppc64), and two for Intel (i386 and x86_64). To remove the unwanted architectures, we use lipo, a utility which does what it sounds like: it sucks out the fat from a fat binary.
% lipo -remove ppc7400 srm -o srm
% lipo -remove ppc64 srm -o srm
% lipo -remove i386 srm -o srm
% lipo -info srm
Architectures in the fat file: srm are: x86_64
After this "surgery", srm has been slimmed down so it now only contains the 64-bit Intel architecture.
LSHandlerRank
The last issue was relatively trivial, but did require a bit of research to determine how I was going to fix the issue. I ultimately just needed to add the LSHandlerRank key-value pair in the app's Info.plist file. As things change over time, Apple's requirements and expectations have, as well, including minor issues such as this.
<key>CFBundleDocumentTypes</key>
<array>
	<dict>
		<key>CFBundleTypeExtensions</key>
		<array>
			<string>*</string>
		</array>
		<key>CFBundleTypeName</key>
		<string>All</string>
		<key>CFBundleTypeOSTypes</key>
		<array>
			<string>****</string>
		</array>
		<key>CFBundleTypeRole</key>
		<string>Editor</string>
		<key>LSHandlerRank</key>
		<string>Alternate</string>
	</dict>
</array>
Now that I had fixed these six issues, I resubmitted the build, and it passed the automatic verification step. Next came the real fun: the App Review.
App Review: Round 1 - Prepopulating the Full Disk Access List
One thing I found recently is that reviews for Mac apps tend to occur within a couple of hours of being submitted during the weekdays, whereas an iOS app can take around a day (which is still far better than the 10-14 day review process it used to take). So I ended up getting my first reviewer rejection fairly quickly.
Guideline 2.1 - Performance
We discovered one or more bugs in your app when reviewed on Mac running macOS 10.15.4.
Specifically, your app does not display in the Full Disk Access menu to be enabled for use.
In my initial testing of Permanent Eraser 2.9.0 (which predated PE 2.8.1), I saw Permanent Eraser listed in the Full Disk Access list, but in later builds of Permanent Eraser 2.8.1, I was no longer seeing that listed. To detect if Full Disk Access needed to be enabled, I checked to see if the user's Trash could be read. If not, then I assumed that Full Disk Access was not enabled. The extra trick here is that the code needs to try and access the contents of the Trash to act as the trigger so that Permanent Eraser would be pre-populated in the Full Disk Access list.
Once I updated my code, I submitted the app again.
App Review: Round 2 - Rejected for the Help Files
Design Preamble
The user interface of your app is not consistent with the macOS Human Interface Guidelines.
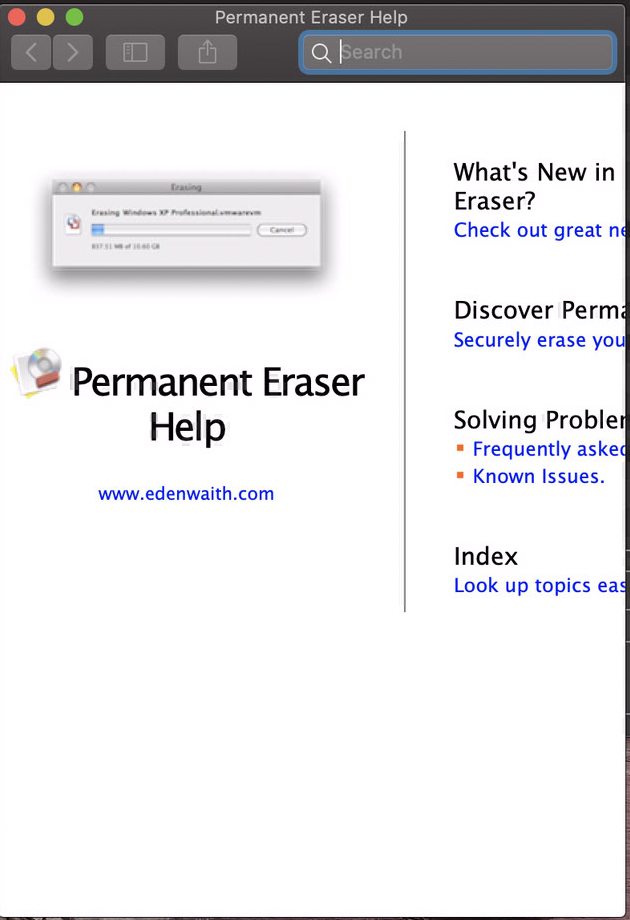
Specifically, we found that the content gets cut off when resizing the app window to a smaller size. When resizing it to the minimum size, the content disappears.
Upon initially reading this rejection, I was confused. The Permanent Eraser window does not resize, so I did not understand what their complaint would be or how the app was not adhering to good HIG. Fortunately, a screenshot was attached...of the help viewer. Since Catalina displays a more narrow help viewer window, the landing page of the help files were cut off on the right (but easily visible by resizing the window). I rejected this rejection and notified the reviewer that this was not a valid complaint and that these help files are based off of one of Apple's own templates! Still, I begrudgingly acquiesced and updated the main help page. Fortunately, my past experience as a web developer came in handy as I made some small updates to the page so it would flow better with smaller display ports. It was a ridiculous reason to reject the app, in my opinion, but I continued to play ball with Apple and made the necessary changes before submitting another build.
App Review: Round 3 - Potentially Harmful
Guideline 2.4.2 - Performance - Hardware Compatibility
Your app contains features, which when used, may cause damage to the user's device.
Specifically, your app overwrites data numerous times in order to "securely erase" it.
You know that scene where Clark Griswald goes on a swearing rant and eventually asks where the Tylenol is? I was definitely feeling those vibes by this point. Now the app was getting rejected for its primary purpose to securely erase files! I carefully explained to the reviewer that the app does not overwrite data numerous times on newer SSDs (which is effectively pointless), and that functionality is reserved for mechanical hard drives. I pointed out that this safeguard has been in Permanent Eraser for the past eight year since version 2.6.0. The following is even stated in the help files:
Per Permanent Eraser's help files: "Files which reside on a Solid State Drives (SSD) will only be overwritten once, due to the wear leveling technique used by SSDs when writing to the drive."
Despite my appeal, Apple continued to reject the app. However, a subsequent response did at least reveal a little bit more information.
Guideline 2.4.2 - Performance - Hardware Compatibility
Your app contains features, which when used, may cause damage to the user’s device.
Specifically, your app securely erase files from system.
Additional Notes:
There was a Policy change regarding file erasing apps since your last update.
Considering that any other file erasing app listed on the Mac App Store hadn't been updated in at least a year, I wouldn't be surprised if this was a new policy that was instituted, but never clearly defined or announced. This hinted that Apple had "altered the deal" once again, but without explicitly dictating what and why they were rejecting apps like Permanent Eraser.
Even after I explicitly described (and showed the documentation) that PE does not perform multiple overwrites of files which are on SSDs, they continued to reject my submission. I can understand why Apple no longer supports secure file erasing and removed it from macOS several years ago, their deafness to developers has been incredibly frustrating and infuriating.
While the Mac App Store version has never been my main focus, it has been frustrating to see that Apple has continued making the Mac more and more restrictive and frustrating to develop for. By this point, I was resigned that Permanent Eraser 2.8.1 was not going to make it into the Mac App Store.
App Review: Final Round - Threatened App Removal
A day after the last rejection, I got this "Policy Notification" from Apple:
From Apple
2.4.2 - Efficient power use
Please review this information carefully as it impacts your app’s availability on the App Store and requires your immediate action.
Hello,
We are writing to let you know about new information regarding your app.
Upon re-evaluation, we found that your app is not in compliance with the App Store Review Guidelines. Specifically, we found your app is in violation of the following:
Guideline 2.4.2 - Performance - Hardware Compatibility
Your app contains features, which when used, may cause damage to the user's device.
Specifically, your app overwrites data numerous times in order to “securely erase” it.
Next Steps
To resolve this issue, please revise your app to remove any feature that may result in damaging the user's device. Apps should not rapidly drain the device battery, generate excessive heat, or put unnecessary strain on device resources – this includes cryptocurrency mining in the background or in third-party advertisements.
To ensure there is no interruption of the availability of your app on the App Store, please submit an update within two weeks of the date of this message. If we do not receive an update compliant with the App Store Review Guidelines within two weeks, your app will be removed from sale. Please note, if your app is found to be out of compliance for any reason and rejected after the time period provided has elapsed, your app will be removed from sale until a compliant update is submitted, approved and released to the App Store.
In order to return your app to the App Store, you will need to submit an updated version for review which addresses these issues.
If you have any questions about this information, please reply to this message to let us know.
Best regards,
App Store Review
Ever had those moments when someone spits in your face, and then later follows up with a kick to the teeth? I'd probably be more insulted by this backhand from Apple if I hadn't already accepted that an update to Permanent Eraser in the Mac App Store was a lost cause by this point.
Right now, I am far from the only one right now having a dispute with Apple and their app store policies. Fortunately, Permanent Eraser has a better alternative as an independent app which does not need to be as restrained by the Mac App Store guidelines. If Permanent Eraser had been an iOS app undergoing such scrutiny, the only options would be change or die.
If Apple makes good their promise/threat, I expect that Permanent Eraser will be removed from the Mac App Store soon. What I will find more interesting will be if Apple will update their guidelines to explicitly forbid file erasing utilities and if they will also remove other similar apps (a quick search for "file shredder" comes up with 13 different apps on the Mac App Store).
Will Permanent Eraser ever return to the Mac App Store? I have some grand plans for what I'd like to include in Version 3, but depending on how much more Apple continues locking down the Mac, it could severely limit the effectiveness of Permanent Eraser, especially if its capabilities continue to be limited under the Mac App Store restrictions. When Permanent Eraser 3 is released, I'll then evaluate whether it might be a candidate for the Mac App Store, or if it is best left roaming outside of that walled garden.
Even if Permanent Eraser's involvement with the Mac App Store comes to an abrupt end, its progress will continue. Permanent Eraser 2.9.0 is intended as a fast(ish) follow up which will address an animation issue on macOS Mojave and Catalina, and will also take a look at macOS 10.16 which is expected to be announced in several days at WWDC 2020.
References
16th June 2020 | Permanent Eraser
Plans are meant to provide guidance and direction, but even with the best of intentions, they can be led astray. When Permanent Eraser 2.8.0 was released, the original intention was that 2.8 was going to be the last significant release of the app until 3.0 was completed. Unfortunately, changes in the latest two versions of macOS (Mojave and Catalina) have caused numerous issues with Permanent Eraser which needed to be addressed first before moving onto the more grander ambitions of the next major version. Numerous people have written in to mention that Permanent Eraser was having issues on macOS Catalina, especially regarding erasing the Trash. After some investigation I discovered that Apple has further increased their security measures, which included locking down the Trash. To allow Permanent Eraser the ability to once again erase files from the Trash, the user needs to enable Full Disk Access. Permanent Eraser 2.8.1 is intended as a stopgap measure to help address some of the most egregious issues with Catalina and Mojave.
- Updated for better compatibility with macOS Catalina and Mojave.
- Updated Help files to instruct how to enable Full Disk Access and Automator Actions.
- Code signed and notarized for macOS Catalina.
- Updated app icon for non-retina displays.
- Tested and verified for macOS Mojave and Catalina.
Several weeks ago, I was doing some final testing and was just about ready to release Permanent Eraser 2.8.1. I had tested across a variety of systems from a PowerBook G4 running Mac OS X Leopard to an iMac running macOS Catalina, and things were looking good for the most part. Then Murphy’s Law inevitably interceded...
On macOS Catalina, I downloaded the DMG containing the final version of Permanent Eraser, and when I opened the app, this message appeared.

One of the key things I focused on with this release was adhering to Apple's increased security, which meant code signing and the new notarization process. I had already notarized a number of games and EdenMath 1.2.2, none which had encountered this particular issue. I performed the standard checks and verified that the app was properly code signed and notarized, yet Gatekeeper was being fiendish and elusive in its reasons for suspecting that something wasn't quite proper with the app.
I checked through the console logs, particularly looking for anything mentioning Xprotect which might give me a hint why I was getting this error. Unfortunately, I still have not resolved this particular issue, which caused me to pause on releasing the app for two weeks. However, if you are using Permanent Eraser 2.8.1 on Catalina and receive this error, right-click on the app and select Open and follow the steps to allow Permanent Eraser to be opened. This is an issue I'm going to continue investigating to try and correct for Permanent Eraser 2.9.0.
In my investigations to determine why Catalina's Gatekeeper was complaining, I did learn something new in the process. Disk images (dmg) can also be code signed and notarized, not just apps and packages.
codesign --force --sign "Developer ID Application: John Doe (12AB34567C)" <pathToDMG>

spctl -a -t open --context context:primary-signature -v <pathToDMG>
The original plan was to release PE 2.9.0, until I realized that to fully implement all of the improvements would require a little more effort than I had originally expected. As I was working through the set of issues which PE was having on newer versions of macOS, I had resolved most of them, but one issue was still prominent: the progress bar was not updating properly, and this was especially noticeable on Catalina and Mojave. The progress bar might make an initial jump, but then it wouldn’t move much (if at all) until it was done erasing. I researched this issue and discovered a way to resolve it, but it required using newer technology (hello GCD!) than what the base version of PE could provide.
I have always tried to support as many versions of macOS as possible and have always been cautious about raising the base minimum for my apps. However, in this case, there are likely more people using macOS Mojave and Catalina than are using Leopard, so to resolve some of the most egregious issues on Catalina, I’ll need to finally drop support for Mac OS X Leopard and PowerPC processors. It’s been a great run, and I held off as long as possible, but that time has come to an end. PE 2.8.1 is final gift for older versions of macOS/OS X/Mac OS X, especially those that might still be running on a PowerPC processor.
When I was starting work on PE 2.9.0, I initially imported it into Xcode 11, and encountered a lot of deprecation warnings in my code. This is yet another sign of the times that the next major version of Permanent Eraser will be a massive rewrite to bring PE into the modern age. There are many parts of PE’s code which are still original from 17 years ago, and the way it was originally architected shows. That the app still manages to run on modern systems is a small miracle in itself, especially considering how Apple tends to force developers to continually keep up with the "latest and greatest."
So much of the code has become deprecated over the years, that it is certainly tempting to throw away every line of Objective-C code and start fresh with Swift. To Objective-C's credit, though, the language has remained fairly stable, even with the additions of Objective-C 2.0 and ARC, unlike the rapid mutations that Swift underwent for its first couple of years. Hopefully Swift (currently at version 5.2) will remain relatively stable so any future updates won't require a bunch of unwanted maintenance just because the language changed again.
Regarding app rewrites: I eventually did an entire rewrite of the iOS version of EdenList because there had been so many changes in iOS development since EdenList's release in 2010, that I could no longer make changes to the original code without something breaking. That forced my hand to perform a complete rewrite of the app. EdenList is only a couple thousand lines of code and is a fairly simple iOS app. Permanent Eraser is far larger and more complex, so I imagine rewriting and reworking the app will take a significant and focused effort. However, it is not just rewriting the app which will be so time consuming, but the addition of many new features I’d like to include into the app.
Next up will be Permanent Eraser 2.9.0 and reasons why it won't be available on the Mac App Store.
References
13th June 2020 | Programming

One of the most derided and cringe-worthy lines squawked by Cedric the Owl in King's Quest 5 was "Graham, watch out! A poisonous snake!" However, this was not the first time that a King's Quest game misused the term "poisonous" to describe a "venomous" snake. In King's Quest 2, a "poisonous viper" is obstructing King Graham from obtaining one of the golden keys. I thought it would be fun to hack the game and actually make the snake "poisonous".
Using AGI Studio, I opened up the 56th LOGIC file, which is the source code for the screen on the plateau with the snake. I first started by making a small change to the initial message to mirror Cedric's warning:
if (!isset(f108) &&
  !isset(f109) &&
  !isset(f110)) {
  print("Watch out! A poisonous snake!");
}
A poisonous snake would only be lethal if consumed, especially if it secreted a toxic substance which would be deadly to intrepid adventurers. Instead of letting the snake get a taste Graham, let's let Graham get in his own "licks". Since the Sierra games of the 80s were parser-driven, there is a dictionary of words that the game understands. In King's Quest 2, there are up to 255 word groups. Each word group can contain multiple terms which are similar in meaning. A person might type "get rock" or "take stone", and the game would (or should) understand that both phrases mean the same thing.
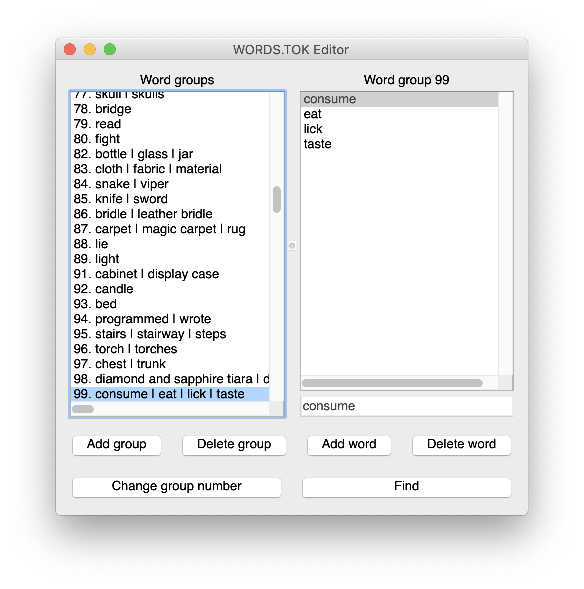
Once again, using AGI Studio, I opened up the WORDS.TOK file (where all of the tokenized words reside), and searched for the word "eat". It initially found the phrase "leather bridle", which does contain the string "eat", but not quite what I was originally looking for. Continuing the search brought up the "consuming" word group which contained the words "consume", "eat", and "taste". I then added the extra word "lick" to this group and saved the changes to WORD.TOK. Now the game will understand the word "lick".
The final piece of this playful hack is to add the code to allow Graham to lick the "poisonous" snake. At line 10, add the lines:
load.view(92);
load.view(91);
This code pre-loads the two views #92 and #91, which are Graham's choking animation and his death sprite, respectively. Next, at line 85 in the file logic.056 I added the following code.
if (said("consume","snake")) {
  if (isset(f31)) {
    print("You bend over and lick the poisonous snake.");
    set(f147);
    get.posn(o0,v67,v68);
    if (v68 < 45) {
      v67 = 0;
      v68 = 5;
      reposition(o0,v67,v68);
    }
    program.control();
    set(f92);
    set.view(o0,92);
    v94 = 3;
    cycle.time(o0,v94);
    end.of.loop(o0,f93);
  }
}

if (isset(f93)) {
  set.priority(o0,15);
  set.view(o0,91);
  set(f50);
}
There are two parts to this chunk of code. The first part checks to see if the player typed in some variant of "consume snake" such as "lick snake", "eat viper", "taste snake", etc. When this happens, the game then loads in view #92 to display Graham choking after licking the poisonous snake. Once the animation completes, flag f93 is set. After the game interpreter loops again through the script, it will come across the second part of this code snippet since the f93 flag has been set. Graham's character is then swapped from the choking animation to the death sprite (View #91). Finally flag f50 is set, which triggers the death sequence.
Happy hacking and watch out for those "poisonous" snakes!
References
26th April 2020 | EdenList
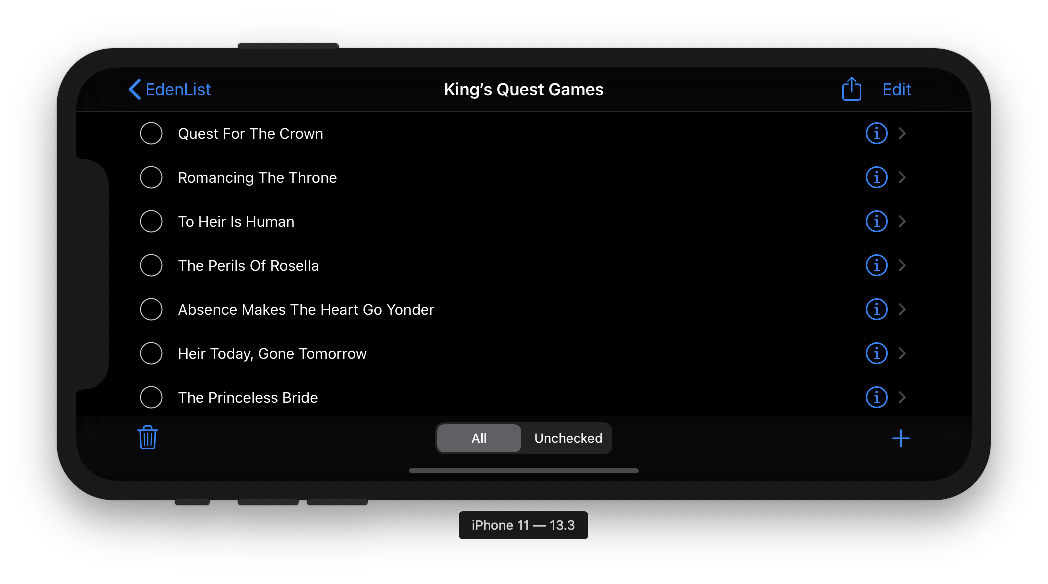
A small update for EdenList for iOS has been released which corrects a couple of UI issues for Dark Mode and verifies that the app works properly on iPad OS 13.4.
- Dark Mode and UI improvements
- Verified and tested for iPad OS 13
26th April 2020 | Permanent Eraser
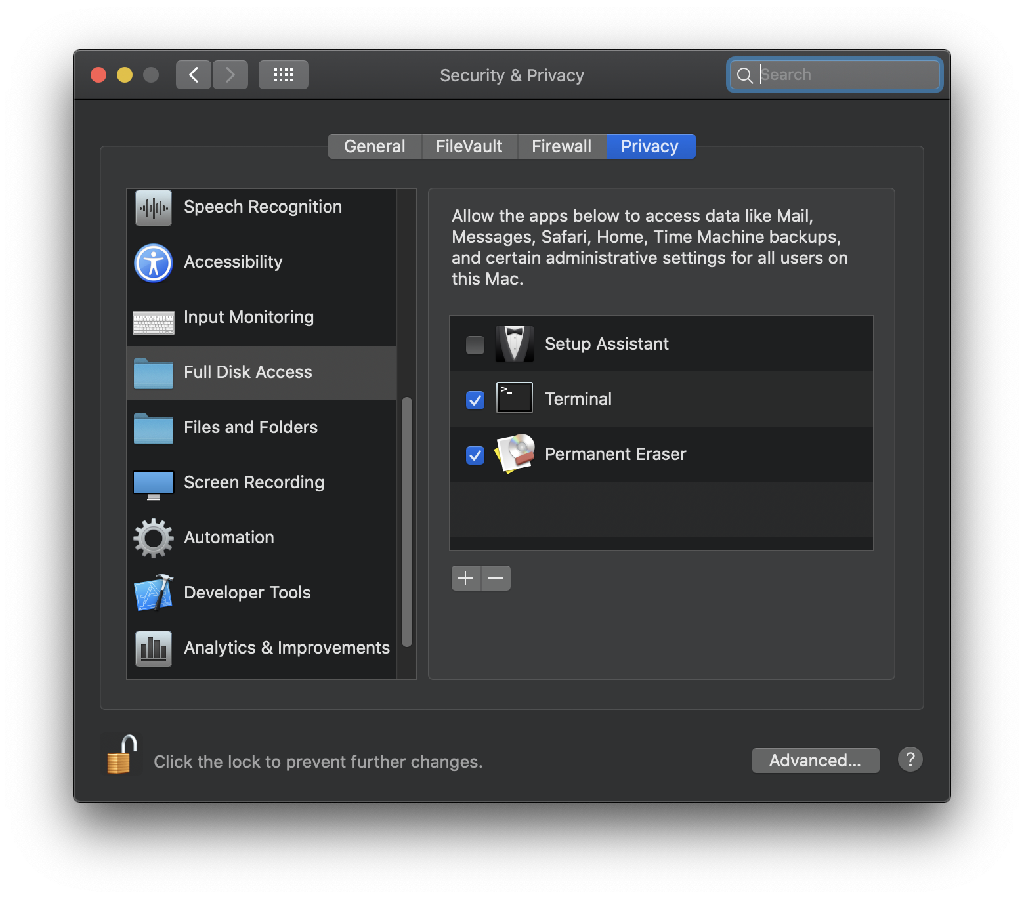
As with the previous iteration of macOS, Catalina has increased its security measures, which has caused complications with existing software. I have received numerous reports that Permanent Eraser is not fully functional under macOS Catalina, primarily with erasing the contents of the Trash (however, individual files which are not in the Trash can still be erased). The primary cause for this issue is that Full Disk Access is required for apps (such as Terminal or Permanent Eraser) to access the contents of the Trash. Since Permanent Eraser was not able to find the contents in the Trash, it was not erasing anything. The following steps detail how to enable Full Disk Access for Permanent Eraser so it can erase files from the Trash in Catalina:
- Open up the System Preferences (
> System Preferences)
- Select the Security & Privacy pane.
- Click on the Privacy tab.
- Click on the lock in the bottom-left corner and type in your administrator credentials to unlock it.
- Select the Full Disk Access option in the left pane.
- Click on the + button and add Permanent Eraser to the list of approved applications for Full Disk Access. Make sure that the checkbox to the left of Permanent Eraser is checked.
- Close the System Preferences window
These steps will resolve the largest problem Permanent Eraser has on macOS Catalina, but an update is in the works to resolve other smaller issues Permanent Eraser has with Catalina.
18th April 2020 | Games
During the 1980s, there was a plethora of competing computer systems (Atari, Apple ][, DOS, Macintosh, Amiga, etc.), which was instrumental in encouraging Sierra On-Line to develop their AGI and SCI game engines to support many of these systems. Since those game engines were interpreters, it was the game engine which needed to be ported, but the resources and code could remain fairly consistent, which reduced the effort to bring the games to multiple platforms.
After things shuffled out and settled down to two or three platforms during the 1990s, most games came out for DOS/Windows. Only a handful of games were ported to the Mac, and even if they were, it was often years later. In an effort to come up with a more platform neutral solution, I developed for my Master's Thesis the Platform Independent Game Engine which was based off of cross-platform frameworks like C++, OpenGL, and OpenAL. This was more of a proof of concept than a full fledged tool for game development.
Several months ago, Steven Alexander (of Infamous Quests fame) directed me to a way that shows how games created with the Adventure Game Studio can be ported to the Mac with minimal effort. (Note: Minimal to the level that it doesn't involve having to rewrite 80% of the code to support another platform.) The process to take the resources from the Windows version of an AGS game and turn it into a Mac application only takes a couple of minutes and does not require fragile third party frameworks like Wine. However, the process does not end there after copying a couple of files.
This article will detail several areas to help add the extra polish to make your game port feel like a proper Mac app by designing an appropriate app icon, configuring the Info.plist, and finally code signing and notarizing the app for security. I'll demonstrate porting the hypothetical game Knight's Quest (where you play the intrepid adventure Sir Club Cracker and roam the countryside picking up anything which hasn't been nailed down) and how to add the extra polish to make it into a "proper" Mac application.
Porting
The aforementioned link to the Adventure Game Studio Forum post details one method how to set up AGS to create a Mac version of a game. Fortunately, there is already a gameless AGS shell application which can be modified for your game to work on the Mac without having to go through a number of convoluted steps to retrofit the Adventure Game Studio to work on the Mac to develop an application. Download the pre-compiled shell Mac application which is built for version 3.4.4 of AGS (also works with AGS 3.3). For AGS 3.5, use this download, instead. This is an empty app, but we will soon populate it with the required game assets. Mac apps are bundles, essentially a folder with a collection of additional folders and files contained within. To port an existing Windows AGS game, we will need to move a couple of the Windows assets into the appropriate locations in the Mac app.
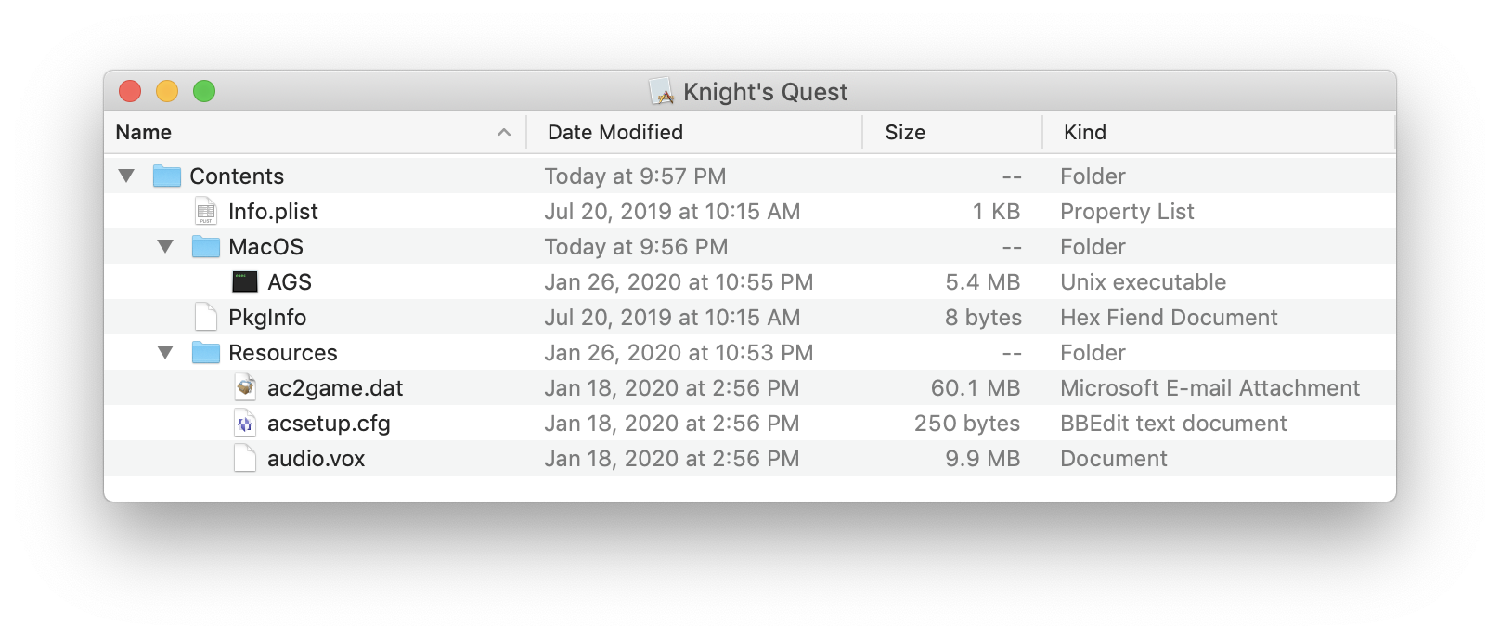
Right-click on the file AGS.app and select Show Package Contents from the context menu. This will reveal the barebones contents of the app. Inside the Contents folder is an Info.plist, a MacOS folder (which contains the AGS executable), PkgInfo, and an empty Resources folder.
Take the executable file (.exe) of your Windows game (not the winsetup.exe file that comes with some AGS games) and rename it to ac2game.dat. (Note: When using AGS 3.5+, this might need to be named game.ags, instead. If you aren't certain which name to use, launch the executable Appname.app/Contents/MacOS/AGS from the Terminal and check the output.) If you run the file command against the ac2game.dat file, you will see it is still a Windows executable file.
$ file ac2game.dat
ac2game.dat: PE32 executable (GUI) Intel 80386, for MS Windows
Next, copy the ac2game.dat, acsetup.cfg, audio.vox, music.vox, speech.vox, and any other support files (such as files ending in .dll, .tra, .000, .001, etc.) to the Resources folder. Your project may not have all of these files, but most projects will contain at least ac2game.dat, acsetup.cfg, and audio.vox. Once this is done, the package folder structure should look similar to the following screenshot.
Next rename the app bundle from AGS to the name of your game.
...and now the port is done! Really. That wasn't so difficult, was it? Except, it's not quite a polished Mac app, yet. To have the proper look and feel of a proper Mac app, we still need to add that extra shine.
App Icon

One of the first things you'll notice about an app is its icon. Like so many things in life, it's important to make a good first impression. The same applies here. Right now, the app has a generic looking icon. For so many years, icons were limited to small, pixelated blobs, but modern Mac icons come in a wide range of resolutions from a tiny 16x16 to a glorious 1024x1024.
If you have an older Mac on hand, use Icon Composer (one of the many utilities which comes along with Xcode), otherwise, use an app like Icon Slate to create a Mac icon file (icns).
If you are starting with this barebones AGS app, the next section will not apply, but this situation did come up with one app I helped port to the Mac where the app's icon was set using an old fashioned resource fork, a throwback of the Classic Mac OS days. If you need to check if there is a icon resource fork present, go to the Terminal and cd into the app bundle, then list the files contained. If you see a file that says Icon?, then there is a resource fork hidden within to represent the app's icon.
% cd SomeOtherGame.app
$ ls -la
total 2568
drwxr-xr-x@  4 chadarmstrong  staff  128 Jan  1 14:15 .
drwxr-xr-x  11 chadarmstrong  staff  352 Jan  1 20:33 ..
drwxr-xr-x@  6 chadarmstrong  staff  192 Jan  1 14:15 Contents
-rw-r--r--@  1 chadarmstrong  staff    0 Nov 26 08:26 Icon?
To remove the resource fork, either delete Icon? from the command line, or if you prefer a more visual method, right-click on the app and select the Get Info menu.
In the Get Info window, click on the app icon in the top left of the window, then hit the Delete key on your keyboard.

Other resource forks might still be lurking within the app, but we will take care of those later.
Place the app icon file into the Resources folder of the app bundle. Next, we will modify the Info.plist to add the app icon and other important details.
Info.plist
The skeleton AGS app contains an Info.plist, which can be opened up in any text editor or Xcode. A couple of additions, modifications, and a deletion are necessary to properly customize for your game.
- Update the bundle identifier (CFBundleIdentifier) to be unique to your game (e.g. com.companyname.productname)
- Update the Bundle name (CFBundleName) and Display name (CFBundleDisplayName) with your game's name. The CFBundleExecutable should remain as AGS
- Update the version (CFBundleShortVersionString) and build number (CFBundleVersion)
- Add the human-readable copyright (NSHumanReadableCopyright)
- Add name of the app icon (CFBundleIconFile)
- Remove the
UIStatusBarHidden key since this is for iOS and probably not necessary for a Mac port unless there is ever an iOS version.
- Add the category type:
LSApplicationCategoryType. Since this is the Adventure Game Studio, let's assume that many games being made with this IDE will be adventure games, so the LSApplicationCategoryType should be set to public.app-category.adventure-games.
- The Info.plist in the skeleton AGS app bundle contains a bunch of other odd cruft (such as DTSDKBuild) which probably can be removed, but I leave it in for now since it doesn't seem to hurt anything.
Following is a subset of the Info.plist file with the necessary changes.
<?xml version="1.0" encoding="UTF-8"?>
<!DOCTYPE plist PUBLIC "-//Apple//DTD PLIST 1.0//EN" "http://www.apple.com/DTDs/PropertyList-1.0.dtd">
<plist version="1.0">
<dict>
	.
	.
	.
	<key>CFBundleDisplayName</key>
	<string>Knight's Quest</string>
	<key>CFBundleName</key>
	<string>Knight's Quest</string>
	<key>CFBundleIdentifier</key>
	<string>com.edenwaith.kq</string>
	<key>CFBundleShortVersionString</key>
	<string>1.0</string>
	<key>CFBundleVersion</key>
	<string>1</string>
	<key>LSApplicationCategoryType</key>
	<string>public.app-category.adventure-games</string>
	<key>NSHumanReadableCopyright</key>
	<string>Copyright © 2020 Edenwaith. All Rights Reserved</string>
	<key>CFBundleIconFile</key>
	<string>KQ-Icon</string>
	.
	.
	.
</dict>
</plist>
Now when you launch the app, the new app icon will appear in the Dock.
Code Signing
Code signing is one of those things which has given me several new grey hairs over the years. If code signing wasn't enough, Apple has now added yet another layer of security with app notarization. Notarizing an app does require several additional steps, but it has fortunately proven to have not been too harrowing of an experience to figure out and implement. If you are going to make an app for macOS Mojave, Catalina, or later, it is a good idea to both code sign and notarize the app so macOS will not pester the player with annoying warnings about the validity and security of the app.
I have written about about code signing before, so this is not a brand new topic, but with the introduction of notarization, there is some new information to share.
With the introduction of Xcode 11, there are new types of development and distribution certificates (e.g. Apple Development, Apple Distribution), but for this example, I use the older style Developer ID Application certificate for signing the app for distribution.
Let's start by verifying that the app is not code signed:
$ codesign --verify --verbose=4 Knight\'s\ Quest.app
Knight's Quest.app: code object is not signed at all
In architecture: x86_64

$ spctl --verbose=4 --assess --type execute Knight\'s\ Quest.app
Knight's Quest.app: rejected
source=no usable signature
This looks as expected. The next step is to code sign the app bundle. In the past, we would use a command like the following:
codesign --force --sign "Developer ID Application: John Doe (12AB34567D)" MyGreatApp.app/
However, with the introduction of notarization, there is a new set of options to add to further harden the code signing process: --options runtime
codesign --force -v --sign "Developer ID Application: John Doe (12AB34567D)" --options runtime Knight\'s\ Quest.app
If everything works as hoped, you will see a successful message like this:
Knight's Quest.app/: signed app bundle with Mach-O thin (x86_64) [com.edenwaith.kq]
If the code signing was successful, skip to the next section about Notarization.
Unfortunately, it is far too easy for things to go wrong. With some apps I've helped port, there would be resource forks or other Finder info hidden somewhere in the app, so I'd see an error message like this one:
SomeOtherGame.app: resource fork, Finder information, or similar detritus not allowed
This error is due to a security hardening change that was introduced with iOS 10, macOS Sierra, watchOS 3, and tvOS 10. According to Apple:
Code signing no longer allows any file in an app bundle to have an extended attribute containing a resource fork or Finder info.
The first time I saw this error, I determined that the "offending" file was the icon file, so I used the following command:
find . -type f -name '*.icns' -exec xattr -c {} \;
In one case, the problem was because I had added a Finder tag on the app bundle. Removing the tag fixed the problem. With another instance, some other file was causing issues, but I was not able to immediately discover which was the suspect file.
To ferret out the problem, I used the xattr command to see what extended attributes were available in the app bundle.
$ xattr -lr Knight\'s\ Quest.app/
Knight's Quest.app//Contents/_CodeSignature: com.apple.quarantine: 01c1;5e0d5c84;sharingd;E82F3462-E848-4A3A-846C-C497474C0E1C
Knight's Quest.app//Contents/MacOS/AGS: com.apple.quarantine: 01c1;5e0d5c84;sharingd;E82F3462-E848-4A3A-846C-C497474C0E1C
Knight's Quest.app//Contents/MacOS: com.apple.quarantine: 01c1;5e0d5c84;sharingd;E82F3462-E848-4A3A-846C-C497474C0E1C
Knight's Quest.app//Contents/Resources/audio.vox: com.apple.quarantine: 01c1;5e2e7a68;Firefox;7587AE66-F597-423C-8787-1DAE23ECA136
Knight's Quest.app//Contents/Resources/ac2game.dat: com.apple.quarantine: 01c1;5e2e7a68;Firefox;7587AE66-F597-423C-8787-1DAE23ECA136
Knight's Quest.app//Contents/Resources/acsetup.cfg: com.apple.quarantine: 01c1;5e2e7a68;Firefox;7587AE66-F597-423C-8787-1DAE23ECA136
Knight's Quest.app//Contents/Resources: com.apple.quarantine: 01c1;5e0d5c84;sharingd;E82F3462-E848-4A3A-846C-C497474C0E1C
Knight's Quest.app//Contents/Info.plist: com.apple.lastuseddate#PS:
00000000  CD 72 0D 5E 00 00 00 00 B4 1E 64 2C 00 00 00 00  |.r.^......d,....|
00000010
Knight's Quest.app//Contents/Info.plist: com.apple.quarantine: 0181;5e0d5c84;sharingd;E82F3462-E848-4A3A-846C-C497474C0E1C
Knight's Quest.app//Contents/PkgInfo: com.apple.quarantine: 0181;5e0d5c84;sharingd;E82F3462-E848-4A3A-846C-C497474C0E1C
Knight's Quest.app//Contents: com.apple.quarantine: 01c1;5e0d5c84;sharingd;E82F3462-E848-4A3A-846C-C497474C0E1C
Knight's Quest.app/: com.apple.quarantine: 01c1;5e0d5c84;sharingd;E82F3462-E848-4A3A-846C-C497474C0E1C
To clean up the extraneous resource forks (and other detritus), use the command:
xattr -cr Knight\'s\ Quest.app/
Once the cruft has been removed, verify with xattr -lr again and then try code signing the app once more. Perform one more set of verifications to ensure that things look good.
$ codesign --verify --verbose=4 Knight\'s\ Quest.app
Knight's Quest.app: valid on disk
Knight's Quest.app: satisfies its Designated Requirement

$ spctl --verbose=4 --assess --type execute Knight\'s\ Quest.app
Knight's Quest.app: accepted
source=Developer ID
Notarization
Now on to the new stuff! The first thing you'll need to do is generate an app-specific password for this app. Log in to Manage Your Apple ID page with your Apple developer credentials. Under the Security section, tap on the Generate Password... link. In the pop up, enter in a description for the app (e.g. Knight's Quest), and then an app-specific password will be generated. The app-specific password will be a sixteen character password that will look similar to this: wcag-omwd-xzxc-jcaw . Save this password in a secure place! You will need this password for notarizing the app.
The next step will involve packaging the app to be notarized. It can be packaged as either a zip archive (zip), disk image (dmg), or an installer package (pkg). Since this is just a single app bundle, a zip file will work.
// Zip up the app
ditto -c -k --sequesterRsrc --keepParent *app KQ.zip
For the next step, if your Apple ID is only part of a single developer account, you can skip ahead. However, if your Apple ID is associated with multiple accounts (such as multiple companies), then you will need to obtain more specific information before notarizing the app. Otherwise, if you try to notarize an app and your Apple ID belongs to multiple accounts, you will see this error:
Error::
 altool[7230:1692365] *** Error: Your Apple ID account is attached to other iTunes providers. You will need to specify which provider you intend to submit content to by using the -itc_provider command. Please contact us if you have questions or need help. (1627)
To get the list of providers linked to your Apple ID, use this command:
xcrun iTMSTransporter -m provider -u john.doe@edenwaith.com -p wcag-omwd-xzxc-jcaw
This command will output a bunch of cruft, but ends with:
Provider listing:
   - Long Name -     - Short Name -
1  John Doe    		JohnDoe18675309
2  Acme, Co.  		AcmeCo
In this hypothetical example, the developer John Doe has his own personal Apple developer account and also belongs to Acme's developer account, as well. For this project, John will use his personal account, so he will use the short name of JohnDoe18675309, which will be used as the ASC provider value in the following command. Again, you can omit the asc-provider option for the notarization call if your credentials are associated with only a single team.
To notarize the app, you will use the application launcher tool (altool), which can also be used for other purposes (such as uploading the app to Apple's servers). The format of notarizing is as follows:
xcrun altool --notarize-app --primary-bundle-id com.example.appname --username APPLE_DEV_EMAIL --password APP_SPECIFIC_PASSWORD --asc-provider PROVIDER_SHORT_NAME --file AppName.zip
For our example, we filled in the blanks with the following values:
- primary-bundle-id : com.edenwaith.kq
- APPLE_DEV_EMAIL : john.doe@edenwaith.com
- APP_SPECIFIC_PASSWORD : wcag-omwd-xzxc-jcaw
- asc-provider : JohnDoe18675309
- AppName.zip : KQ.zip
xcrun altool --notarize-app --primary-bundle-id "com.edenwaith.kq" -u john.doe@edenwaith.com -p wcag-omwd-xzxc-jcaw --asc-provider JohnDoe18675309 --file KQ.zip
For a more in depth break out of what each of these options mean, refer to Davide Barranca's excellent post on this topic.
This process can take awhile, depending on how large your file is, since it needs to get uploaded to Apple's servers and be notarized. Unfortunately, this potentially long wait time comes with consequences if there is an error. One reason notarization might fail is if you need to accept Apple's terms of agreement (which may have also been updated), so you might see an error like:
/var/folders/pv/xtfd6hjn7hd8kpt70q0vwl8w0000gq/T/15A31C27-F6AF-48E8-9116-A30A7C76AD03/com.edenwaith.kq.itmsp - Error Messages:
		You must first sign the relevant contracts online. (1048)
2020-04-11 11:23:19.745 altool[22640:1119844] *** Error: You must first sign the relevant contracts online. (1048)
One approach to fix this is to log in to the Apple developer portal and check to see if new terms of service need to be reviewed. If so, agree to the terms, and wait a couple of minutes before trying to notarize again. You can also check Xcode's license agreement from the Terminal by typing in the command:
sudo xcodebuild -license
However, if everything works properly with uploading the file, you will get a message like this:
No errors uploading 'KQ.zip'.
RequestUUID = 2de2e2f9-242f-3c78-9937-1a7ef60f3007
You'll want that RequestUUID value so you can check on the notarization status to see if the package has been approved yet. After uploading your app, the notarization process typically takes anywhere from several minutes to an hour. When the process completes, you receive an email indicating the outcome. Additionally, you can use the following command to check the status of the notarization process:
$ xcrun altool --notarization-info 2de2e2f9-242f-3c78-9937-1a7ef60f3007 -u john.doe@edenwaith.com -p wcag-omwd-xzxc-jcaw
No errors getting notarization info.

          Date: 2020-01-04 22:44:42 +0000
          Hash: adf86725dec3ab7c26be17178e07efaf3b2806f743fefd0dd1059f68dcf45398
    LogFileURL: https://osxapps-ssl.itunes.apple.com/itunes-assets/Enigma123/v4/a5/15/64/2d...
   RequestUUID: 2de2e2f9-242f-3c78-9937-1a7ef60f3007
        Status: success
   Status Code: 0
Status Message: Package Approved
Once the package has been approved, we can move on to the stapling the ticket to the app.
xcrun altool --notarize-app --primary-bundle-id "com.edenwaith.kq" -u john.doe@edenwaith.com -p wcag-omwd-xzxc-jcaw --asc-provider JohnDoe18675309 --file KQ.zip
23 July 2022 Update
altool has been deprecated and it is now recommended to use the new tool notarytool, instead. notarytool is faster and has a --wait option so the tool will only complete once the notarization is finished so one does not need to keep polling the servers to determine when the process is complete.
The new notarytool command which was introduced in Xcode 13:
xcrun notarytool submit ./KQ4R.zip --wait --apple-id john.doe@edenwaith.com --password wcag-omwd-xzxc-jcaw --team-id ABCD123456
This command has some similarities to altool, but one difference is that instead of using the --asc-provider option, use the --team-id instead. You can find the Team ID by logging in to your account at https://developer.apple.com
and going to the Membership section.
Stapler
At this point, the app has been validated and notarized, so if an app launches, macOS will check with the servers and verify that the app has been properly notarized. However, if the computer is not online, then it cannot perform this step, so it is useful to staple the ticket to the app for offline usage.
xcrun stapler staple -v KQ.app
Once again, a ton of text will scroll across the Terminal. If it works, the last line should read: "The staple and validate action worked!"
For sanity's sake, validate that stapling worked:
stapler validate Knight\'s\ Quest.app
Process: Knight's Quest.app
The validate action worked!
However, if the stapling hasn't been completed, there will be an error like this:
$ stapler validate Knight\'s\ Quest.app/
Processing: Knight's Quest.app
Knight's Quest.app does not have a ticket stapled to it.
For a final verification, use spctl to verify that the app has been properly signed and notarized:
$ spctl -a -v Knight\'s\ Quest.app
Knight's Quest.app: accepted
source=Notarized Developer ID
Notice that this check varies slightly from when we first did this check before the notarization — the source now says Notarized Developer ID.
Final Packaging
Now that the game has been ported, code signed, and notarized, it is time to package it up for distribution. There are a variety of ways to do so, whether via an installer, a disk image, or a zip archive. If you are distributing the game via download from your website, you'll probably want to bundle the game and any other extras (such as README files, game manuals, etc.) into a single containing folder. If you are going to upload the game to Steam, then you may not want an enclosing folder.
To be a good internet citizen, make sure when the zip archive is created, that any Mac-specific files are removed, such as the .DS_Store file and __MACOSX, which stores excess metadata and resource forks.
zip -r KQ.zip . -x ".*" -x "__MACOSX"
This example zips up everything in the current directory, but excludes any dot files and any unwanted metadata. With the game packaged up, it's ready to go!
Building the AGS Mac App Bundle
For the first couple of games I ported to the Mac, they were using an older version of AGS, generally version 3.3 or 3.4. I used the Mac app shell someone else had built, but I discovered this didn't work properly with newer games developed with AGS 3.5. I've encountered a few hiccups with trying to get games developed with AGS 3.5 to work properly on the Mac. The first issue I encountered was that some colors were inverted, but it appears that this was due to an incorrect library being used. Another issue I encountered was when I used a debug build of the AGS app shell, it would write out log statements to the allegro.log file that is contained within the app bundle's Resources folder. The problem with this is if the app has been code signed, the contents within the app cannot be modified, otherwise the app appears to be corrupted. I solved this problem by building the Mac app bundle myself by running the following script in the same folder that contains the CMakeLists.txt file (e.g. the ags-release-3.5.0 folder).
Once this finishes building, it will create the app bundle AGS.app in the build_release folder.
Ported Games
It has been a pleasure and joy to help bring a number of adventure games to the Mac. Below is the list of AGS games I've helped port. I highly recommend that if you enjoy adventure games, give them a try! I hope that this extensive tutorial has been useful in learning how to port games developed with the Adventure Game Studio to the Mac, in addition to learning how to code sign and notarize a Mac application. If you would like assistance in porting, contact me via e-mail or Twitter.
Resources
13th April 2020 | Games
Back in 2003, I was playing the Macintosh version of Quest For Glory 1 (VGA), and I came across this interesting Easter egg which I've never seen in the PC version of the game. The standard Easter egg from the VGA version of this game is when Earl the dinosaur comes walking by. Instead, the Macintosh version of the game has a familiar set of characters making an appearance with a rabbit moving through the bushes, followed by a hunter who has difficulty in pronouncing the letter 'R'.


28 June 2022 Update: Chris Benshoof wrote up an even more in depth post about this particular Easter egg, with a bonus! Apparently, this Easter egg is interactive. If you have the Flame Dart spell, you can cast it at Elmer and set his hat on fire. Very neat.
11th April 2020 | EdenMath
Even though the scientific calculator EdenMath is the first Mac application I wrote (18 years ago!), its development has come in random fits and spurts. This year was one of those random, yet unplanned, events where I did manage to do some work on this ancient app to keep it running on the latest version of macOS. Perhaps it was seeing how many apps I still had on my computer that were not compatible with macOS Catalina which helped prompt a quick update of EdenMath so it can gasp out a couple more years before EdenMath 1.3 is finally released.
It's been six years since the previous release, so there has been some room to add a little extra shine and other improvements for this app, including:
- 64-bit version for macOS Catalina compatibility
- Code signed and notarized for macOS Mojave and later
- New and updated icons
Download EdenMath 1.2.2 for Intel and PowerPC Macs, compatible from Mac OS X 10.5 Leopard through macOS Catalina. The source code is available on GitHub.


