Edenwaith Blog
16th January 2023 | Twitter
Farewell to Twitter and hello to the IndieWeb
When I first took notice of Twitter around 2009, I did not have much interest in it. It was initially useful to follow a few accounts, but I did not actively participate much at first besides making a handful of product announcements each year. Years later it became more of a platform to connect and engage. As with any worldwide community, a lot of good things came of it, with many great connections with interesting people and topics. Especially in the past couple of years, it provided as an alternative to Facebook, with a wider variety of interactions with people, especially those you may not know as well as more personal connections on Facebook.
Once the internet escaped the walled domains of universities and governments and was let loose into the clumsy hands of the general populace, it has been used for both incredibly beneficial and nefarious purposes. To quote the hermit from The Bride of Frankenstein, "There is good. And there is bad." However, this is the internet, which provides a platform to display the worse impulses and tendencies of humanity with little to no repercussions for such vile behavior. (It took an insurrection for Twitter and Facebook to finally take action and censure certain individuals who should have had any "rights" revoked a long time ago.)
This now brings us up to the present moment where Twitter was purchased for an astounding $44 billion dollars in late 2022. If the platform wasn't already a shit show in its own right, it was about to become a burning circus show. It's simultaneously amazing and appalling to watch how a single person has managed to destroy a company in such a short period of time. Half of the employees unceremoniously dumped, the rest expected to pick up the remaining pieces, bills not getting paid, and now it looks like third-party Twitter clients have been cut off with absolutely no notice.
The IndieWeb and Fediverse
I recently read through the Indie Microblogging book, which has provided a new perception of social media, especially in regards to blogging and microblogging. There is renewed excitement, energy, and enthusiasm for creating again — owning your own content. It is the joy of rediscovering the Old, and learning the New.
Decades ago, around the 2001-2003 timeframe, I made a lot of short messages on my devlog, more as an artifact to the old UNIX .plan file, but a precursor to microblogging, years before it ever existed. I might have been on to something before it really took off.
Sites like Twitter and Facebook make it easy to post, but they control the content and the ways things are run. Consider how many years Twitter has gone without even an Edit functionality to easily fix typos. Much to my delight, such an obvious feature already exists for Mastodon.
There is a benefit of owning everything, with better ease to comb through your own content. If one of these social media silos crumbles, it will take everything with it. So many things have been posted over the years, but as Roy Batty so eloquently put it:
"All those moments will be lost in time, like tears in [the] rain"
There is definitely a sense of starting over. Things will inevitably be lost, and other areas, such as discovering new Playdate projects, will likely need to fall in the domain of YouTube, Reddit, and developer forums.
Leaving Twitter
In 2014, I wrote the short story Digital Suicide, a story about digital death, burnout, and starting over. Those three points exemplify what is happening now quite aptly. The death of digital properties. The burnout of so much frustration and related headaches. And the process of letting go and starting anew.
Twitter has become the source of so much "doomscrolling" where a single word or curt phrase could cause severe anxiety to manifest. I've seen numerous people take breaks from social media for their own mental well-being; some have even taken a permanent vacation. I'm currently in the process of archiving and deleting some Twitter accounts (e.g. @kq1redux) and winding down regular usage of my primary account. The biggest change I have noticed has been breaking the habit of continually checking my phone, getting that little hit of "what's new and interesting". But it has also helped distance me from much of the world-wide negativity. Not that the world isn't still delightfully mad at times, but it has helped calm the torrential storm. When I occasionally duck my head back in to the fetid waters of Twitter, it feels like returning to a place where you once lived. Seeing what's new, what's changed, and then getting out as quickly as possible as you are reminded why you left.
Even as I was in the process of writing this post, more bad news kept rolling in from a massive security breach of 235 million e-mail addresses to the inexplicable blocking of popular third party Twitter clients. If this is true that third party Twitter clients have been so unceremoniously cut off without any warning (much like how half of Twitter's employees were let go last November), it's just more reason to get away from Twitter and not support it. As Manton Reece detailed in his book's chapter Leaving Twitter, the company has been restricting API access for years, and this might be the final death knell. As of this writing, Twitter has not officially responded to what is happening and if this is an accident or truly extremely hostile behavior towards other developers who have helped support and build upon the Twitter platform for years. Twitter has been crumbling for years, perhaps it just took the new ownership to topple things even further instead of trying to repair the faults.
My current Twitter alternatives:
I will see how everything shakes out, especially with Mastodon if it proves to be a happier alternative to Twitter, or if it will devolve into a similar cesspool of vitriol. Ultimately, this is a way of starting over again. Fortunately, I had not amassed a huge collection of connections on Twitter, and there will inevitably be connections which will be missed and lost, but for now, it involves finding active accounts which have made the move to Mastodon. Over the years I've invoked my minimalistic tendencies and culled through lists on social media, and this might be the most efficient method of trimming the branches.
How to get an archive of your Twitter data (via the website):
More > Settings and Support > Settings and privacy > Your account > Download an archive of your data
Note, this is not an instantaneous process and will see a message that says: "We received your request. To protect your account, it can take 24 hours or longer for your data to be ready." From my tests, it took about a day before I got a notification that my data was ready to download.
How to deactivate your Twitter account:
More > Settings and Support > Settings and privacy > Your account > Deactivate your account
See you around the chronostream...
An Ode to Twitter
I'll end this by paraphrasing the Scorpions' song "Humanity"
Twitter, auf wiedersehen
It's time to say goodbye, the party's over
As the laughter dies, an angel cries
Twitter, it's au revoir to your insanity
You sold your soul to feed your vanity
Your fantasies and lies
Be on your way, adiós amigo
There's a price to pay
For all the egotistic games you played
The world you made is gone
You're a drop in the rain
Just a number not a name
And you don't see it
You don't believe it
At the end of the day
You're a needle in the hay
You signed and sealed it
And now you gotta deal with it
Twitter, Twitter
Goodbye, goodbye
7th January 2023 | Edenwaith
Another circuit completed around the sun, and well... life is chaos, but it's good to be still around. This past year has been fairly quiet on the software front as I spent most of the time working on the second draft of my current novel. One chapter, in particular, took quite a bit of time since it required a massive rewrite (and is much better because of it!). I also posted an old short story "Digital Suicide" as a bit of a nod to the burning circus show which has become Twitter over the past two months. Since the focus of this site has become a lot more gaming-oriented over the past several years, I also wrote up a couple of articles about Quest for Glory V.
Last Year's Plans
A quick look back at how last year's tentative plans shook out:
- Mac AGS ports: I made an update for KQ4 Retold. There is another AGS game I also made a Mac port for, but it hasn't been released yet, so more about that once it is available.
- Updated the Agifier graphics plug-in for Acorn. Ended up doing a ton of research into dithering techniques and color theory.
- Tested a number of games with the Logitech CyberMan, which became tons easier once I obtained a Packard Bell computer. This sidelines my initial plans to write a Mac driver to work with the CyberMan.
- No updates to AGI Studio this year. Potential improvements would involve updating the Qt libraries and making an Apple Silicon build.
- I did create my own custom font using Glyphs Mini, FontStruct, and Caps for the Playdate.
- Completed the second draft of my novel, working on wrapping up some smaller projects and blog posts, next on to the Playdate!
- No real work on Permanent Eraser 3.0.
Plans for 2023
- This will be the Year of the Playdate! This curious handheld gaming device shipped last year, which has generated a lot of interesting ideas across the Playdate developer community. I have a couple of small, Sierra-themed ideas I want to experiment with. I might even bring my old game Psychomancer to Playdate via Pulp!
- There is another very special project I've been assisting with this year that I'll reveal later.
- EdenList 2.3.2 has already been released this year, which follows up on last year's releases for Edenlist 2.3.0 and 2.3.1.
- Start on the 3rd draft of my novel. Considering how much time the 2nd draft took up last year, I don't plan on focusing on this quite as much, but I will do some clean up and find more beta readers.
- Perhaps make an update to King's Quest 1 - Redux. I've already made one small experimental update, so I might add a few more if the fancy strikes me.
- More AGS ports, maybe look into an Apple Silicon build. Fortunately, any of the existing AGS Mac ports I've created seem to work fine on Apple Silicon Macs up to this point (currently macOS Ventura), but eventually Apple will drop support of Intel, just like they did with PowerPC and the Motorola 68K chips in the past (it's inevitable).
I'm planning on making a Mac port of the full version of The Crimson Diamond when it is ready.
- If the time and energy is there, perhaps more work on Permanent Eraser 3.0.
2nd January 2023 | EdenList
Today, EdenList 2.3.2 for iOS has been released and is freely available for download from the Apple App Store.
What's new in this release:
- Updated UI for iPhone 14 Pro
- UI improvement
- Fix for returning to a new, empty list
- Verified and tested with iOS 16
This release focused on a number of smaller quality improvements, the type of things which often would be pushed aside for more "important" features in larger app development. I first noticed that the search bar was far too close to the Dynamic Island on the iPhone 14 Pro, which was corrected by connecting the search bar controller to the navigation item, instead of the table view. I also saw an odd darkened tint appear in the menu bar when transitioning screens on iOS 13 and later, and this issue has also been corrected. It has been a pleasure to be able to continually add polish to this long standing iOS app over the years. Share and Enjoy.
29th December 2022 | Writing
DIGITAL SUICIDE
by Chad Armstrong - November 2014
The steady glow from the screen was the only source of illumination in the otherwise darkened room. The feeble light could barely make out the towers of boxes cluttering the room and the sole occupant sitting before the computer. A flurry of chiclet keys being pressed was the only evident sound, a noise portending the coming terminal doom.
Robert was dying. Not so much in the physical sense, even though his heart felt like it had been cauterized out by the soul-sucking entity called Corporate America. He was destroying his electronic avatars, one bit at a time. He was bit flipping his life. One moment he would be there, but with the flip of a switch he wouldn’t. Facebook was the first to go, with Twitter soon following. The crusty remnant of his MySpace page from ten years ago was still lurking around, but he had forgotten the original password. One password reset later, then digging about to find how to delete the account, and then the awful deed was done.
After so many years residing online, he had built up a number of digital personas, enough that he struggled to remember everything he had signed up for at one time or another. He had even once had a GeoCities page at one time, replete with annoying, animated GIFs. Yahoo had already euthanized that entire site of embarrassing starter sites which had been the home to so many teens in the 1990s who were constructing their first amateur web pages.
The computer, the very machine which had been the focus of his craft, the instrument of creation, was now being used as an implementation of destruction. His life was in shambles, he was now just tearing down what little still remained. The road had become rocky over the past several years, which finally halted at the dead end of today. There was no future path in that direction, it was time to backtrack and start over.
The journey had initially begun as an exciting endeavor, enticed by the new possibilities offered by emerging technologies. Young and impetuous, he was eager to make a dent in the universe. After fifteen years of the game, he was seeing the same play reenacted, just with a change in the cast. Companies continually sparring against each other. Competing. Cheating. Stealing ideas and making bold claims of innovation. To fuel the fire of controversy were the legions of fanbois, loudly thumping their chests and claiming their position superior to all others. They might all make excellent politicians one day; if they could find their way out of their parents’ basements, that is.
Robert had had his own time, especially during the early years, espousing the benefits of his preferred web browser or operating system. Now, he didn’t care so much. Age and experience had knocked the blinders off, so he could finally step back and objectively look at the world. Nothing was perfect. One product might have advantages over another, but that did not denounce the competitor as wholly wrong.
As he got older, and occasionally picked up a nugget of wisdom along the way, he realized that time was no longer an infinite commodity, but a very finite and precious resource. Whether he liked it or not, time was continually spent, which made it all the more critical that he made good use of it. Wasting his time, energy, and patience arguing with thirteen-year old boys on the internet was no longer entertaining. The game had become trite and boring.
The daily motions of work and school had become well engrained and automatic. Grade school with its rigid structure was merely the prelude to a corporate world filled with bureaucratic rules and starched, white shirts. The fire in his gut that had spurred on his natural curiosity to explore the ever-burgeoning technological landscape had been quenched after so many years of corporate monotony. The passion that had fueled his earlier academic endeavors had been reduced to the faintest ember.
Year after year, he had continually strived to better himself, keeping his skills finely honed. If he ever faltered or dared to take a break, he would lose his competitive edge and be supplanted by some recent fresh-minted college grad who had nothing to their credit besides unbound enthusiasm and fewer chips on their shoulders.
Technology was quicksilver, perpetually reinventing itself every couple of years. There was no solace in settling with a single niche technology, since it would most likely be obsolete within a couple of years. Rewards were only dolled out to those who kept ahead of the curve and ended up in the right place at the right time — if the particular technology caught on with the mainstream. Otherwise, one might have just wasted their time.
The never-ending cycle had worn him down and made him eternally weary. He no longer had the energy to keep sprinting through the marathons. He had worked the grueling death marches to meet some arbitrary goal.
But no longer. He would no longer subject himself to such pointless exercises of torture.
In the end, it was all for naught. All those years, professionally nodding his head in agreement with managers who were limited by the Peter Principle, too ignorant to realize their ineptness, and too stupid to understand the idiotic decisions they made. Yet, blinded by their own misguided brilliance, they brazenly ignored the advice from anyone but their favored cadre.
Robert had not been in that particular group of ordained rock stars, so it came to little surprise when he lost his job. It didn’t matter a single whit all of the nights, weekends, and even holidays he had worked. It’s not Labor Day if you don’t put in 10 hours of labor! He wasn’t the best or fastest worker, he knew that, but he had always put in his best to ensure that the job was done properly. But he didn’t deserve the treatment he had received in the end when the axe came down. The managers needed a scapegoat to sacrifice, and he fit the bill. By getting rid of him, all of their problems would suddenly go away. Robert knew differently, though, their problems wouldn’t just ‘go away’. The company was rotten straight down to the core, and no amount of slicing or dicing of innocent employees would ever fix the company’s true problems. Not until the company had undergone a management enema would there even be the slightest change for a positive turn of events. Not that he harbored any false hope that would ever happen, especially not with the lunatics already running the asylum.
To hell with all of it. He was sick of the high school politics. The blatant favoritism. The shiny, gold rock stars. Since he wasn’t in the proper clique, he didn’t matter. Robert could have told the management the building was actually on fire, but they wouldn’t have believed him unless one of their valued toadies confirmed the fact that the building was indeed, on fire.
Another rapid succession of key strokes. Another account gone, marking a chapter of his life that had come to an end.
The fire had been ignited by the fury of his anger, but he intimately realized that he was wasting his hate on the simpletons who had cast him aside. He wasn’t the first, nor would he be the last. In an intoxicating dream of Americana, employees were loyal to the company, and the company would take care of the employees in return.
Company loyalty was an ancient concept, long dead and gone. Companies were always willing to let their employees work their way down to their hypothetical bones, before tossing off their withered husks to the winds of unemployment. There would always be more resources to draw from. The universities kept churning out new batches of eager grads, anxious to make their mark on the world. A mark that could just as easily be wiped away, without the slightest trace of it ever existing.
Robert had spent years etching his digital signature across the internet, but it was going to be his own hand that would erase it, not that of some soulless entity. Next up were the source code repositories. Several minutes of work, and all of the contributions he had made on GitHub and SourceForge were obliterated. He wasn’t just eradicating his presence, but taking everything he had created, as well.
Day in, day out. Weeks and months rolled over into years, which bled into decades. Then one particular job, Robert found himself to no longer be the confident upstart who was intimately familiar with the latest and greatest of technologies, but now found himself to be closer to the cynical graybeards he had once mocked.
Where do all the old programmers go? A common question, but left without a proper answer, one that Robert would have liked to have known. Programming was an endeavor best left to the youth who had spare energy to burn. He had burned the candle at both ends for too many years, leaving a sodden, waxy mess in its wake.
Since he was effectively removing his online presence, he figured he might as well do the same for his physical self, as well. It was well past time to disconnect from the rat race of society, decompress for several months and focus on more leisurely pursuits, rather than spending his days ferreting out software bugs.
Finally seeing things with a crystal perspective, he observed the desolation of years gone by with little to show for all of his efforts. Like Thoreau, he was going off the to the woods to live deliberately, so that when it came for him to die, he could claim that he had truly lived, and not squandered his life on petty frivolities.
Perhaps now was the moment for a well-timed mid-life crisis. He had been traveling on the same career path for so long that he had never taken the time to consider other options. The further he traveled down the road, the more difficult it became to start over. But that might be the best thing for him, to begin anew. Cast off the chains off a former life, and embrace the excitement of a new venture.
It was time to get back to the basics. Remove the technological hurtles and simplify life. Thoreau had his pond. Robert had his mountains.
He had always loved going to summer camp during his youth. It was the one week out of the year where he could extract himself from the rut of daily life and live in a more carefree fashion. It was a time of reinvention where the other kids had no preconceptions about him, which allowed him to be whatever type of person he desired. It was blissful freedom, the type that was not offered by the constraints of his normal life. A small valley of paradise was surrounded by mountains, which formed an impenetrable barrier around an idyllic alternate reality based on faith, hope, and charity. It was time for him to return to nature.
His severance package had not been overly generous, but he wasn’t going to be overly hurting for money for the next several months. He had rented out a small cabin at the camp, where he would spend the summer relaxing by reading and playing guitar. His life had been so consumed by his work, leaving him exhausted each night, that he rarely had the time or inspiration to pursue the hobbies of his youth.
This was his declaration of personality bankruptcy. By wiping away his past and allowing for a time period of adjustment, he would rise from the ruins to begin a new life.
The laptop’s dim, TV-static light cast an ghostly pall throughout the room, outlining the pillars of boxes which contained nearly all of Robert’s possessions he had slated to go into storage. Only a small pile of books and a guitar remained unpacked. The light was too weak to read the book titles, but Robert knew which titles he had carefully selected that would be taken on his sojourn: Fahrenheit 451, Walden, and a Led Zeppelin tablature book.
Now for the final account, his e-mail address he had used longer than any other. Tens of thousands of e-mails, perhaps even hundreds of thousands, each message detailing a small figment of his life. All of those correspondences and memories, to be wiped out by a single motion. His finger hovered over the DELETE key, momentarily pausing like a guillotine blade.
A single soft click heralded Robert’s demise. His digital presence was gone, wiped clean away. Bit flipped to 0. Zero, nil, the empty set. He was expecting a wave of regret to smack him smartly upside the head, but it never came. With his past now a memory intended for the dustbins, Robert readied himself for his new future. He had purified his mind by releasing the past to allow for new memories to flood in.
As the computer prepared itself for shutdown, Robert picked up the books and guitar. The computer’s grey screen winked out, cloaking the room with darkness.
28th December 2022 | Games
Welcome back for another post about the Quest for Glory computer game series. This one will revisit Quest for Glory V: Dragon Fire, covering various releases, tidbits, and other interesting details (and less about fighting technical issues like last time I wrote about this game).
Related QFG articles:
QFGV Box Variants
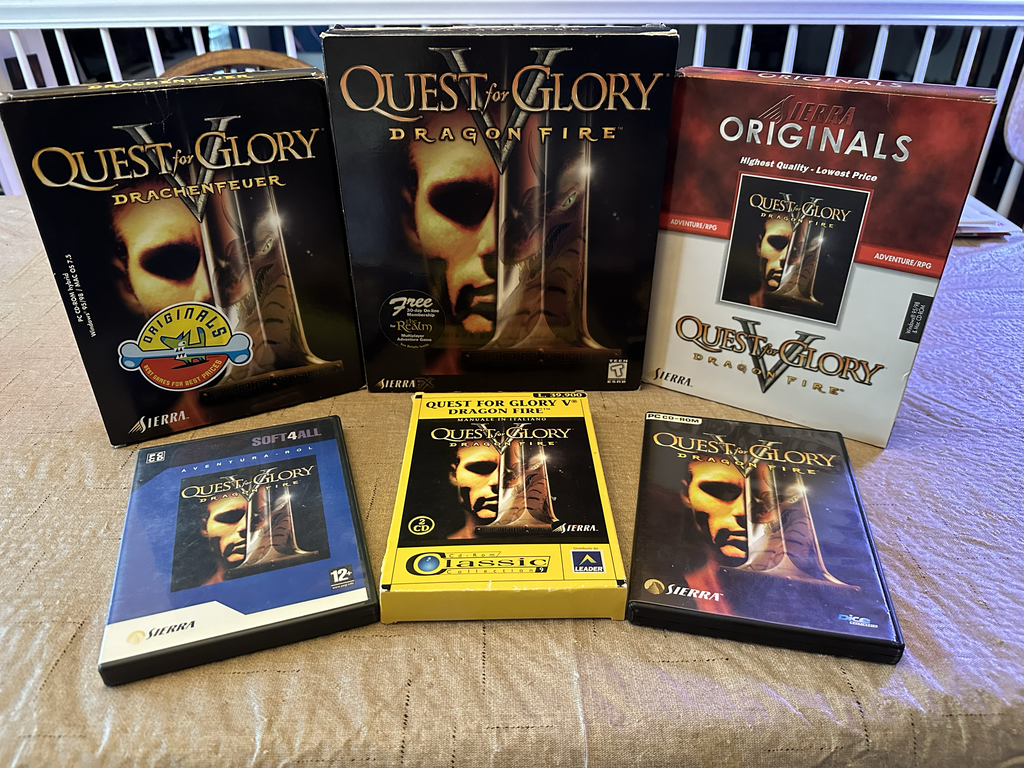
As evidenced in Stephen Emond's Sierra Collector's Quest volumes, there were many variants of Sierra products over the years. This collection is just a subset of what was released for Quest for Glory V:
Back: (L to R)
- German version (Drachenfeuer)
- Original US version I bought back in late 1998
- UK version
Front: (L to R)
- Spanish version
- Italian version : Despite the many variants recorded in the Quest for Glory volume of the Sierra Collector's Quest collection, this yellow version was not shown in this book, which is likely a sign of how many versions can be made, and how incredibly difficult it can be to catalogue every version.
- Benelux version (descriptions in Dutch and French on the back)
Side note: I purchased the Polish QFG collection which has the "Hero's Blade" cover, but the CD only contains the first four QFG games, despite the cover being from the fifth game of the series. I initially thought that this was another variant of QFG5. When I looked at the system requirements (486 processor, 8MB of RAM, x2 CD-ROM), it tipped me off that this wasn't what I had originally expected. Stephen Emond's book about the Quest for Glory variants confirms that this is just the Polish version of the traditional QFG collection. I am not aware of any boxed collection which contained all five QFG games, since most of these collections were released in the mid-1990s, a few years before QFG5 was released in late 1998.
PowerMac G4 Setup
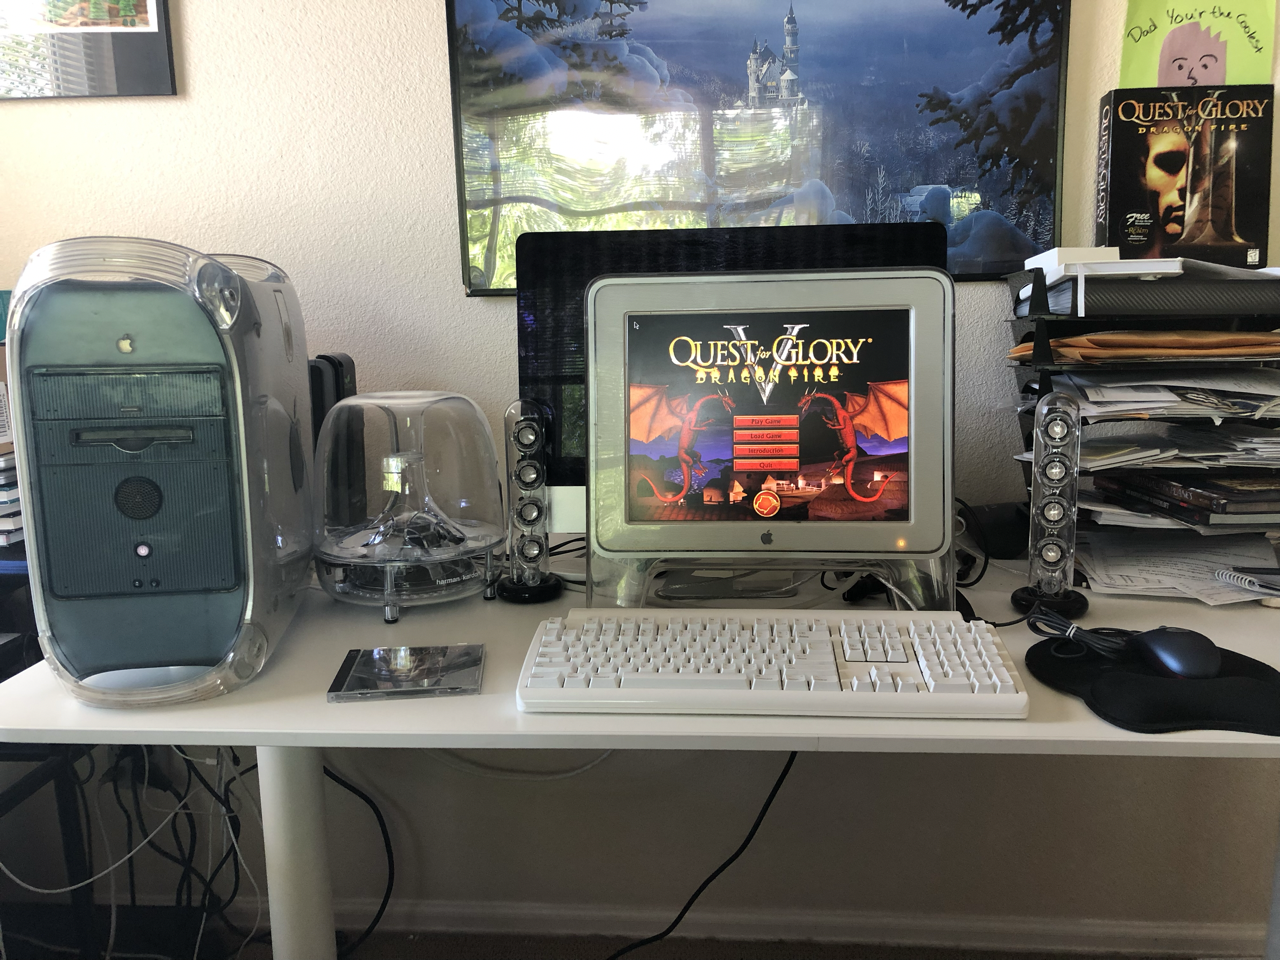
This is a game which takes a little more setup since it came out during that odd era of the late 90s (Windows 9x/Classic Mac OS), so it isn't as easy to play this game as those games which were developed with the SCI engine (thank you DOSBox and ScummVM). In my previous QFG5 post, I contemplated investigating Sheepshaver further, but instead I upgraded my PowerMac with new RAM, a better set of speakers, a new mouse, and an SSD drive.
PowerMac G4
My main workhorse for many years, which is able to run every version of Mac OS from version 9 through 10.4. When I initially purchased this computer in 2001, I was deciding between this and a G4 Cube. As stylish as the Cube is, I'm glad I ended up going with the PowerMac, which has had numerous upgrades, including a Zip drive and two larger hard drives. The expandability is a key reason it has survived so long.
512 MB PC100 SDR SDRAM
After the multitude of problems I experienced five years ago, I needed to replace the bad RAM stick. It had been awhile since I'd purchased new RAM, and it looked like my old sources (RIP Ramseeker and 1-800-4-MEMORY) are no longer around. Fortunately, OWC had me covered for some new RAM. I certainly didn't need the extra RAM, but there is something satisfying about bumping the computer up from its original 64MB of RAM to 1.75GB of RAM.
Fortunately, replacing the RAM resolved the issues I experienced previously. There were only one or two crashes experienced throughout the game. I had a few cases where it initially looked like the game crashed, only to find that Mac OS 9 decided at that point to start indexing the hard drive. Ah, the joys before proper preemptive multitasking.
ADC Display 15”
I splurged and bought a refurbished one of these monitors (from the now defunct PowerMax) when I was a poor university student, and it is still an amazing monitor. I even used it as a daily supplementary monitor until recently (had to convert from ADC to DVI to USB-C, but it worked). Prior to USB-C, ADC might have been the only single-cable option which could provide video, power, and USB through a single connection on a Mac. The power button on the monitor is also very handy, especially since I don't have a keyboard with a power button on it any longer.
ATI Radeon 9000 Pro Mac Edition
An upgrade from the default ATI Rage 128 Pro (16MB VRAM) video card to 128MB DDR VRAM. Includes both ADC and DVI ports.
Logitech Wheel Mouse
This is the type of mouse I would have been using 20 years ago. I used the Logitech MouseWare driver software to switch the middle and right mouse buttons, so right-clicking would correspond to right-clicking in the game.
Harman/Kardon SoundSticks III
I saw the Harman Kardon SoundSticks IV at a Micro Center and initially thought this was some retro-style callback product from twenty years ago, only to discover that this was the fourth model of a continuing line of speakers. These were more modern and included Bluetooth, which did not interest me for my retro computer setup, but a standard 3.5mm line in would work just fine.
Years ago, I had some JBL Creature speakers, which sounded great until the satellite speakers died. I purchased a used set of these speakers, but the satellite speakers didn’t work. After a bit of research, I discovered that there's a known issue with the magnets coming loose. I even tried to find a fix, but it would be tricky in finding proper replacement speakers. I then looked at some Apple Pro Speakers. I fortunately did not find any, because my PowerMac is one year too old to power and run them effectively.
Since the other options weren't panning out, I took at look at the SoundSticks again, and discovered that the model III was still available for sale on Amazon, and at a much more reasonable price versus the IV's $299 price tag. The SoundSticks III look great, sound great, and made the magnificent QFG5 soundtrack soar.
Matias Tactile Pro 4 Keyboard
I started using the model 1 about fourteen years ago, which also had the power button on it. This time around, I'm using the fourth generation, which also contains a keypad, very useful for combat in this game.
120GB OWC Mercury Pro Legacy
I purchased one of these to help future-proof this machine by being able to equip the PowerMac with an SSD drive in case any of the existing hard drives die. Mac OS 9 doesn't handle partitions larger than 80GB (or perhaps a little larger), but most new 3.5" hard drives tend to be in the 1TB+ range. I haven't installed it yet, I'll need to copy over the data from one of the other drives, but it will be interesting to see what type of speed increases I might see.
Batch Renaming PICT Files
In preparation for this post, I took a number of screenshots from the PowerMac G4, and then copied the files over via a USB thumb drive to a modern Mac so I could convert the images to a more modern format.
While many things have changed over the last several decades, some things have remained the same. As it was with Mac OS 9 and even up to today, the keyboard shortcut to take a full screenshot is Shift-Command-3. The primary difference is that Mac OS 9 saved the image in the PICT format, whereas the modern macOS saves as a PNG. However, when moving the Mac OS 9 screenshots over to a modern version of macOS, there is no file extension and macOS Ventura doesn't recognize the file and assumes it to be a UNIX Executable File. Mac OS 9 identifies them as SimpleText files (since the program SimpleText is used to open those screenshots), but they are the older image PICT format. By just adding a .PICT extension, macOS can properly identify the files.
The next step was to convert the PICTs to a more web-friendly PNG format. Since there were a decent number of files to convert, I used a short script from the command line in macOS Ventura 13.0.1, which uses the zsh shell.
for i in *; do sips -s format png $i --out $i.png;done
Running this command iterated over the directory of PICT files and created a PNG version of each image.
Other Oddities and Things of Note
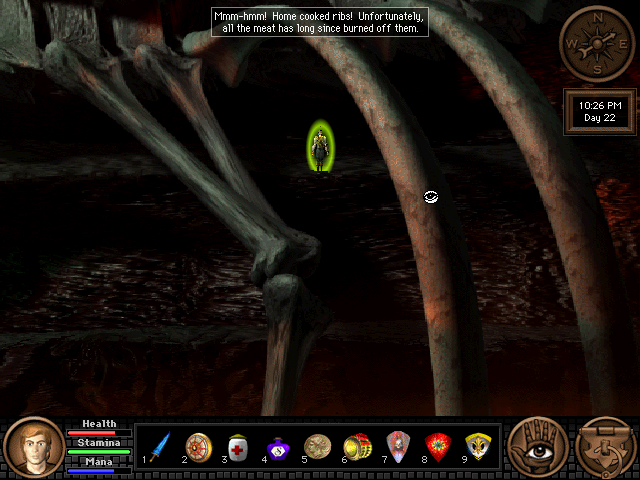
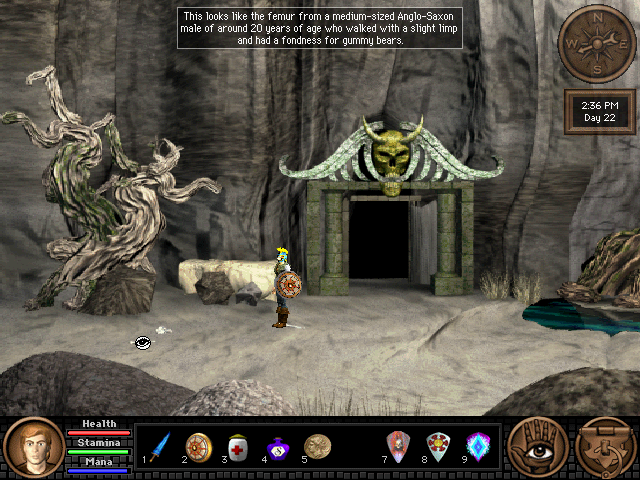
After multiple playthroughs of a game, one finds little oddities and inconsistencies, as documented with the following screenshots:
Three-Way Tie
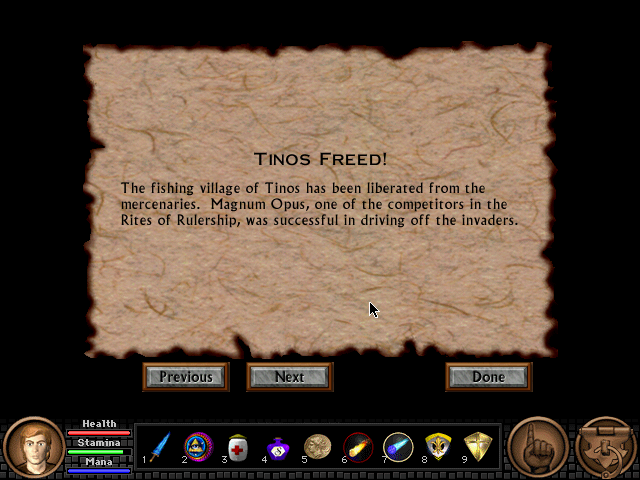
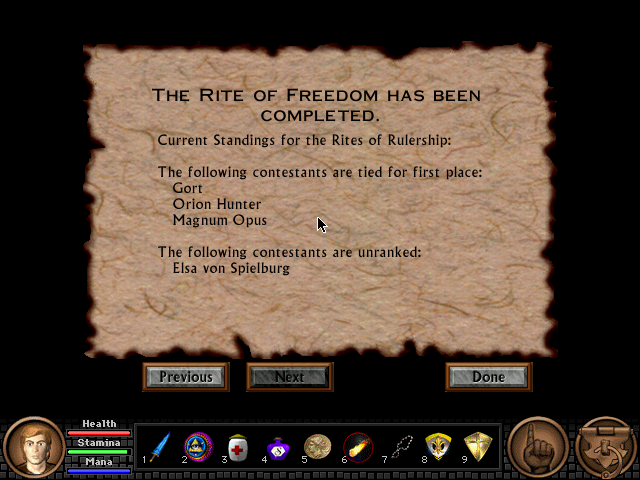
When I completed the first Rite, I freed all five of the fishing villages. The primary goal is to be the first person to free their village and return with the town's sigil. If one is not fast enough, then Gort can win this Rite. An extremely odd thing happened this time around when I spent several days freeing all of the villages, the game claims that Magnum Opus also freed his village, which resulted in a three-way tie.
Difficult To Find Monsters
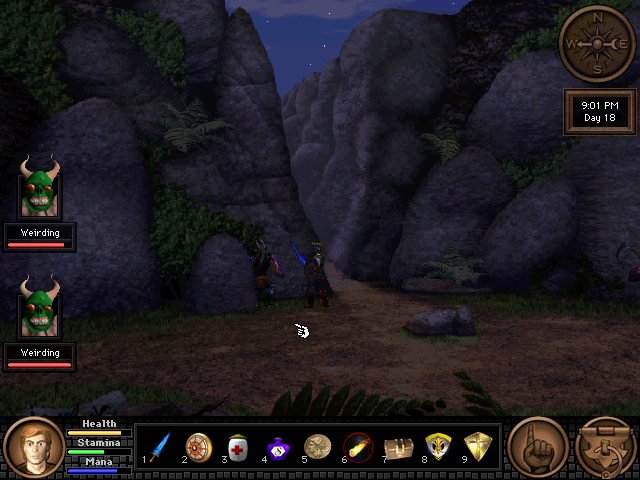
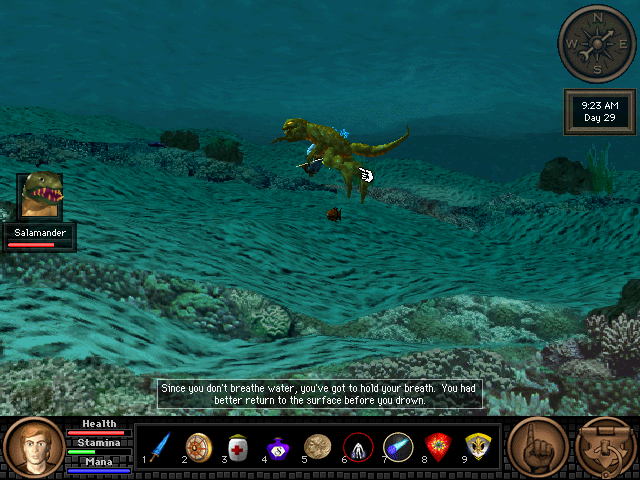
There are around twenty types of enemies to fight in the game, and some of them are a little more difficult to find, whether they are found only in certain locations or at night. The Weirdings I only found near the island of Delos, and they came with some great loot of Magical Chain Armor. The Salamander I don't ever recall finding before because I hadn't done too much swimming in the ocean besides near Silmaria.
Poisoned Tea
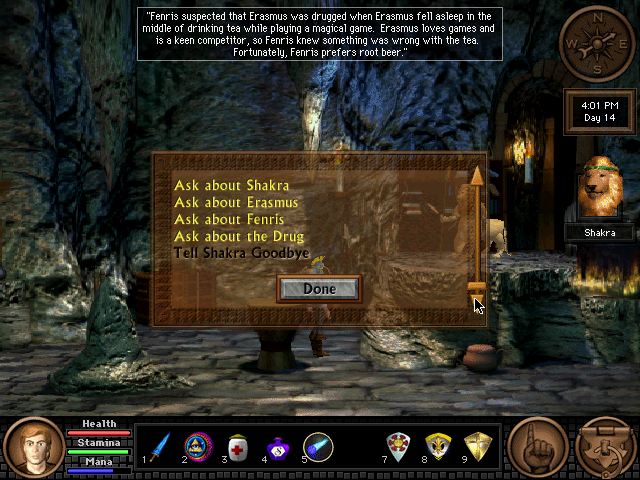
In the game, the (SPOILER) scientists poison several wizards with a tainted box of chocolates. However, there is a line where Shakra mentions that Erasmus was poisoned via his tea, which is inconsistent with the rest of the story. I'll assume that this was a change in the story, and that one line slipped through. Also notice how in this game, the rat's name is spelled as "Fenris", but in the previous QFG games, it was spelled as "Fenrus".
Spelling Inconsistency
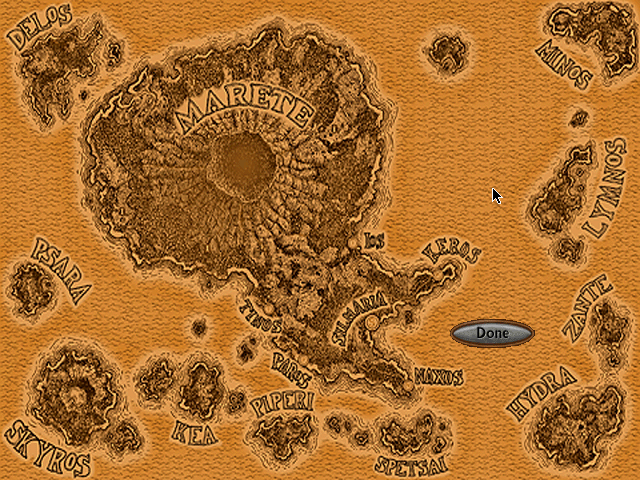
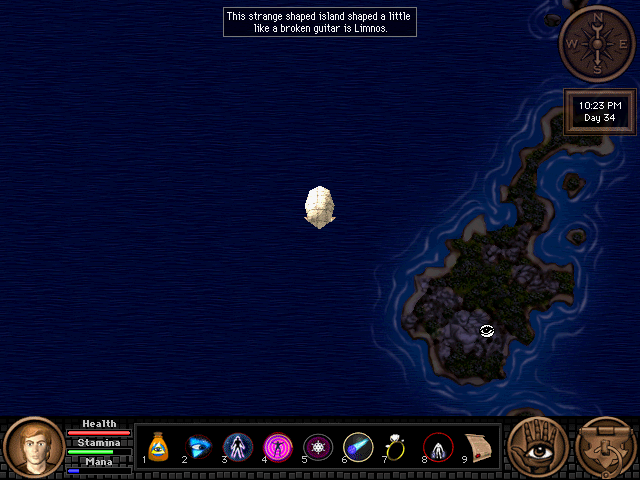
Speaking of spelling inconsistencies, another one appears in how to properly spell the name of the island Lymnos/Limnos. On the map, it is spelled "Lymnos", but the in-game dialogue and description spell it as "Limnos".
Poe Poetry
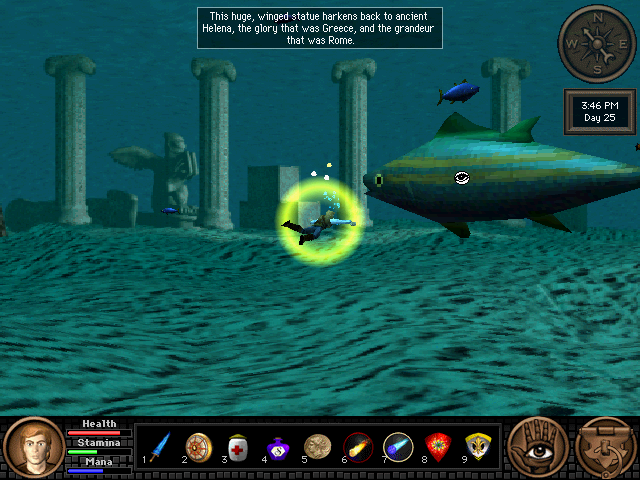
Quest for Glory 4 had numerous Edgar Allan Poe references, and while QFG5 does not contain the gothic atmosphere of the prior game, at least one more nod to Poe made it in. When looking at one of the underwater statues, there is a line which comes from the poem To Helen — To the glory that was Greece, And the grandeur that was Rome.
Unlucky In Love
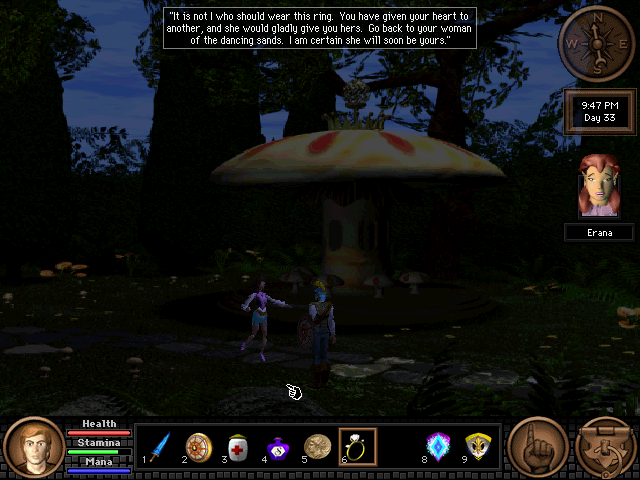
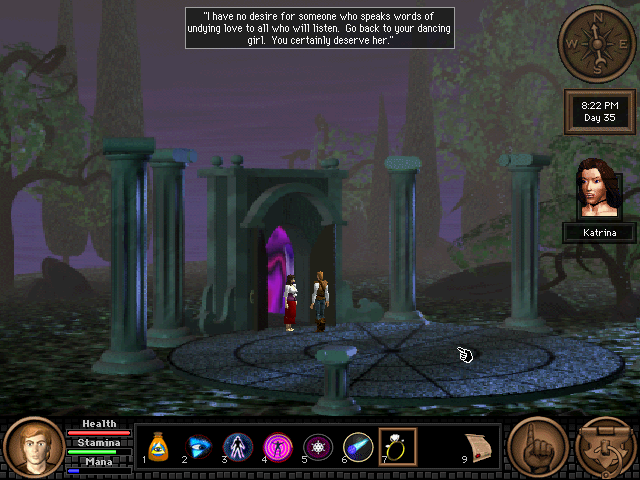
Neither Erana nor Katrina seem to appreciate it if the hero has been a little too friendly with Nawar. (Odd how they know, considering they don't leave their respective islands.) Elsa doesn't seem to care, though.
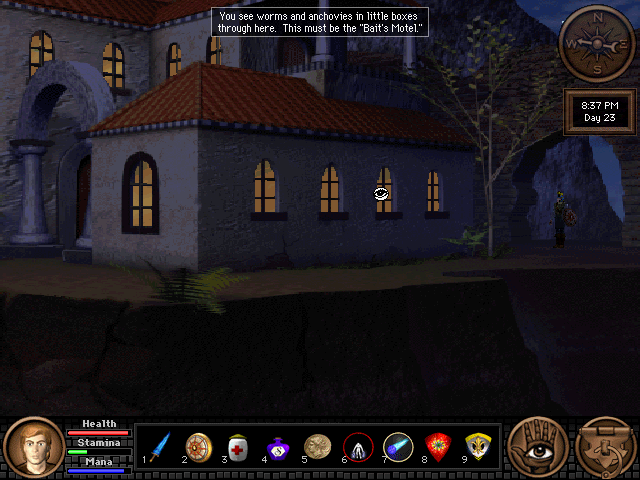
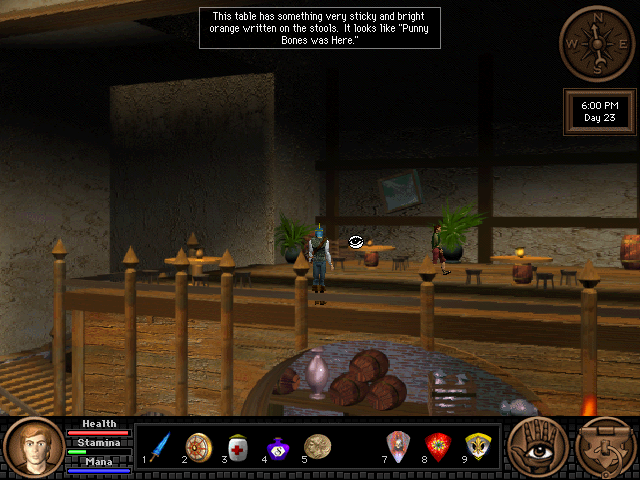
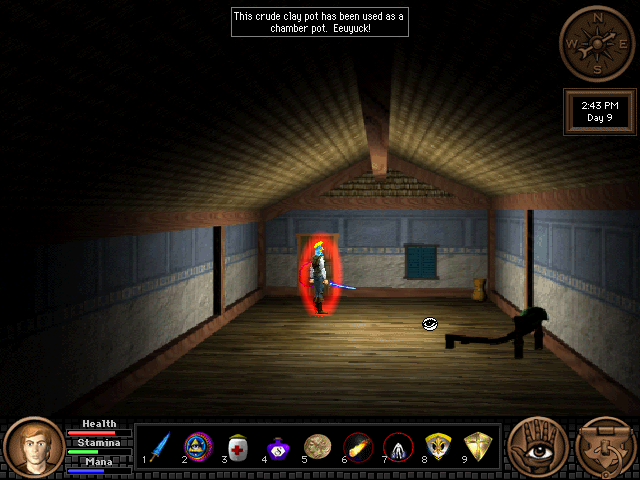
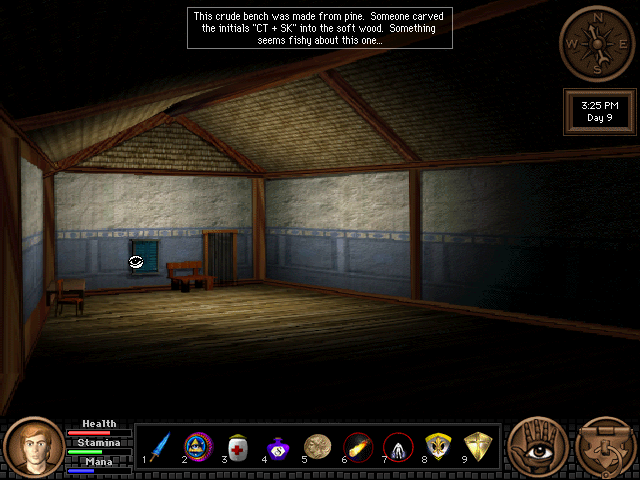
Extra Quirky Messages
Quest for Glory games contain a lot of silly jokes and descriptions, and QFG5 does not have a shortage of those, whether it be an Alfred Hitchcock reference or some in-joke that might only make sense to the game developers.
Thoughts About QFG5
- The QFG series introduced an interesting Adventure-RPG hybrid, yet the original QFG5 game box classifies this as an Action-RPG (however, the UK box says Adventure-RPG). So, is this still a QFG game? Absolutely. It ties in and ends a series which had originally been planned as a four-part series, but was stretched out to five games (pentology?) with the inclusion of QFG3. The same cannot be said of King's Quest: Mask of Eternity, which barely had any ties to the previous KQ games. It is the logical conclusion of the series, representing West and winter. A number of previous characters and references to the other games are also present (Erasmus, Fenrus, Erana, Katrina, Rakeesh, Salim, Julanar, Elsa, Bruno).
- It is different from the other games in that it is more of an Action-RPG hybrid than an Adventure-RPG hybrid. It is definitely much stronger with the fighting and typical RPG elements, especially with a larger variety of weapons and armor (whereas the previous games kept these fairly limited), and a large variety of monsters. Perhaps they focused a little too heavily on some of these aspects of the game, and not as much on others. But considering how there have been monsters axed from final games (such as the Hyenamen from QFG3), perhaps it was a bonus to have a variety of monsters, or perhaps creating a variety of monsters (Boarmen vs. Goremen) were similar, more variants than truly unique monsters. In QFG5, there were at least twenty different opponents (not including the arena combatants). For a comparison, QFG1 had ~10 types of monsters: Saurus, Saurus Rex, Troll, Ogre, Minotaur, Bear, Goblin, Brigand, Mantray, Cheetaur (7 of these being common monsters, three are one-time encounters).
- Makes it up to the Thief for shorting that class in QFG3, with plenty of things to do in this game, and it ties up the whole Blackbird mystery.
- Once again, the Fighter is somewhat ignored and doesn't even get the bank robbery side quest. However, this game is action and fighting oriented (so not possible for a 100% pacifist run). The arena combat and plenty of rites involve fighting, plus a plethora of monsters.
Tidbits
A few tidbits straight from the creators of QFG via their Twitch channel, the original QFG5 website, and other nuggets dug up across the internet:
- The original title was going to be King's Crown.
- If QFG5 had come out right after QFG4, they would have kept with the QFG4 style of graphics and combat system.
- A wizard mini-game was planned to earn the Whirlwind spell by playing some Wizard's Whirl, but it was scrapped. It might have been something similar to how the Magic User can learn the Dazzle spell from Erasmus after winning a game of Mage's Maze in QFG1/HQ.
- When I first learned about QFG5 being in development, it was originally slated for release in Summer 1997. Even at this time, that release date seemed far too ambitious, since game development often gets delayed for a myriad of reasons. Reading the designer diaries from the QFG5 website confirmed my suspicions that they were no where near to release the game in mid-1997.
Back in mid-October 1997 the 3D Max artist John Lindemuth was still contemplating how to animate a water-breathing amulet (so much for a summer 1997 game release). A designer diary from lead systems designer Eric Lengyel mentioned adding lighting effects and how great it would be to see 16-bit color would look in a future Sierra game. Good news, that "future Sierra game" ended up being QFG5. Interesting to look back at various snapshots of a project's progress and see how things shook out. Adding the dynamic lighting and 16-bit graphics added another 6 months of development to the game, but it was well worth the end result. Considering that the early 3D games of the 90s often did not age well, QFG5 fared far better with many rendered objects and dynamic lighting.
Hacks and Updates
QFG3 and QFG4 have received new fan-made patches in the past few years (in addition to the indispensable NewRisingSun patch), and QFG5 has also received its own new patch for Windows. According to the notes, it fixes a number of bugs (especially for non-English versions of the game), plus it fixes some issues when playing through the game as either Elsa or Magnum Opus, who were playable characters in the demo, but were only NPCs in the final game.
Speaking of Elsa and Magnum Opus, when I was digging through my Mac to look at all of my QFG5 saves and determine how many times I've completed this game (at least 8), I found some Elsa and Magnum saves dated November 28, 1999. These are likely hacked saved games to play as either Elsa or Magnum as each of the four classes. There were plans to allow for multi-player capabilities, and between the patch and these save games, it should be possible to play through the game as one of these others characters.
15th December 2022 | Programming
With the release of the Playdate
this year, it has further rekindled my interest in graphics styles of an older era. Or are they just older graphics implementations for the modern age? Even though modern electronics have been able to push 16.7 million colors on high gamut displays for a long time, there is always a market for small, simple, and inexpensive displays. While the 1-bit display on the Playdate delivers a hefty dose of nostalgia (along with a ton of fun), it has been exciting to see what developers have been able to do with limited graphical constraints. This led me back down a deep rabbit hole of to research ancient dithering algorithms and color spaces to create the second version of the Agifier plug-in for Acorn.
What's new with Agifier 2.0
- Implemented Floyd-Steinberg dithering. This was a critical missing piece in trying to simulate a more complete image while using a limited color palette. There are many different dithering algorithms available, but I settled with one of the most famous ones.
- Experimented with the CIE Lab color space. As Tanner Helland mentions in a blog post, using the CIE Lab color space might work better than just comparing against RGB, but I did not get any better results than using either RGB or my own custom selection method.
Screenshots
Original Image

Agifier 1.x

Agifier 2.0

Agifier 2.0 using CIE Lab Color Model

Download + Installation
- Download: Download the files directly from GitHub or install via git with the command
git clone https://github.com/edenwaith/Agifier.git
- Installation: Copy the
Agifier.acplugin plug-in bundle (found inside the Agifier folder) into ~/Library/Application Support/Acorn/Plug-Ins folder on your computer. Create the Plug-Ins folder if it does not exist yet.
- Usage: Restart Acorn after copying over the plug-in, then open a file and select the Filter > Stylize > Agifier menu. This will reduce the size of the image and reduce the color palette down to the standard 16 EGA colors that were used in Sierra games.
Future Work
- Continue exploring better selection for colors, especially in regards to green, perhaps experiment with additional color models. Unfortunately, the human's perception of color does not always align with the math of finding the "closest" color, so a lot of the greens get washed out and turn to more muted greys and browns. This is partially due to the human eye being more sensitive to greens, but not as much with blues. I did add another example for trying to select colors (modified Euclidian method), but it didn't seem to help much.
- Use different dithering methods to see if the results come out any better or worse.
- [Far Off Future] Implement Machine Learning (ML) methods to determine the best way to make a proper EGA representation of an image. Perhaps implement checkerboard dithering patterns to simulate certain color areas (in the style of SCI0-era Sierra games of the late 80s).
References
20th October 2022 | Programming

In my research for developing for the Playdate and for improving my Agifier plug-in for the Acorn image editor, I've been delving deep into the academic and artistic aspects of dithering. This article lists a number of the resources I've used so far in my research in regards to dithering and digital halftoning.
Links
White Papers
Books
9th July 2022 | EdenList
After reading an
article about making a "satisfying checkbox", I was inspired to add a little extra fun and delight to EdenList by adding some haptic feedback when tapping on a list item (an effect I had once added to another now-defunct iOS app). I wanted to add something else to this patch release, so I added the large title display feature (introduced in iOS 11), which was very easy to implement, but it would require bumping up the minimum version of iOS and dropping support for iOS 10. Since any device that can run iOS 11 can also run iOS 12, I raised the minimum version to iOS 12. This was the initial work for what was expected to be version 2.2.1.
I tend to be cautious about bumping up the minimum version of an app, and requiring iOS 12 for just a patch release didn't seem worth it, so I decided to add a larger feature by being able to search through the main list of lists. I've found this to be useful if you have a lot of lists and want to quickly find a particular list or few (such as all "to do" lists). By adding this additional feature, it bumped up the app version to 2.3.0.
New features in EdenList 2.3.0 for iOS:
- Search and filter by list names
- Haptic feedback when selecting list items
- Updated UI with larger titles
- Verified and tested with iOS 15
- Note: Now requires iOS 12+
EdenList for Mac
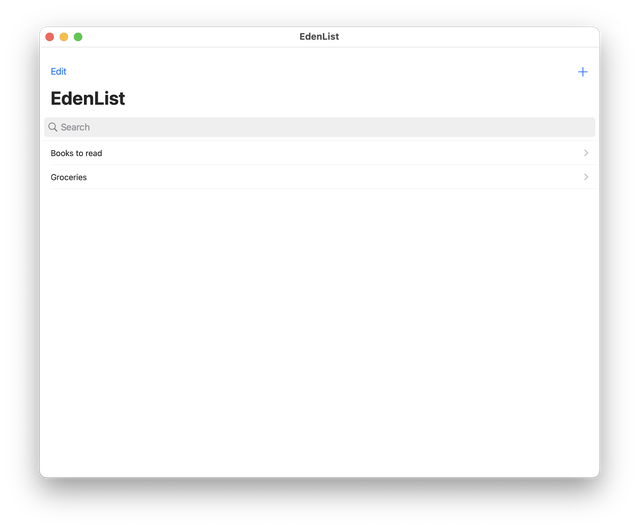
A benefit of the newest Macs running on Apple Silicon (instead of Intel chips) is that they can also run iOS apps. Even though EdenList for Mac has not been updated in a dozen years, the iOS version can be downloaded and run on Apple Silicon Macs (M1 chips and beyond). I have done a preliminary test to verify that the iOS version does run on Apple Silicon. Not a perfect solution, but it does work.
An update to the original Mac version is slowly in the works to make it 64-bit and as a new type of Universal Binary (Intel/Apple Silicon instead of PPC/Intel) so it will work on modern Macs. The current 1.0 version will only run on versions of macOS from 10.4 through 10.14. This is proving to be more work than initially expected, primarily because the codebase hasn't been touched in a dozen years, and some of the code dates back to even 2003, so it definitely needs some clean up, improvements, and the removal of deprecated methods. I'm hoping to eventually rework EdenList into a more unified app (using Mac Catalyst, SwiftUI, or whatever) to provide the functionality across multiple platforms so the Mac version doesn't get left so woefully behind.
EdenList 2.3.1 for iOS
9 August 2022 update: I tend to only update EdenList on a yearly basis, but an astute user of EdenList notified me of a very long-standing (and cleverly hidden) bug in EdenList where if a list name contained a / in the name, then it would not properly save any data to the list. I fixed this issue so list names can no longer contain that slash. I also made a small UI update for the search bar for iOS 12.
New improvements in EdenList 2.3.1 for iOS:
- Bug fix for naming lists
- UI improvement for iOS 12
4th May 2022 | Programming
Twenty-one years ago I created an AppleScript to serve as an installer for Quest for Glory V on Mac OS 9. This was created because the original installer did not work under Mac OS 9 (but oddly enough, the installer that comes with the German version ("Drachenfeuer") of the game worked fine). This script was based off of advice I got from QFG5's lead programmer Eric Lengyel on which particular files need to be copied off of the install CD.
AppleScript is always kind of interesting to play with. Some things are quite elegant, whereas other things can be quite maddening in their implementation. The original script was far from a piece of beautiful coding prose, since it was likely produced by recording my actions using Script Editor. This updated version (1.1) of the script is a complete rewrite with several improvements and safe guards.
- Checks for an appropriate destination: It first checks if the
Applications (Mac OS 9) folder exists. If not, then it looks for the Applications folder. If neither of those options exists, then the game is installed on the startup disk.
- First checks if any of the destination folders already exist before trying to create them.
- Checks to see if the
QG5 Install CD is inserted. If not, the installation shows a warning and will not progress.
- Extends the timeout period to complete the script when copying the files so AppleScript does not give an errant error.
The installer script can be downloaded here.
The list of files which are copied over:
- From the QG5 Install/Install folder, copy the folders MDATA, Import, and the file QFG5 to the Quest for Glory V destination folder
- From the QG5 Install/Install/Data folder, copy the files hdn.spk, hdnm.spk, and the folder Mov to the Quest for Glory V/Data destination folder
One feature I wanted to implement with this script was to be able to copy the QFG5 icon onto the main destination folder, but I have not found a way to do this in Mac OS 9. There is a way to do this in Mac OS X which requires "System Events", but unfortunately that is not available on Mac OS 9, so the function below won't work for this script. The following is an example code snippet that can copy the icon of a file and paste it onto a folder.
tell application "Finder"
	set sourcePath to file "Snow Leopard:Users:chad:Pictures:L-150.tif"
	set destPath to folder "Snow Leopard:Users:chad:Desktop:Foo:"

	my CopyOrPaste(sourcePath, "c")
	my CopyOrPaste(destPath, "v")
end tell

on CopyOrPaste(i, cv)
	tell application "Finder"
		activate
		open information window of i
	end tell
	tell application "System Events" to tell process "Finder" to tell window 1
		delay 0.25
		keystroke tab -- select icon button
		delay 0.25
		keystroke (cv & "w") using command down (* (copy or paste) + close window *)
	end tell
end CopyOrPaste
It's been five years since I've played Quest for Glory V, and this is the first of several QFGV-related projects I'm planning for this year. There's also a fan-made patch for the game to try out, in addition to setting up my ideal PowerMac system when I replay the game this year.
28th April 2022 | Programming
Since the classic days of Mac OS, the Desktop has been the traditional dumping ground for a variety of files and folders. When one takes a screenshot, the Desktop is the default location where to save it, but it is possible to change where screenshots are stored. A couple of quick commands will help clean up your Desktop so it isn't populated by quite so many screenshots.
Mac Screenshots
If you have macOS Mojave (10.14) or later on your Mac, the location can be set using the Mac's built in screenshot functionality.
- Press
Command + Shift + 5
- Click on
Options
- Pick one of the listed folders or choose
Other Location. For my purposes, I selected the folder Screenshots in my Pictures folder (~/Pictures/Screenshot).
However, if you are not using macOS Mojave or later, you'll need to use the Terminal. The following commands sets the Mac's default location to a folder named Screenshots in the Pictures folder:
defaults write com.apple.screencapture location ~/Pictures/Screenshots
killall SystemUIServer
To read the default setting:
defaults read com.apple.screencapture location
If the location value has not been set yet, you'll see this response:
defaults read com.apple.screencapture location
2022-04-25 11:02:26.195 defaults[6668:108767]
The domain/default pair of (com.apple.screencapture, location) does not exist
Or check all of the com.apple.screencapture settings.
% defaults read com.apple.screencapture
{
    "last-analytics-stamp" = "672074805.851666";
    "last-selection" =     {
        Height = 945;
        Width = 433;
        X = "-1201";
        Y = 118;
    };
    "last-selection-display" = 1;
    style = selection;
    video = 1;
}
After setting the location:
% defaults read com.apple.screencapture location
~/Pictures/Screenshots
% defaults read com.apple.screencapture
{
    "last-analytics-stamp" = "672074805.851666";
    "last-selection" =     {
        Height = 945;
        Width = 433;
        X = "-1201";
        Y = 118;
    };
    "last-selection-display" = 1;
    location = "~/Pictures/Screenshots";
    "location-last" = "~/Pictures/Screenshots";
    style = selection;
    target = file;
    video = 1;
}
iOS Simulator
If you are a developer who often saves screenshots of the iOS Simulator, it also has its own setting where to save the snapshots. Changing the location where the iOS Simulator saves screenshots is fairly similar to the approach to saving macOS screenshots when using the Terminal. The Terminal command to change the default location where the iOS Simulator saves screenshots:
defaults write com.apple.iphonesimulator "ScreenShotSaveLocation" -string "~/Pictures/Screenshots"
To verify, run:
defaults read com.apple.iphonesimulator "ScreenShotSaveLocation"
This should then reveal the location where the screenshot will be saved (e.g. ~/Pictures/Screenshots). Like the Mac example, if the location hasn't been set yet, you will get a response like this:
% defaults read com.apple.iphonesimulator "ScreenShotSaveLocation"
2022-04-26 19:52:49.189 defaults[20441:18169586]
The domain/default pair of (com.apple.iphonesimulator, ScreenShotSaveLocation) does not exist
References


